I’m ready for my closeup: 6 methods for perfectly focused self-portraits

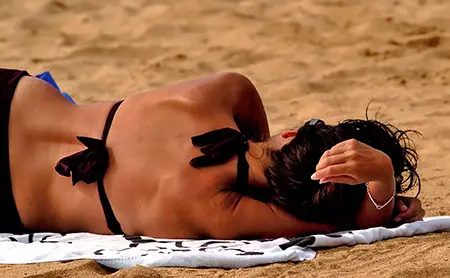
Self-portrait shooters usually rely on the trial-and-error method of focusing. Shoot, shoot, and shoot again until the perfect combination of pose, exposure, and focus are achieved. But there is a better way (several, in fact)! All of these methods are quick and easy and will give you accurate focusing without a lot of frustrating trial and error.

Before you begin, you’ll just need to acquaint yourself with how to put your camera into manual focus mode. You won’t actually use manual focus for focusing—you’ll just use it to keep the focus once you’ve got it set just the way you want. For each of the methods below (except the last one), you’ll auto-focus first and then set the camera to manual focus so that it won’t attempt to re-focus when you take the shot. You’ll also find that having a remote shutter release helps immensely.

Continue reading I’m ready for my closeup: 6 methods for perfectly focused self-portraits

Why are my photos of moving subjects blurry?

There are two primary kinds of blur in photos (well, three, but we’ll assume you keep your camera fairly clean): focus blur and motion blur. Here are examples of focus and motion blur, respectively (click to enlarge):

Focus blur Motion blur

Focus blur happens when the subject of your photo is simply out of focus. The solution to that is to make sure your autofocus is on and try again. If it’s out of focus, re-focus and shoot again. Pretty straightforward. On point and shoot cameras, the most likely reason you’re out of focus is because the subject moved or the smart focusing system wasn’t so smart and focused on the wrong object.

Motion blur, on the other hand, doesn’t happen because your subject is out of focus. It happens because your subject is moving relative to the camera frame while the exposure is being made AND the shutter speed isn’t fast enough to freeze it. Let’s tackle those two aspects separately.

Continue reading Why are my photos of moving subjects blurry?

Ten Tips for Photographing Pets

This time of year, many photographers are trying to take pictures of their pets wearing fake antlers, Santa hats, or other seasonal trappings. Although I don’t indulge in that sport, I do love taking pictures of my pets and other animals, and I thought I’d share some tips that have worked for me and for others.

1. Be patient. Pets don’t often pose. Sometimes they sniff your camera or your sleeve. At other times they decide to crawl under a table or fly on top of a dresser. Just wait quietly until they settle down.

<i>Scanning the Neighborhood</i> by Michael Fletcher 
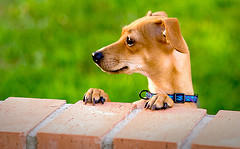
2. Try to capture a characteristic action or activity. If you’re shooting your pet, you know its personality. Try to take a picture that reflects some characteristic, such as curiosity, goofiness, adoration, or self-possession. You do not have to include every inch of your pet, only the parts needed to express what you’re trying to capture. This image by Michael Fletcher certainly shows how alert this little dog is!

Continue reading Ten Tips for Photographing Pets

Black & White Is the Key to Better Color

Lately, I’ve found a great way to use black and white to improve my color photographs. So, you say, that doesn’t make any sense, right? Well, I understand your confusion, but it’s really quite simple. What I mean by this, is you can convert your photo temporarily to black and white and perform some editing to make your photographs more appealing in color.

sunbathing.jpg

This is a photo I took at Hanauma Bay in Oahu of a lady sunbathing. It’s a nice photo. I’m actually fairly happy with how it turned out. I had taken it a couple of years ago, so I though I’d try reworking it using my black and white trick.

Continue reading Black & White Is the Key to Better Color

Shooting Outdoors in Wet Weather

While the fainthearted may see grey skies and feel trapped inside, the rest of us need not be stopped by wet weather. Taking pictures in mist and rain can be very satisfying, especially when the rain is light and feet stay dry. Often, grey skies intensify certain colors, while changing others.

I really noticed this last week when I went outside to get my morning paper and saw the pumpkin stand across the street from my house. The pumpkins practically glowed. Luckily, I was only steps from my camera and managed to capture the rich orange.

farmstand in mist

The last few days have been damp and grey where I live. While friends and neighbors bemoan the lack of sun, I happily take advantage of the overcast skies and wet surfaces. I put on my waterproof shoes, grab my slicker, and out I go.

Continue reading Shooting Outdoors in Wet Weather

Take Pictures at Night, Too

A year ago, I was afraid to shoot pictures at night. I thought it was a horribly complicated undertaking that would leave me frustrated and confused. Then I heard a fifteen minute talk on night shooting and saw a group of pictures taken one night by both inexperienced and experienced photographers. I was hooked.

Fine ArtsFirst, I loved the images that this group presented. Some were gaudy, while others were surreal, but even the greenest photographer was able to capture something interesting. Second, the process sounded relatively simple. The main requirements were a tripod and a willingness to play.

A few nights later, I went to a nearby town and took dozens of pictures. Some were disasters, but others were delights. Now I do night shoots frequently.

Continue reading Take Pictures at Night, Too

Anatomy of a photo edit: Our love is all of God’s money

Our love is all of God's moneyI think that post-processing is an integral part of photography whether you are processing your own black and white prints in a smelly darkroom or using Photoshop. As my abilities as a photographer have improved over the years, I’ve found it more and more likely that I will shoot a photo with a particular final look in mind. That was the case when I shot this photo recently so I thought I’d share my editing process with you. If you like this article, you may also like my previous Anatomy of a photo edit: Ready in 3 minutes.

Continue reading Anatomy of a photo edit: Our love is all of God’s money

Photos Help You Sell

Many photographers started using digital photography only when they needed pictures for online auctions and sales. In fact, sales pictures are still a major reason why people use digital cameras. Luckily, shooting pictures to help you sell items is not difficult, but you should keep a few things in mind.

First, your picture should clearly show the item. Although this sounds too obvious to mention, it’s not. Many people upload blurry, dark images that make viewers squint at their screens and scratch their heads. Maybe the photographer thought, “Close enough!” However, potential buyers are likely to move on to something that they can see and don’t have to imagine.

For example, if a bookshelf has drawers, open one slightly so people will realize that they are not mere decorations. If you’re shooting a porcelain sugar bowl, be sure that the shape, pattern, and lid are clearly visible. If you’re selling a cup, show the handle and shape; if your product is a book, slant it so that buyers can see both spine and cover.

Continue reading Photos Help You Sell

Location as important as technique when shooting fireworks

Fireworks by Mr Magoo ICUJuly 4th is just around the corner and with that comes another opportunity to get that classic fireworks shot you’ve always dreamed of. We’ve already covered the techniques you need to know and equipment necessary to shoot fireworks well. The methods are the same as last year. But an important point to keep in mind is that vantage point and location (especially secret locations like the one in the photo at right) are just as important as technique.

Continue reading Location as important as technique when shooting fireworks

Using Overexposure

Most times when photographers shoot pictures, they work hard to get the exposure correct so that their images reflects what they saw in real life. At times, though, I deliberately over or underexpose for effect. In an earlier post, Creating Blackgrounds, I discussed how to use underexposure to create dramatic black backgrounds. Similarly, you can use overexposure to create other specific effects.

tulips

For example, overexposure can create a light, dreamy, impressionistic atmosphere. Edges blur, colors soften, and a light background fades to white. The subject is enveloped by light.

The tulips here look soft and delicate, even though their petals and leaves are firm. The pastel colors suggest spring, new growth, and freshness. A different exposure might have captured the shapes more clearly, but the effect would have been totally different.

Continue reading Using Overexposure