Lately, I’ve found a great way to use black and white to improve my color photographs. So, you say, that doesn’t make any sense, right? Well, I understand your confusion, but it’s really quite simple. What I mean by this, is you can convert your photo temporarily to black and white and perform some editing to make your photographs more appealing in color.
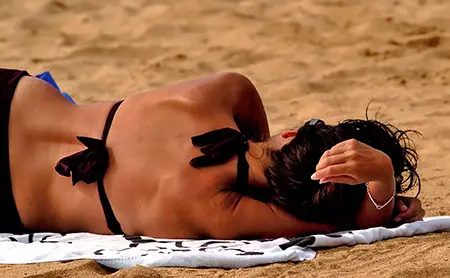
This is a photo I took at Hanauma Bay in Oahu of a lady sunbathing. It’s a nice photo. I’m actually fairly happy with how it turned out. I had taken it a couple of years ago, so I though I’d try reworking it using my black and white trick.

This is the same photograph after a very quick rework in Photoshop CS3. I think it’s an improvent in skin tone and her hand is more emphasized in this version.
OK, now for the technique I employed. After loading the photo into Photoshop, I convert the image into black and white by choosing Image>Adjustments>Black & White… from the menu. When the dialog box comes up, I simply choose the default black & white setting and click OK.
Next, I choose Image>Adjustments>Levels… to adjust the brightness and contrast of the photograph. Simply move the white, gray and black triangle markers at the bottom of the graph until the photograph has the best visual brightness and contrast. The black triangle controls the darkest part of the image, the gray controls the middle tones and the white controls the brightest tones. Each photo will be different, but I like to start by moving the black triangle to the right until the blacks look well defined, then move the gray triangle to the left to lighten up the mid-tones and finally move the white triangle to the left if the highlights need a boost. Once this looks good with the black and white image, I save the levels to a file by clicking the Save… button. Then I exit the levels dialog by clicking on Cancel.
Now, I revert back to the color version of the image by clicking on the location just before the Black & White conversion in the History window. Select Image>Adjustments>Levels… again and click on the Load… button. Select the levels you saved in the prior step to apply the same levels adjustment to the color image as you did to your black and white version. With a little practice, this technique should give you a more contrasty, saturated, dynamic image. It seems the brain has an easier time with the levels adjustments in black and white mode because it doesn’t have to bother processing the color information. You can more easily see the direct effect to the image’s brightness and contrast.
Sometimes, I may have to make some minor adjustments to the color image after performing this technique, but usually not. I think this is great way to improve the quality of your color images. Often, in the process of adjusting levels, the color will be more saturated and/or appealing. Levels are not the only adjustments you can perform while the photo is in black and white mode. Any adjustments you normally make to a color image may be employed to get the optimal black and white look.
Although these instructions are for Photoshop CS3, this technique can be used in most any photo editing program including Photoshop Lightroom, Aperture, Capture NX, Capture One Pro and DXO Optics Pro. In some programs it’s even easier because you toggle the conversion to black and white, make your adjustments and toggle it back to color. You don’t need to revert back to color and reapply your levels adjustments. Please refer to your program’s instructions for details concerning switching to black and white and levels adjustments.
Now go load a previously processed color image and try this technique. You just might like the results you get.


Also works great in iPhoto 7.
…and WinImages.
To save some time, simply use adjustment layers in CS3 instead of actually converting to black and white, then saving the levels file and reverting, etc. Make a Black and White Adjustment layer, and then ad a Levels adjustment layer on top of that. Make your levels adjustments and then turn off the Black and White Layer to see the results on the color layer. You can also toggle the Levels layer on and off to see if you like the results.
Eliot and Ben – Thanks for letting us know this works well in iPhoto 7 and WinImages. It should work in the majority of image processig programs.
Mark – That’s a much cleaner way to apply the levels adjustments, indeed. Thank you so much for sharing your technique. It’s more elegant and requires less work, so I really like it. 😉
i need photoshop cs2 cd
Can you use Lab mode for this as well?
or you can use ctrl+alt+l to redo levels with last settings.
(same is with ctrl+alt+u and so on)
i want cs2 photoshop
I like to use the lab colour mode to do that. it’s as simple as going in image/mode/lab in the menu and instead of the usual rgb channels it splits the colour in two channels (which I have yet to understand) but the lightness of the image in its own channel. I actually do some sharpening on the lightness channel and then use curves adjustment on top of my background layer. curves in this mode will only be applied on the lightness so it won’t burn the colours like a curve would in rgb and I pull awesome contrasts from that technique. You can simply flatten and turn back to rgb after to do further editing. I also remove some contrast and make basic raw ajustements in Aperture before I do that. Super fun stuff.
Can’t we just copy the layer and turn that into B&W and have this one adjusted with the curves. After that it can be deleted and the curve adjustments work for the color original pic.
I do this but use Layer > New Adjustment Layer > Black & White… then when I’m happy with my levels i delete the Black & White adjustment layer.
That’s because this article was written 7 years ago…
perfect
super !!