I really enjoy the process of editing a photo. Each one is different. And it can be a lot of fun playing with ideas, colors, highlighting this area, downplaying another. A single photo really does have a lot of possibilities depending on what you do with it. But I’ll often make a photograph knowing in advance the edits I’ll need to make to “develop” it. Ready in 3 minutes was such a photo.
I shot this at our local county fair at around sunset. As we were leaving, a scene presented itself that I had to shoot and I only had a few seconds to get it. Unfortunately, there were a couple of problems. Although it was sunset, all of the beautiful golden light was being blocked by a building behind us. And I was dealing with a large dynamic range because I wanted to capture the brightly lit marquee and the dark interior of the photo booth. Here is the original shot:
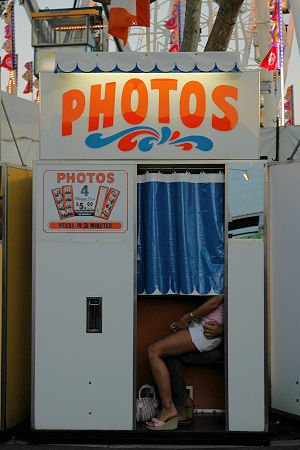
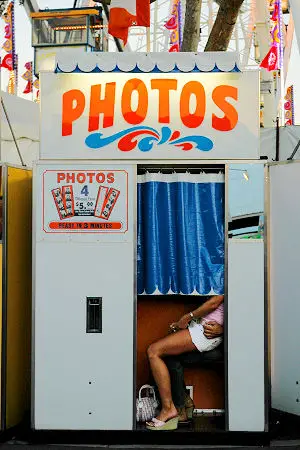
Original. 1/200s @ f/4.5
You’ll notice right away that it’s a little underexposed. I had already set the camera to shutter priority and 1/200s to capture the lights of the fair and the colors of the sunset. I probably should have switched to aperture priority to let the camera slow down the shutter speed but—well, I forgot. Fortunately, it’s not too bad. The exposure I had chosen did the job I had intended it to do and captured the marquee and lights in the background well. So, the first step during editing was to increase the overall exposure a little. I like to start with the Levels tool which lets you set the white and black points (the brightest and darkest pixels in the photo). Doing that stretches out the usable part of the histogram. In this case, I moved the white point down adding about a full stop of exposure. I also increased the black level a tiny bit which bumped up the contrast:
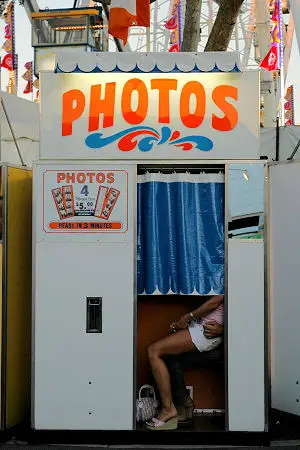
Ready in 3 minutes step 2: levels
That’s better but the exposure still isn’t where I want it. I really want the booth to be white. I don’t remember if it actually was white or not (it was probably fairly dirty) but I want it to be white. Next step is the Curves tool. Adjustment curves are something you should get to know. They’re an extremely powerful way to adjust not only the brightness but also the contrast and even the color of a photo. In this case, I only wanted to increase the brightness of the bright areas of the image and leave the dark areas alone. This accomplishes my goal of whitening the photo booth and increases the contrast again:
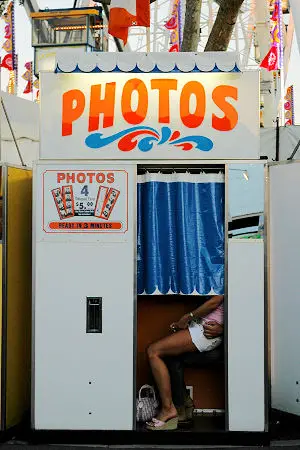
Ready in 3 minutes step 3: curves
Next up, a very slight color saturation increase. The effect is very subtle but I like it better than the previous step. You have to be careful with increasing saturation because you can easily lose detail in over-saturated areas, especially bright reds.
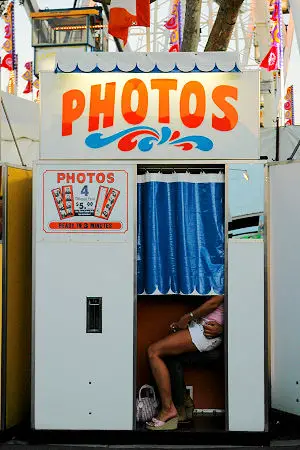
Ready in 3 minutes step 4: saturation
Finally, we get to the real subject of this photo and the reason I shot it. When I saw these two step into the booth I knew it was going to be a good shot. These two people in the photo booth, their hands, the surroundings—it all told an interesting story. I’m only sorry I wasn’t ready a little faster—they went through a number of gyrations to get comfortable in the small booth.
When I shot this, I knew I’d have to adjust the area under the curtain. I was dealing with a bright marquee and lights and the relative darkness of the booth interior (and as I found out later a little underexposure). I knew when I shot it that I would want to enhance their legs and hands later. Another curves adjustment to the rescue! But, in this case, I only wanted the adjustment to affect the rectangle directly beneath the curtain. So, I made the adjustment and then created a mask based on the rectangular selection so that the adjustment only affected that part of the photo:
Ready in 3 minutes step 5: more curves
I’m pretty happy with the final result. It’s very much like my memory of the moment. And despite the dramatic change from the original, each of the adjustments was actually fairly subtle. It shows how a few small adjustments can make a photo really stand out. I hope it also shows that you have to start with a photo that’s already pretty close to your final vision. You’re probably not going to succeed if you have to make numerous, huge adjustments in an attempt to “salvage” a photo. As the saying goes: garbage in, garbage out.


That’s a great editing job, really makes you notice more then you would in the original. Great work!
Thanks so much for that! I know I have my own techniques, but it is wonderful to get a peak behind someone else’s. It increases the editing arsenal 🙂
I really like this photo! It’s kind of funny and touching at the same time, and I really like how your adjustments make the final image look a little punchier, kind of like the Polaraid-esque photo that probably is produced from that booth!
But I have a question… I’m not sure I understand how setting the camera to 1/200 helped you to “to capture the lights of the fair and the colors of the sunset”. Can you explain? I was thinking you meant that you wanted a relatively fast shutter speed and that maybe the ferris wheel in the background had been moving, but then you said that you thought you should have “switched to aperture priority to let the camera slow down the shutter speed”, so I’m confused!
Also, I don’t know if you’ve played around with Selective Color (or at least, I don’t remember if you’ve written about it here), but you might enjoy that as a way of separately saturating (or otherwise adjusting) colors, so that you wouldn’t have to be so careful about the reds.
The lights and sunset are very bright so I wanted a relatively fast shutter speed, even though it was getting dark, so that they weren’t blown out. At that time of day especially, a faster shutter speed gives the sky a really nice saturated color instead of tending towards being washed out. Point your camera towards the bright part of the sky (don’t look directly at the sun even through your viewfinder) and check out how fast of a shutter speed your camera wants to use even at sunset.
Switching to aperture priority in this situation would have allowed the camera to choose a longer shutter speed (probably in the 1/50s range) that would have exposed the booth better at the expense of blowing out the lights and possibly parts of the marquee. At 1/200s in shutter-priority, the camera can only set the aperture which was already maxed out wide open.
Great Shot! I find it very interesting you started with Levels and THEN used Curves, especially for a color photo. The overall effect looks like it proved successful.
If you want to save time, you can use the data that the histogram in your lcd screen provides you, then you can make these correction prior picture taking! I found this instructive video that shows well how to use it, take a look 🙂
John – I love your photos! What editing program do you use?
For this I think I used Raw Shooter and Paint Shop Pro. But these days I’m using LightZone and GIMP.