A year ago, I was afraid to shoot pictures at night. I thought it was a horribly complicated undertaking that would leave me frustrated and confused. Then I heard a fifteen minute talk on night shooting and saw a group of pictures taken one night by both inexperienced and experienced photographers. I was hooked.
 First, I loved the images that this group presented. Some were gaudy, while others were surreal, but even the greenest photographer was able to capture something interesting. Second, the process sounded relatively simple. The main requirements were a tripod and a willingness to play.
A few nights later, I went to a nearby town and took dozens of pictures. Some were disasters, but others were delights. Now I do night shoots frequently.
The process is relatively simple. Find a scene, set up the tripod, and focus the lens on infinity. Set the aperture around 8.0 or 9.0 so that you have a decent depth of field. Then try shooting and see what happens.
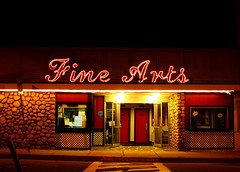
If the scene is lit, start with a relatively quick shutter speed, perhaps a second. In a well lit scene, it’s easy to overexpose the lights while you’re trying to capture the unlit areas. So take several pictures at different shutter speeds until you think you have something decent. (The darkest picture in this article, the farm, was exposed for 30 seconds; the brightest, the theater, for less than a second.)
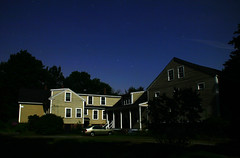 If the scene is unlit, this problem disappears. You have to go for a longer exposure, but every part of the scene will be more evenly lit. This farm picture was taken on a night with a full moon. Since the house and barn were painted a light color, they showed up well. However, because the scene was exposed so long, the sky is a bit brighter than it actually was.
Be aware of your surroundings when you shoot at night. A road that is dark at the beginning of a long exposure might become busy before the shutter closes. So use your ears as well as your eyes. Be aware of people, animals, or vehicles that might cross in front of your lens.
Also, do not lose yourself so completely in your photography that you lose your street smarts. When I shot in town, many people approached me while my tripod was set up. They were merely curious about what I was doing and why. However, I did not let my enthusiasm carry me down dark alleys or places where I would otherwise not venture. In such places, I would always go with a buddy who kept watch and had a phone.
I can suggest three good tools to carry. One is a small flashlight, which is useful in two way. First, it helps me see my camera controls. Also, it can aid in picture taking. During a long exposure, you can light up details that would otherwise be lost in shadow. For example, you might want to show the edge of a building or the trunk of a tree. Just sweep the beam of light over the subject. Take two or three shots, with the flashlight on for different amounts of time. When you do it correctly, the effect is very natural.
 Another good tool is a sheet of dark paper or a dark cloth to cover the lens if you see motion that you do not want to capture. For example, perhaps you’re shooting a neon sign on an empty street and you see a car approaching. Just cover the lens until the car passes. (You could also leave the lens uncovered and have a stream of light, if that’s what you want.)
Finally, if you have a remote shutter release, take it along. I usually use one to eliminate the possibility of camera shake, but if your tripod is solid, this is not really necessary.
When you shoot at night, you learn the true meaning of the word noise. Noise refers to unwanted specks of light or color in what would otherwise be a solid area. Noise is usually greater at higher ISO numbers, which is why I suggest shooting at lower speeds. While you’re learning, don’t worry too much about noise. Later, you can either buy special software that eliminates it, or you can use photo processing software to cover up the occasional spot.
I now eagerly await every full moon, hoping that the weather will be clear. My photographic world has doubled now that my outdoor shooting no longer ends at sundown. If you too have avoided night shoots, take heart from a convert. Try it this week and see how much fun it is.


All excellent suggestions, especially about bringing a flashlight and a friend (preferably one with a high tolerance for boredom).
I’m a big fan of Neat Image to reduce noise. It does a terrific job at the default settings, but has settings you can change for those extra-difficult jobs. Price starts at $50 and there’s a version that lets you run it directly from PhotoShop or PhotoShop Elements, which makes it really easy to integrate in your workflow.