While the fainthearted may see grey skies and feel trapped inside, the rest of us need not be stopped by wet weather. Taking pictures in mist and rain can be very satisfying, especially when the rain is light and feet stay dry. Often, grey skies intensify certain colors, while changing others.
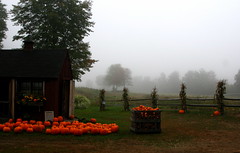
I really noticed this last week when I went outside to get my morning paper and saw the pumpkin stand across the street from my house. The pumpkins practically glowed. Luckily, I was only steps from my camera and managed to capture the rich orange.
The last few days have been damp and grey where I live. While friends and neighbors bemoan the lack of sun, I happily take advantage of the overcast skies and wet surfaces. I put on my waterproof shoes, grab my slicker, and out I go.
Naturally, you do not want small electronic devices to get wet, but a few precautions can prevent this. If you are using a small camera, keep it in your pocket until you’re ready to shoot. A larger camera will usually be OK in a light mist, but take along a plastic bag in case of a real downpour. (I also take along a towel and wipe off my zoom lens before retracting it. I have no idea whether that does any good or not, but it makes me feel better.)
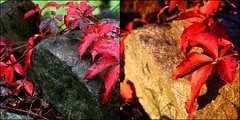
Look at the two pictures below, which were not color corrected in any way. Both show the same weed growing on the same stone wall. One was shot on a rainy day, while the other was shot in late afternoon on a sunny day. Although both are colorful, they certainly look different.
Damp weather should not deter you from outdoor photography. In fact, wet weather photography offers some unexpected opportunities. With a little forethought and the right footwear, you ought to be able to have fun, stay dry, and get some interesting shots.


Nice article!
For larger cameras a plastic shower cap makes a great rain cover.
For more than a light mist, I really like the gallon-sized ziplock bags (not brand-specific) for my DSLR.
First I take off the UV filter, then I put my camera in lens-first. Then I try to screw the UV filter back on, hard enough to mark the outline of the lens size (sometimes even enough to cut through the bag). Then I remove the camera and cut the bag (or rip, depending on my patience level) so I can get a snug fit around the lens. Then I put the filter back on and put the camera back in the bag so just the filter sticks out. I can then see the viewfinder and LCD through the main opening of the bag and use the buttons on the back. I generally have the bag closed enough so my finger pressed the shutter and works the zoom through the plastic. If the rain increases I’ll pull the bag on more for better coverage.
It may not be pretty but it’s cheap, easy to replace and does the job.
Great idea, Stew. Thanks. Cheap and useful gets my vote every time!
Ha ha!… and there was me about money on a dedicated rain cover for my D80 (as if that wasn’t expensive enough lol). Great tip Stew… so simple and almost obvious. Thanks for saving me some cash for my trip to Canada in a couple of weeks. I think I may just owe you a beer 😉