Retouching with Cloning Tools: Part 1

If you look closely at commercial photographs, you will probably notice that they rarely contain random power lines or vehicles in the way of the shot. You’ll probably also notice that the models always have flawless skin, and iconic tourist locations are tourist-free.

Photographers don’t spend all of their time searching for perfect-looking models or visiting deserted cities. Instead, they typically achieve this look by removing the unwanted objects after they have already taken the picture.

Continue reading Retouching with Cloning Tools: Part 1

Free photo editors for Linux, Mac, and Windows

Can’t afford Photoshop? Can’t justify the expense? What do you need in a good photo editor anyway? To me, the absolute essential features necessary for any photo editing app are:

  • Layers and layer masks (alpha editing). These features let you selectively apply edits and filters to portions of the image that you control.
  • Painting tools. Brushes in varying sizes and hardness. For painting masks, mostly.
  • Curves. Essential. A curves adjustment tool lets you control color, color saturation, contrast, brightness, and black white points. Curves is often the only tool I use.
  • Color adjustment. Hue and saturation adjustments.
  • Channel mixer/B&W converter. Some way to make black and white photos.
  • Filters. Blur and sharpen. You don’t need page curl or lens flare.

Without further ado, and in alphabetical order, some free apps that fit the bill:

Aviary Phoenix (Web app–All platforms)

The only web/online app in the list that supports layers and masks. “From basic image retouching to complex effects,

Continue reading Free photo editors for Linux, Mac, and Windows

Black and White Conversion: Channel Mixer Recipes

Black and white conversion is a mysterious process. There are many ways to do it and none is objectively any better than any other for every photo. So, these are guidelines, really, in the spirit of a recipe. But unlike following a recipe for baking a cake, we are not all trying to create the same photo. Keep in mind that every photo is different and will require slightly different values for any image editing technique.

Here’s a photo I took on a hike recently with my kids:

Meadow path

To compare with the channel mixer conversions below, first I’ll show the results from a simple average color desaturation. This is a simple conversion, it’s fast, and it’s very easy to do. In Photoshop it’s Image | Adjustments | Desaturate. In GIMP it’s Color | Desaturate.

deasat1

Many people, myself included, feel that this method often results in lifeless photos. If you’re going to convert this way, you’ll be doing yourself a favor if you also boost the contrast after the fact:

deasat2

I think the simplicity of just desaturating a photo and boosting the contrast has a lot of appeal.

Continue reading Black and White Conversion: Channel Mixer Recipes

A Very Basic Guide to Textures

First off what do textures do? Well, things like this…

music-mountains
drive-in-liqour

yellowstone

Some are more subtle than others, obviously! So how do you add them to your photos? The easiest way is to use textures that other people have created. Some are free and some you need to pay for but either way this is what you need to do with them once you’ve downloaded them:

1. Open both the texture and the photo you want to edit in Photoshop. Click on the photo and check it’s dimensions.

2. Change the dimensions of the texture so that it’s as close to the same size as you can get it ( you can uncheck the constrain proportions box if you need to).

3. Still with the texture selected (rather than the photo) press Ctrl+A or Cmd+A (or go to file, select all) and little running lines should appear around the texture.

4. Press Ctrl+C or Cmd+C (or go edit, copy).

5. Select the photo and press Ctrl+V or Cmd+V (or go to edit,

Continue reading A Very Basic Guide to Textures

Black and White with a Splash of Color Photosop Tutorial

One of the techniques people most often ask me to teach them is making a photograph like the one on the right that is black and white with one other colour.

There are a few ways to achieve this effect but here are two ones I find easiest for Photoshop users.

Continue reading Black and White with a Splash of Color Photosop Tutorial

“Photoshopped.”

My photo blog (shameless plug: lightproofbox.com) has been getting some traffic from StumbleUpon lately which brings with it little waves of attention. 99% of it is positive. But invariably there are a few people who don’t seem to have anything better to do than to say trite, mean things (anonymously, natch).

Hey, I’ve been around long enough to know there are jackasses out there who, while not doing anything risky or creative of their own, will always be willing to bash what everyone else is doing. I let it roll off my back.

But the one that makes me laugh is when they claim a photograph has been “photoshopped.” Well, duh. That’s like looking at the ocean and denouncing it by saying, “Wet.” Photoshopped? Let me think… Um, yes, please!

I modify 99% of my published photos. Of the thousand I’ve posted to Flickr there are maybe a half-dozen that I posted as-is from the camera. My earliest photos had the least “work done.” Later, as I became more experienced with digital post-processing, I edited quite heavily (probably too heavily in many cases).

Continue reading “Photoshopped.”

Review: Adobe Photoshop goes online with Photoshop Express

Photoshop Express featured 
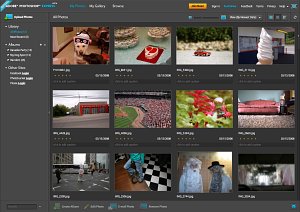
Adobe has finally opened up the beta of Photoshop Express, the long-awaited online version of Adobe Photoshop. I’ve just finished running it through it’s paces and I am impressed.

Photoshop express requires registration to use. You get access to the online editing tool and a relatively meager 2 GB of space for photos at a custom URL which you can organize into a slick public gallery and slideshows. It won’t replace dedicated photo sharing like Flickr (no comments, limited interaction) but for casual users just being able to share a few albums and slideshows may be enough. By default, photos you upload to the service are private until you move them into your public gallery.

Photoshop Express

The interface should be immediately familiar to anyone who has used Adobe Lightroom. The default view of your photos mimics Lightroom’s browse mode and even includes the ability to rate and caption your uploads. Unfortunately it does not support RAW editing. That would have been killer.

Editing is also very much like Lightroom. Unlike Photoshop, it does not support layers, masking, or really any of the features that make Photoshop,

Continue reading Review: Adobe Photoshop goes online with Photoshop Express

Quick Fix for Cluttered Backgrounds

Despite all that has been written about keeping the background of your photos simple, that goal is not always achievable. Sometimes your subject is in a place with a busy background everywhere. Or perhaps the subject is doing something that you don’t want to interrupt by walking around the person or requesting that she or he move to a different location.

I have found a very quick solution for such cases. Take the picture you want and then work on the background in Photoshop or another image editing program. First, I crop such images to remove part of the background. That alone makes the background somewhat less intrusive. But often I don’t want to eliminate it entirely; I merely want to de-emphasize it. One quick fix is first to blur the background slightly and then to adjust the saturation of both background and subject.

My brother PeteRecently, my brother came to visit. He and another friend of mine had an animated conversation in my kitchen. These were two very large guys and their expansive gestures and expressions really captured my interest. I grabbed a camera and took a whole series of pictures of them holding their conversation in my cluttered kitchen.

Continue reading Quick Fix for Cluttered Backgrounds