Despite all that has been written about keeping the background of your photos simple, that goal is not always achievable. Sometimes your subject is in a place with a busy background everywhere. Or perhaps the subject is doing something that you don’t want to interrupt by walking around the person or requesting that she or he move to a different location.
I have found a very quick solution for such cases. Take the picture you want and then work on the background in Photoshop or another image editing program. First, I crop such images to remove part of the background. That alone makes the background somewhat less intrusive. But often I don’t want to eliminate it entirely; I merely want to de-emphasize it. One quick fix is first to blur the background slightly and then to adjust the saturation of both background and subject.
 Recently, my brother came to visit. He and another friend of mine had an animated conversation in my kitchen. These were two very large guys and their expansive gestures and expressions really captured my interest. I grabbed a camera and took a whole series of pictures of them holding their conversation in my cluttered kitchen. The first picture shows enough of the background to distract from the person, my brother.
I began by cropping the image to remove part of the room behind my brother. This eliminated part of the bright red rug with its distracting pattern. Then I used the lasso tool to select my brother and a bit of the nearby background. I feathered the edge by about 40 pixels. Then I went to the SELECT menu and chose Inverse. Everything except my brother and a small space around him was now selected.
Next, I went into the FILTER menu and choose the Gaussian Blur from the Blur command. I fiddled with it until I liked how it looked, a little blurry but still recognizable. Then I clicked on the Sponge Tool, which is stacked behind the Dodge and Burn tools. When you click the Sponge tool, you can select one of two modes in the Options bar above the image: saturate or desaturate.
I chose desaturate, and I desaturated by 15%. Using a large, soft brush, I desaturated the blurred background until it faded just a little. This had the effect of drawing attention away from the colored pencils on the table beside my brother, as well as the red rug behind him.
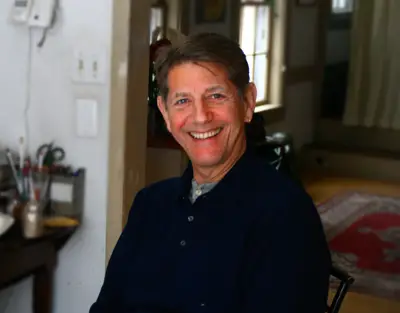 Finally, I went back to the SELECT menu to deselect and then went back to the Sponge Tool and changed it to Saturate. I saturated just a small amount, 8%, and used the tool to saturate my brother’s hair, cheeks, eyes, and shirt. This helped make him stand out a bit more from the background. The resulting picture was far more pleasing, I thought, than the original.
All in all, the process took perhaps 6-7 minutes. To shorten that even more, try merely desaturating the background. In a color image, this has a greater effect than the blurring. If you want to see examples of pictures that were edited using only desaturation, you can check out my flickr set of the conversation.


Maybe it’s only me but I’d prefer less saturation for the subject. The observer is too much concentrated on it and will notify the unnaturalness, for example, of the skin. It’s too red.
Why not instead desaturating the background? Most won’t look at it (that’s the goal, isn’t it?) and won’t notify the difference but you separate the background nonetheless and therefore isolate the subject.
Damn, that looks effective. Must try on a few family pics.
Great! I’ll have to try that out.
I agree with Matidio; saturation is bad for portraits. The crop and selective blurring of the background works, but the saturation gave him a burnt-red “Rockwell” look.
Yeah… I would attack the background first … add a little de focus and mute the color and then access the main subject.
Totally agree, over saturated face 😀 – very lobster’esque! – bad sun burn?!!!
nice article though 😀 thanks
Wow! Your brother is a dead ringer (or should I say ‘alive ringer’ 😉 for Peter Coyote, one of my favorite actors. Coyote has the most distinctive voice (but I love his face more). Love him!
Thanks for the great tip and explicit instructions how to achieve the results. We need more creative people like you who actually assume there’s a lot of non-techies out here in blogosphere who need info in the form of blow-to-blow details. Thanks again.
Janet Leigh
Perhaps I overdid the saturation a bit on the face….
I don’t see the difference.
Yeah, the background tip is great.
My eyesight is red-green colour deficient so my edited picture often end up with too much red in areas as well.
Earth has a surface area of 196,940,400 square miles- instead of diddling with a computer to change the background, why not find a different location to shoot the photo?
Great tips. My daughter is a budding photographer and I’ve passed this on to her as well.
Tell your brother I’ve become a huge 4400 fan (even if he has emerged as a bad guy in the series)! He brings a huge amount of depth to the series – I wish he was still front and center in the show. 🙂
Very helpful. Thank you!
Hey Joe, I hear you, but when you’re taking photos of family and friends in a casual setting, well, you work with what you’ve got.
well .. isn’t framing one of the _skills_ of a good photographer? with auto focus and auto exposure, increasing dynamic resolution of the images there isn’t much more left to _learn_, is there?
so why not just try to at least frame “in-camera”? or do you need an auto-frame function too?
framing, just like selective focus or controlled exposure is a skill.
ability to compose a shot there and then, rather than later with painstaking trial-and-error, in “post”.
if the vase in frame bothers you why not just frame it out? or (sic!) move it out of frame?
if you want the background out of focus why not open the aperture or use a longer glass?
anyway, happy photoshopping 🙂
If you find yourself doing this often it may be time to purchase an SLR or a faster lens for your SLR and shoot it wide open or nearly wide open. This is basically the same effect that an SLR (or larger format sensor/film) plus a fast lens achieves. It is reduced “depth of field” so that your focus point (your brother) snaps out of the rest of the field.
Background does suck. I usually correct exposure, white-balance, saturation, etc. before cropping and manipulating the background. I would’ve then straightened it out a bit–all the vertical lines in the back are off-kilter. I also would’ve cropped it much tighter–it’s still too busy! I’ve learned that some portrait photogs only include the background when it happens to be the subject’s own office, home, studio, etc. to show that the surroundings are a reflection of the subject or vice versa. If the subject is not in his/her own setting then a much tighter crop to eliminate any distractions is in order. To each his own.
I work in a crazy small town furniture store in sales but was volunteered to take some pictures for a flier. The problem is the story is too crowded and often messy to get a good clear picture. So, I thought this would be the solution. It wasn’t. The owner just told me to take the pictures again because he didn’t spend $1000 on a camera to take blurry pictures.
I wrote more about it here (http://lernr.com/2008/01/05/busy-background-removal-in-photographs/) with an example picture if you’re interested in more detail.
if family portrait not workin… just remove the family member…haha.
thats how my family takes care of clutter.
nice job on the tip.
Or buy a reflex.
I really appreciate all the thoughtful comments, but I want to add a few of my own. Yes, framing is usually part of the photographic process, but in this case I was moving around and shooting quickly. Merely opening the aperture would have blurred the background but it would not have muted the colors. Compare the red and orange pencils on the left side of both images, and compare the color of the rug in both. Also, this was a “quick” fix. I know I could have removed whatever using Photoshop, but I was working on a series and did not want to put that much time into each image.
And yes, my brother Pete does bear a remarkable resemblance to that actor ; >
Nicely done & thanks for the tip. Re: the picture, I’d be tempted to crop it so there’s no desk and very little carpet, turning it round to portrait format, maybe crop a little from the bottom too. That and the blur would make for a nice portrait, imho.
This is a useful tutorial to those without an SLR camera, who can’t simply open the aperture, etc. There are a few comments I’d like to make since I’ve been doing these fixes quite a bit to get portraits of my roommates done. I think that more needed to be cropped off the left because the wires are an unnatural distraction. The rug doesn’t bother me so much because it’s an aesthetically pleasing object. Also, the sponge tool also tends to give an alien effect to its subjects. After selecting (using the pen tool or magnetic lasso) and feathering, I would have gone into the settings for the background and the foreground and fiddled with not only the saturation, but the contrast as well. This is still a quick fix and should make your portraits look more natural.
I know I commented already about having used this techneque at work (i forgot to mention it was really the first time I’d taken photos). I had gotten some great feedback on the sample photo I put up on my blog thru email asking to put a couple more examples up, so I thought I should mention it here. Here is the link [lernr.com]
In my opinion, here’s a much better version of the photo. If I had the original file, the photo would have been larger. This edit took me a few seconds to do in Picnik.com.
http://www.photobird.com/ekrimen/test/the-grin.jpg
Also, in the original blog post above, in the second photo, he looks sunburn.
Just select background and apply slight Lens blur filter.
Your brother is Peter Coyote?