Is it worth to watermark your photos? This is the question every photographer asks himself before sharing photos online. Visual watermarks protect your ownership and copyright from online theft. Photographers use watermarks for self-promotion, recognition and advertising purposes.

All photographs you share online should be attractive and cohesive. Watermarks (like large stamps or long texts) carelessly placed, distract from the overall look and feel of a photo and make it unattractive. You should unobtrusive and artfully integrate watermarks. Your watermark should be a part of a photo. Carefully integrated watermarks are hardly noticeable and their removal is a labor–intensive process.
You can apply a watermark using professional feature-complete copyrighting tool such as Visual Watermark or Photoshop, a powerful photo editing app. I’ll demonstrate you how to blend a watermark into a photo using Adobe Photoshop CS6. Tutorial steps are the same for older versions too.

Step 1
Open your photo. In this tutorial, I’ll watermark a photo using a simple text signature (it is shown in the image below). Add your signature using Text tool or place your logo from a file on your hard disc.

You can also add a copyright © symbol to your watermark. Press Alt+G (Mac) or Alt+0,1,6,9 (Windows) when entering text to type a © symbol. Entering it on Windows is a bit tricky, so here is a video on how to press buttons: Copyright Symbol – How To Type It
Step 2
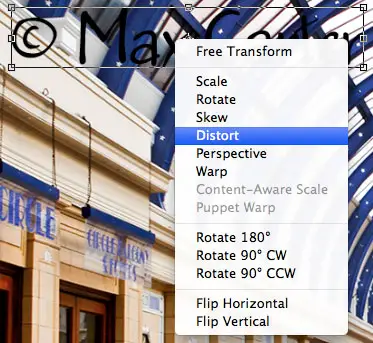
Fit your watermark into the right place within a photo. In my case, the most appropriate location for my signature is top of the wall on the left, just above the red doors. I’ll locate and scale my watermark property so that it looks as naturally as possible. Be careful, the watermark shouldn’t impact the original photo.
Free-transform tool has several editing modes. You can switch between them using a right-click menu. I’ll use either Perspective or Distort tool because we need to fit our watermark into perspective of the photo. Both of them won’t work for text object, so I convert my text into a raster layer.
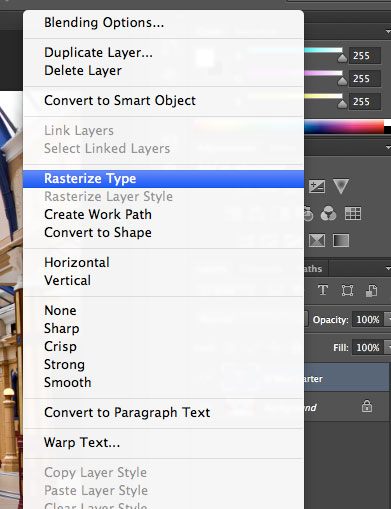
Now I can enable Free-transform mode. Press Ctrl+T (Windows) or Cmd+T (Mac) or select Edit-Free Transform menu item. Control frame will appear around your text string. Right-click and select Distort option.
Personally, I prefer Distort to Perspective since I feel it’s more convenient to drag corner points to place where I want them to be. With Perspective tool, I’ll have to adjust perspective in one direction then in another direction. Usually, second adjustment will make me to re-adjust first direction because it will move out of place a little bit. And then I’ll have to re-adjust second direction. I believe this tool works ok for one-direction perspective only.
Here is what we should get. Press Enter when ready.

Step 3
Finally, blend your watermark with the rest of the photo so that it looks like a part of the photo. I’ll make it partly transparent by setting its opacity to 36%.
![]()
And I’m done. I’ve successfully integrated a watermark so that it doesn’t distract from the original photo.
Final Result:

Original Photo:

About the author: Julia is an editor at visualwatermark.com. She covers photography topics by talking to pro photographers, recording how they work and making tutorials.


Clever idea