
Many people shy away from flash photography because it makes people look bad. Photographs taken with a flash can leave harsh shadows that highlight every wrinkle, turn skin blue, shine a flood light at thinning hair, create hot spots on the forehead, nose and cheeks, and generally make subjects look unattractive. But when there isn’t enough light, sometimes your only choice is to use a flash or not take photos at all.
Well, I’m here to tell you that your flash photos indoors can look amazing. And here’s how…
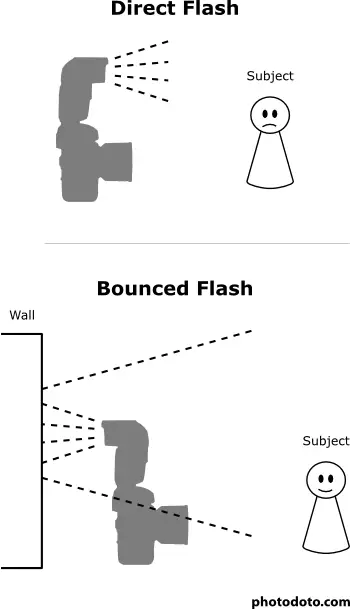
All of the problems mentioned above with indoor flash photography stem from harsh, direct lighting coming from a small source: an on-camera flash. It’s no different than shining a flashlight in someone’s face except for the duration. But there’s a simple fix: turn the flash head away from your subject and towards a nearby wall. Bounce flash diffuses flash power over a much larger area which makes the light softer. Instead of coming from a 1-inch wide spot, the light now effectively shines from an area several feet across.
The traditional way to do this is to point your flash head at the ceiling. This can work nicely and ceilings are white more often than not which doesn’t affect the color of the light. But it’s also easy to create new, unflattering shadows under the chin and eyes. And it may not be possible if the ceilings are too high.
The alternative? Point the flash at the wall behind you. The principle is the same but has a few advantages over bouncing the flash off the ceiling.
- The light comes from a direction more to the front of the subject preventing shadows from overhead sources.
- Both the subject and the near background can be evenly illuminated.
- You can control the intensity of the light by moving closer or farther away from the wall.
- You can control the direction of the light by using a wall to your side and adjusting your flash head and shooting angle.
The technique is simple:
- Rotate the flash head to point at a wall behind you or to the side (2-4 feet away) instead of directly at your subject.
- Increase the flash power (+1/2 to +1 EV) to compensate for the loss of power from the bounce and extra distance.
Here are two photos, one with direct flash and one bounced. Notice the problems in the first photo taken with direct flash: the harsh shadow under the chin, the shadow on the wall, the dark background, and the bluish skin tone. But the second photo, taken by bouncing the on-camera flash off the white wall behind me, has good color, softer shadows, and even illumination that doesn’t distract from the subject.

Direct flash

Bounced flash
One of the reasons I love my DSLR is because it allows me to attach accessory items like flashes. Popular flashes from Canon and Nikon (like the 580EX and the SB-800) attach to the hot shoe on top of the camera and allow the head to rotate 180 degrees. In addition to providing more power and lighting flexibility, a flash like this is far enough away from the lens axis to prevent red-eye. If you own a DSLR, you owe it to your photos to get a decent unit to replace the built-in flash.


Just remember readers, if bouncing the flash off a wall or ceiling be sure that this surface is white and not a pale colour because the light from the flash will reflect this colour and thus the white balance will be wrong
If shouting RAW on a DSLR however, this can be quickly fixed in post processing but for all you JPG shooters I thought this tip might save you a few headaches!
Hi
I dont have a separate Flash in my DSLR, not too sure whether it rotates, in that case what do i do?
P.s. : Cud u email me the answer? Thanks
Ram N
Excellent article. The next accessory I need to purchase is a flash. Thanks for the tips.
I have a Canon Powershot S3 IS with a flip up flash. I sliced open a ping pong ball and slip it over the flash to diffuse it. I like how it tones down the flash and gets rid of those sharp shadows or washing out of the faces.
I hope to move toward a DSLR by the middle of the year.
My favourite way to do things is to have the flash pointing straight up from the camera, or up and just slightly backwards.
Some cameras have a flash EV setting which you can set to dial-down the strength of the flash so that the light isn’t as harsh. This option works well for me. Not all cameras have it though. The S3 IS should, since I have the S2 IS and use it frequently
For an on camera flash the best solution is scotch tape (or wax paper) over the flash. It will slightly diffuse it. But it’s still a case of too little control.
Personally my favorite is a good external flash with two light sources. The one I use most often is a Metz 45 CT-5. I get amazing results bouncing the primary off the ceiling or a wall, while the secondary is pointed directly at the face. Also, setting the output to slightly below the true camera settings (unless running in TTL mode) helps as well.
I think you could have gone one step farther and suggested people take their flash off their cameras and have it triggered with something like a Pocket Wizard. Being able to direct that light is so much more liberating than being stuck with a light on top of the camera body. Now, of course, there may be instances when setting a light up remotely isn’t going to be possible. In those cases, bouncing light is a whole lot better (if you have something to bounce it off of that won’t leave a color cast on your subject, of course).
Ah, a visitor from the Cult of Strobist! Setting up PWs and remote flashes would be more than one step… I’d have to rename the article. 😉 Seriously though, visit Strobist for the best tips about using off-camera flash.
bouncing the flash off is a great Idea but if all you have is a pop-up flash check out this DIY pop-up flash diffuser,
TheyShootin.com
I take photos in a nightclub setting and Its works great…