Do your images end up looking soft when you resize them and export them for the web?

When you resize an image, it loses some sharpness. With a 24 MP image measuring 6000 px you need to resize quite a lot to downsize it for optimal web use which is often around 800 px wide. That is why a set-once-and-forget approach to sharpening will not get you great, sharp looking images to share on social media or to upload to your website.
Some time ago I noticed how photos from other photographers looked much sharper on the web than my photos did. After quite a lot of searching for a better way to sharpen images for the internet and trying a lot of different workflows, I have one method I find to be the best. This is the one I share this with you below. It is not the fastest method or workflow for sharpening, but it will give you better results.
The Best Way to Resize For The Web
This method relies on Photoshop, so if you want to follow along, begin by opening an image in Photoshop.
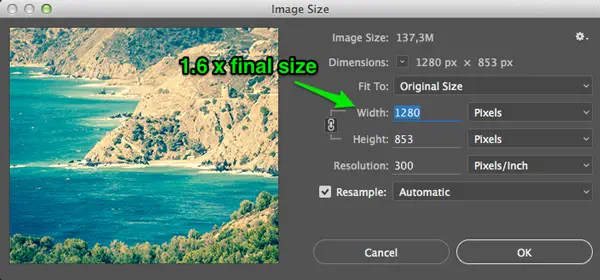
The first step is to resize your image to approx. 1.6 the size you want. I.e if you need a 800 px wide image begin by resizing your image down to 1.6 x 800 px = 1280 px. This way you have a good basis for sharpening without losing it all when resizing, and you get a better result than if you just resize to 800 px from the start.
To resize go to Image 》Image Size and enter the width. You can change the resample method to Bicubic (smooth gradients) instead of automatic, but it is not crucial.
The next step is to apply sharpening by using Filter 》Sharpen 》Sharpen.
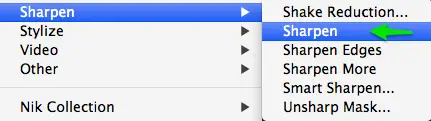
Then duplicate the layer by pressing CMD/CTRL+J. Rename the layer to Extra Sharpening. Then apply sharpening once more by using the menu Filter 》Sharpen 》Sharpen.
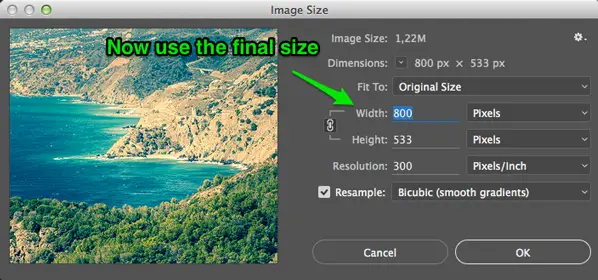
Now it is time to resize to the final image size. Go to Image 》 Image Size and enter 800px as the width.
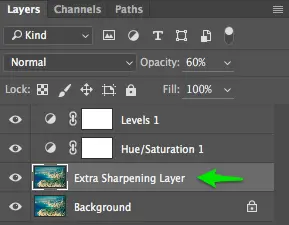
If the sharpening looks too much, just pull the opacity of the Extra Sharpening layer down to around 60%. Lowering the opacity should take care of it.
You might think we’re done for now, but there are still some small issues to take care of.
Would you like to simplify the process? Grab the full package of 34 Photoshop Actions by the pro photographer Peter Bredahl Dam and make your image sharpening process a breeze.
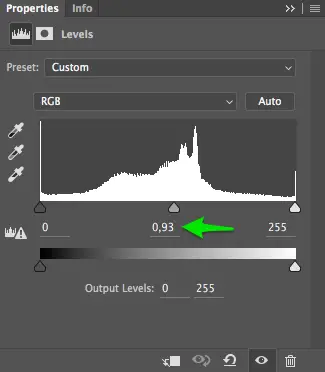
Sharpening an image also automatically adds a little brightness, so you need to counteract this, by adding a level adjustment layer. To bring down the overall brightness of your image pull the middle pointer of the levels adjustment curve a bit to the right as shown in the image below. Just a tiny bit. You could also use an exposure adjustment layer for this. However, I prefer to use the levels adjustment layers for this.
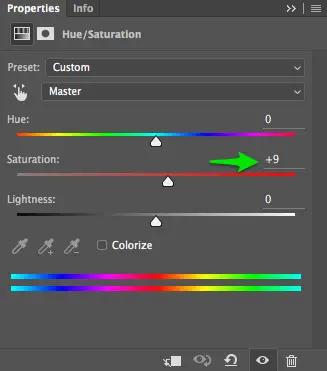
As a final thing, you would want to add a little more saturation back into your image, since this also suffers a bit when (resizing/sharpening). Open up a Hue adjustment layer and pull the slider a bit to the right to around +5 to +9.
That is it. You should now have a very sharp image ready for web use. If you already used a lot of sharpening on the original image, this can make the resized image look a bit too crunchy. However, you can adjust the sharpening effect by changing the opacity of the Extra Sharpening layer or disable it altogether.
Concluding words
Using this method has made a tremendous difference in the sharpness of my web images. However, doing this process for several images can take ages. This is why I chose to make a bunch of actions for different sizes commonly used on the web. The actions are included in my Photoshop Actions for Photographers package.
Do you have any other methods for sharpening your images for the web? Feel free to share your thoughts below in the comments.


Worked great. Thank you. I’ll definitely check out your Photoshop Actions.