Now that you know how your camera manual mode works, and you are in control of what it is doing when you take a picture, what’s next? Our brain likes the process of constantly learning something new. That’s why we network with other people, visit conferences, read books and articles, travel, scroll social media feeds, and so on.
There are many more things to know about your camera, such as focus modes, metering modes, working with an external flash, and post-processing. The better you understand all camera settings, the better pictures you can get because you are in full control of shooting. Let’s get started.
Focus modes
Focusing modes is not something all photographers know, but learning focus modes is a great way to take your skills to the next level. Photography focus modes rely on either the camera’s technology or using your hands and focusing manually. However, both of these focus modes are useful in particular situations.
Manual Focus Mode (M)
Photographers used manual focus mode for decades before auto-focus was developed. Since autofocus can make mistakes and choose the wrong subject to focus on, manual focus comes in handy.
Manual focus is extremely useful when you shoot in low-light conditions, but it also works pretty good for still life, architecture, and macro photography.
Autofocus Mode (AF)
Autofocus is available thanks to the camera’s technology and lens motors. It depends on different factors, such as lighting, your subject, and your camera’s capabilities.
In the last few years, autofocus modes became more advanced. There are three types of autofocus, such as
– One-Shot (AF-S),
– AI Servo (AF-C), and
– AI Focus (AF-A).
One-Shot focus is quite simple and it does this in the way it focuses on a single shot. It is a perfect option for subjects that are not moving.
AI Servo (AF-C) or continuous focus works the best for moving subjects, when you shoot some sports activities or cars, for example. It focuses when you press the shutter button partially, but it still controls the movement within the frame.
AI Focus (AF-A) is a mix of both technologies mentioned above. It fits the best for shooting subjects that could move without much notice, such as birds. AI focus can be applied for subjects that are slightly moving.
All modern DSLRs allow you to turn off the autofocus and try manual focus. Many people may find it too difficult and time-consuming, but photography is a creative genre that requires some unusual decisions from time to time.
Metering Modes
When you grow your digital abilities, you become in control of the light on the scene. Knowing metering modes can help you to work with tricky lighting conditions and make them less challenging for you.
Nancy Young
In a nutshell, metering is the process that your camera undergoes when it works out what exposure to choose for a particular shot. There are a few metering modes that you can choose for certain conditions.
A correctly exposed photo is made of 3 tones of light: shadows, mid-tones, and highlights. Take a look at the image below: it features
- Highlights on the sky,
- Shadows in the front,
- Mid-tones in the middle of the scene.
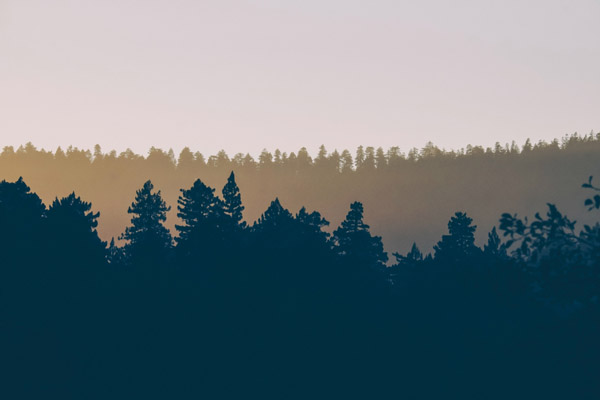
If you choose to expose the image only for the sky, the sky would be well-exposed, but the rest of the picture would be underexposed and way too dark. If you decide to expose the image using the forest on the forefront, the foreground would be well exposed, however, the sky would be overexposed, and you would get blown-out highlights.
There are four major metering modes and below I’m going to explain what they do.
Evaluative (Matrix) Metering Mode
It’s a complicated and modern way to meter the scene. This is the metering mode your camera uses and it goes by default settings. Your camera reads light all over the scene, and then the camera’s technology determines the correct exposure and perfect amount of highlights, shadows, and mid-tones.
Partial Metering Mode
This metering mode collects the data from the round small area in the centre of the photo. This small area covers only 10-15% of the image. This metering mode will come in handy when your subject is in the very centre of the image.
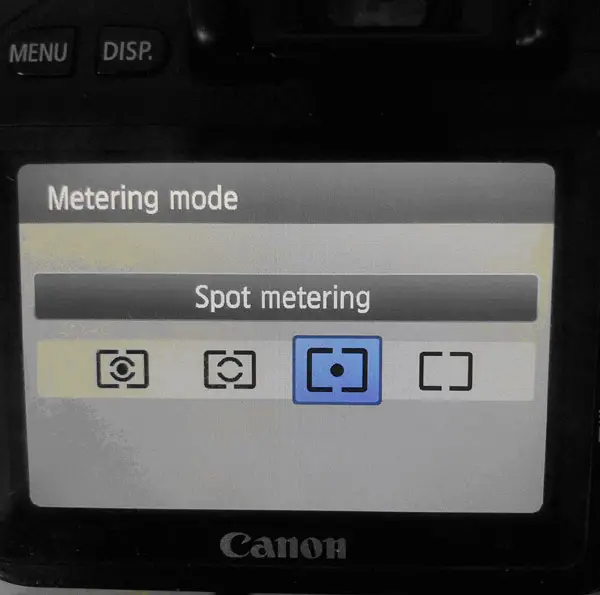
Spot Metering Mode
Spot metering mode means that the camera takes a small spot in the centre of the picture (about 5%) and determines correct exposure. It works better than the partial mode because it takes into account metering for a very small area. However, it could leave the rest of the image underexposed.
Centre-Weighted Metering Mode
Centre-weighted metering mode is similar to partial metering, but it reads a much larger area from 60-80% of the whole scene. Camera manufacturers know that most people take pictures where the subject is placed in the middle of the scene. To give an accurate exposure value, there should be an effective metering system inside of a DSLR. However, this metering mode is difficult to use and predict.
A quick tip: if your photo is lit, use evaluative metering mode. In the case where your subject takes most of the scene, use spot metering mode. Centre-weight metering mode will be useful in situations when you have the sun (or another illuminating object) behind the subject.
Using External Flash to Set the Mood
Quick explanation: an external flash is the one that is not built into your camera body. You can mount an external flash on a camera or remotely trigger it to light off-camera.
When do you need an external flash?
Obviously, with built-in flash, it’s difficult to illuminate wide-angle shots; that’s why when you shoot something far away from you, the corners of the scene remain dark. Here an off-camera flash can come in handy.
Another big advantage of external flash is that it does not use the camera’s battery and lasts longer.

Besides, you can’t control the direction of the built-in flash. It produces harsh-looking shots every time. But with an external flash, you can produce bounced light that gives softer shadows and an illuminated background that looks almost like natural light.
External flash also reduces red eye in the photo. Of course, you can always change that in Photoshop, but with an external flash, you’ll get real eye color.
Reading and Using Natural Light to Your Advantage
We are all familiar with natural light, but have you ever thought about how you can use natural light as an advantage?
Natural light in photography means that you use the sun as a light source. The lighting varies with the time of the day.
The noon sun will give you very strong shadows and highlights, while one hour before the sunset allows you to take magical pictures with soft yellow light. That’s why many photographers love the time before sunset which is called the golden hour, but this is a topic for the next article.
The best way to start reading and using natural light is to experiment with it.
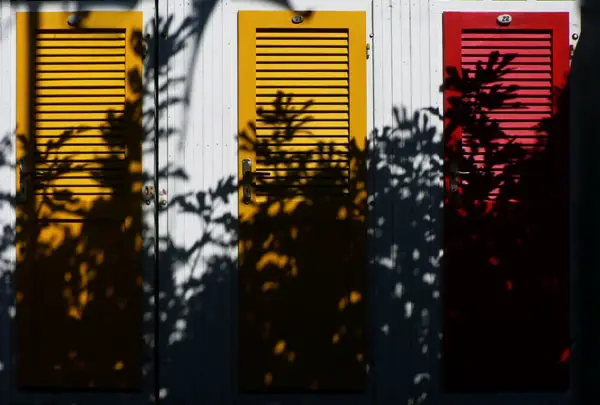
Shoot with Hard Light at Midday
Most photographers try to avoid midday sun because it gives hard shadows and a harsh appearance, but you can still get some creative beautiful shots at noon. Shadows could be a great composition element, just like in the image below.
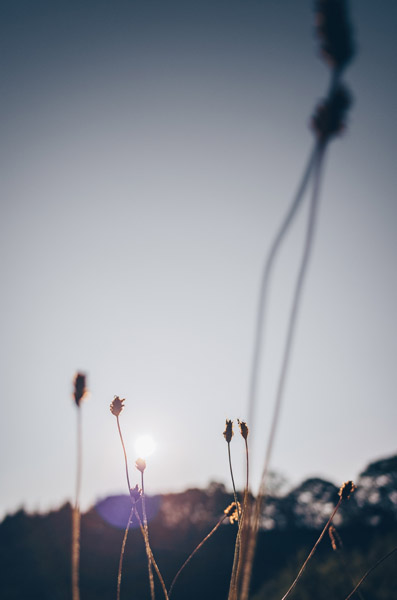
Try to Shoot at Sunset and Sunrise
Shooting in the morning or the evening gives you the best possible light. The sun is low and it offers softer shadows. You can shoot not only sunsets (that is a cliche), but soft light before the sun goes down is a perfect time to shoot portraits.
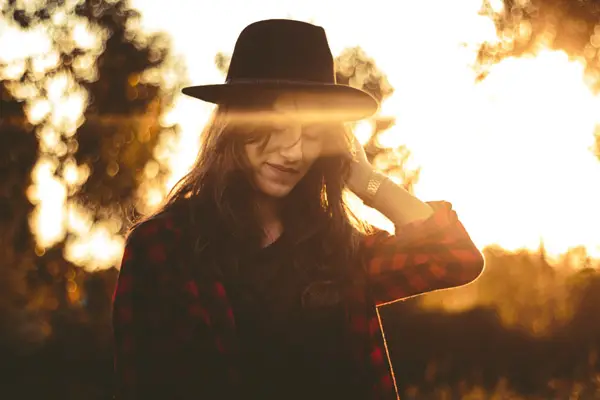
Shoot with the Sun in Front
Taking pictures with the sun in front of you gives you amazing light flares that look magical in the pictures. In this case, your subject with the backlight could be underexposed, but you can always change that with post-processing.
Straight Light on the Subject
The angle of light can make a huge difference. Light straight on the subject is one of the simplest and straightforward techniques for outdoor photography. It helps to avoid hard nasty shadows on the subject.

Side Lighting
Side lighting can help you to show texture on a surface, for example, on the interior design or body muscles. At the same time, you should be careful with side lighting, because it could create bad shadows on a model’s face.

Improving Your Post-Processing Skills
After you have mastered manual mode, you also need to get familiar with the basics of photo editing.
Cropping and cleaning up your images
When we talk about cropping and cleaning up, there are a series of things you need to understand, and we are going to be taking a look at them one after the other.
- Straighten images: the first thing is for you to make sure that your images are horizontal when you shoot, and if you happen to miss that, you have to make sure that you straighten your images.
- Image cropping: another thing you have to consider is cropping your images to improve the positioning/composition and remove all the unwanted elements.
- Spot cleaning: the final step here is spot cleaning, and this has to do with changing your view of the photo to checkout spotted locations and make sure the image is spot free and better looking.
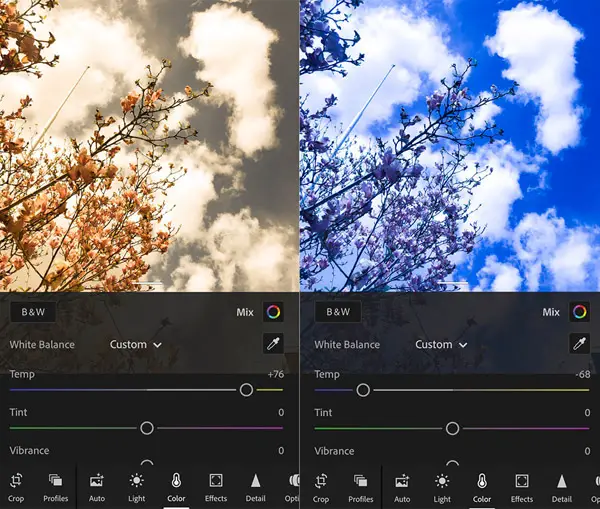
Adjust the white balance
White balance is something that has to do with color levels rather than exposure. White balance is all about changing your images’ overall color tone, especially when you feel like they do not fit the overall context of the image you are trying to portray.
Nancy Young
For JPG files, you need just a small amount of white balance adjustments because of the availability of less digital data than the raw image files.
Exposure and contrast adjustments
You knew I was not going to leave this out of this article, didnt you?
- Adjusting exposure: some pictures are great, but they do not look as great as we want them to be. One thing is that they are not as bright or as dark as we would want them to be, and that is where exposure comes in.
- Adjusting contrast: this has to do with tones, and you do not want it to be either too high or lower than you need it to be, which means that the best selection is the middle tone.
You can adjust exposure, crop images, change brightness, and contrast using numerous post-processing programs. Two of the best and most popular tools for photo editing are Adobe Lightroom and Capture One.
Lightroom is a solution for photographers that can help you post-process images and also organize them. It allows you to import/save, organize, view, edit, tag, and share large numbers of digital images. The best part about Lightroom is that you can use Color Mix to adjust Hue, Saturation, and Luminance of any color.
Capture One is a similar tool that lets you edit photos and create image catalogues, as well as post-process raw files. With Capture One you can create annotations that give an ability to edit the image by different people and see their comments. When it comes to their interface, you can place tools anywhere you like or hide them anytime.
Using Your DSLR for Videography
Did you know that your DSLR can not only take pictures but also make videos? Without a doubt, taking video with your camera is way more complicated than taking stills, but it’s definitely an interesting and exciting skill to master.
DSLRs have evolved so much in this aspect that for productions many people use them instead of large, expensive bulky professional camcorders. You can now find all sorts of accessories such as camera cages and rigs to turn your DSLR into a full production camera.
You do not need to spend thousands on any extra equipment to film with your DSLR. There are even some with built in microphones and you can use the mounting points like a hotshoe adapter and tripod screw to add a few things you may need.
Because of their large image sensors and ability to change lenses, plus manual zoom and focus, adjustable frame rates and other features, you can make really cinematic videos with as shallow of a depth of field as you want.
The best cameras that are suitable for shooting videos are Nikon D810, Canon 5D Mark III, Sony Alpha a7SII, and Canon 80D. You can Google if you can use your camera for videos.
Check out the following video on using your DSLR for filmmaking:
Conclusion
After you mastered camera manual mode, you need to know 6 more things that you can learn about your DSLR. I hope these things will help you to become a better photographer. Never stop learning something new.
Take a look at the following link to learn how to use your camera’s depth of field creatively.


1 comment