You pull out an impressive piece of equipment. Her eyes widen. Did she lick her lips? The pressure’s on now. Yes, she definitely licked her lips. When you declare with total confidence, to a beautiful woman, that you’re a photographer, there are potential benefits and downsides.
Suddenly she wants you to take photos of her in the night sky, with the Christmas lights in the background. “No problem” you say as you start snapping off frames like you’re Mario Testino. You pretend to change settings without removing the camera from your face. You definitely have her interest, and possibly more. Then you check the shots.
The background of your photos are superbly exposed, Ansel would be proud. But your subject’s face is so underexposed you can’t even make out her expectant smile. She sees the results and fires you a look like you just dropped her mom with a left hook. There’s no worse a situtation as a photographer. This happened to me not that long a go.

Knowing how to control exposure in any lighting situation is an important step in moving from beginner to accomplished photographer. And can save you a lot of embarrassment. Read on to learn how to master exposure quicker than I can manage to lose a pretty girl.
An Introduction To Metering Modes
Digital cameras typically come with three metering modes. They’re called Zone Metering, Center Weighted Metering, and Spot Metering. Canon often uses a fourth metering mode called Partial, which is a mix between Spot and Center Weighted.
You need to understand what each of these modes do, and know when to use them if you want to have complete control over exposure. Here’s a summary of what each metering mode does.
Zone, Matrix (Nikon) and Evaluative (Canon) Metering is the default metering mode of nearly every digital camera. In Zone Metering the final exposure is calculated based on everything in the frame. The frame is split into zones, on a Canon 5D MkIII it’s 63 zones. Your camera will calculate the overall average light level based on the light and dark tones in each zone, and choose the exposure based on that calculation.
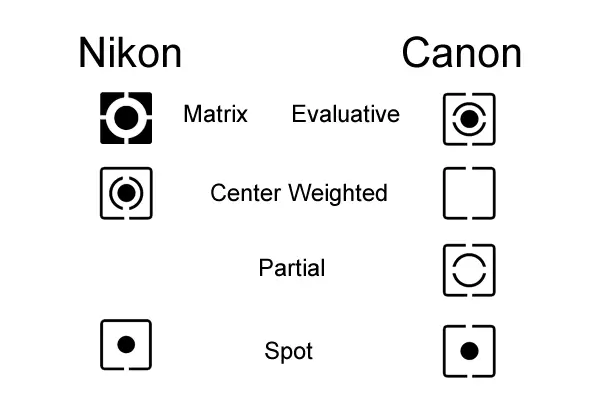
Center Weighted Metering metering is similar to Zone Metering because it takes the whole frame into account when calculating the exposure. The difference being that it will give more weight to the area in the center of the frame. This area makes up about 10-15% of the total frame.
Spot Metering takes it reading from a tiny point in the middle of the frame, and ignores everything else. The exposure point is between 1.5-3% of the total frame and is usually the same as the focus point. Spot Metering takes a little practice to learn what areas of a scene make good exposure points. But understanding it will give you the ability to have precise control over the exposure.
Partial Metering is mostly found on Canon cameras. This mode is a mix between Center Weighted and Spot Metering. It ignores the whole frame, and exposes on one area in the center of the frame, this area takes up about 10-15% of the frame.
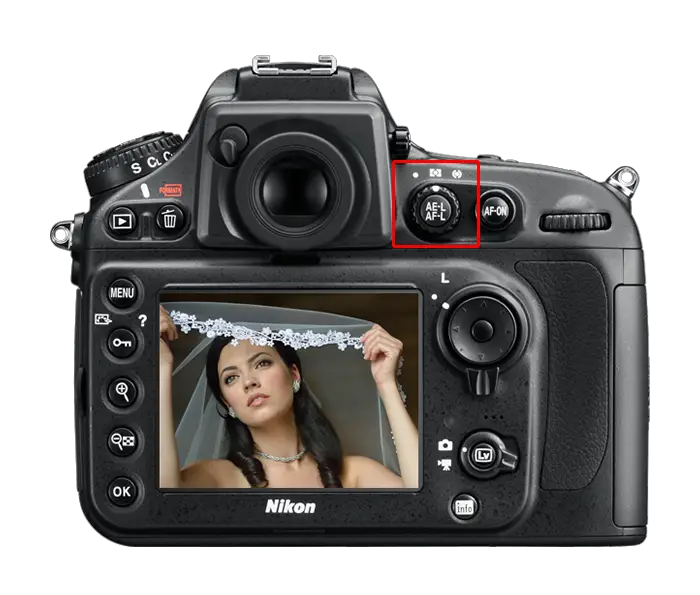
How To Change Modes
Every camera manufacturer, and each model of camera, differs in the way you change the metering mode. Some cameras require you to go into a menu to change it. While other cameras will have a dedicated button or switch on the back.
As much as we all hate reading our camera’s manual, you may need break it out so you can quickly understand how to change metering modes. Here are some links to download camera manuals.
Using The Different Metering Modes
Now that you understand what each mode does and how to switch between modes, it’s time to get your hands dirty and do some practice. Unfortunately there’s no set rules about when you should use each mode. Instead you need to learn how to evaluate the lighting in a scene to determine the best setting.
Practice Zone Metering
Zone metering is best used in situations where the lighting is fairly even across the whole frame. If there are large areas of the frame that are much darker or brighter than your subject, then Zone Metering may not give you the best result.
Since you’re probably already using Zone Metering I encourage you to go back through your recent photos and study the light. Is there a lot of contrast or is the lighting fairly even?

Look at the shots that you love and the shots where the exposure is off (assuming you didn’t delete them). What’s the difference in the lighting between the good and bad shots?
Take some shots in lighting conditions where there’s a lot contrast. How do they turn out?
Practice Center Weighted Metering
Use Center Weighted Metering when the subject is close the center of your frame, and there are dark or bright objects in the other areas of your frame. Center Weighted can be useful for portraits where your subject is well lit. If you used Zone Metering in these situations your subject could become under or overexposed.

Plan to spend a day of shooting with center weighted mode switched on. Shoot the same subjects that your normally do, and keep checking the LCD screen and histogram. Remember that your camera will expose for the center of the frame no matter where your subject is.
Experiment with different compositions. How do your photos look when the subject is off center?
Practice Spot Metering Mode
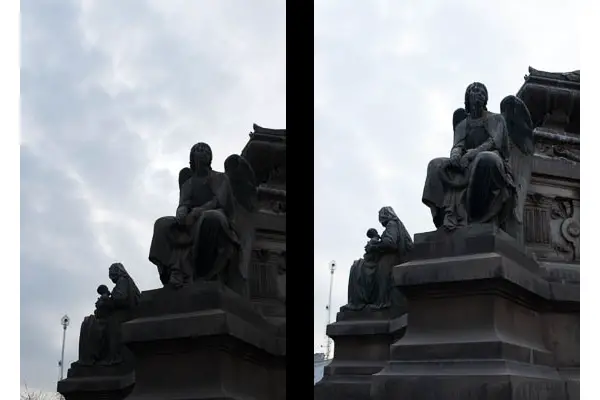
Spot Metering is great when you need pinpoint control over the exposure. Sometimes, in tricky lighting situations, Spot Metering is the only method you can use to get the correct exposure. Back lighting is a good example of when to use Spot Metering.
I probably spend around 80% of my in this mode. The only time I don’t use it when I’m shooting landscapes and the light is even, so I let the camera decide the exposure.
My suggestion would be to spend a week taking photos in Spot Metering. Experiment taking photos in different lighting conditions and exposing on different points of the frame to get an idea of what works best. Holding the shutter button halfway down will lock the exposure and focus, allowing you to recompose the frame before pressing the button all the way down.
Try taking shots in sidelight and backlight. Switch between spot, center weighted, and zone metering. How do the different modes change the exposure?
Take some shots in even lighting, exposing on different areas of the frame. Then switch back to zone. Is the exposure better with spot metering, or when the camera does the work for you?
Seeing The Light
Just as important as practicing the use of metering modes, it’s also important to start taking the time to evaluate the lighting conditions before you press the shutter. An understanding of the light and how it affects exposure will help you make better photos more consistently.
Conclusion
Understanding the different metering modes of your camera is a crucial step towards becoming a better photographer. And having the ability to take photos that match your vision will breathe extra life into your art.
If you take the time to practice using the different metering modes you’ll be able to have complete control over the exposure in every photo you take. And you’ll be able to impress beautiful women, or men, the world over with the quality of your photos – not just the size of your equipment!
After practicing the different metering modes, what do you think is the most useful mode? And what style of photography do you mostly shoot?


Thanks a lot for the article..helped a lot 🙂
No worries, I’m glad it helped.
this is over 4 years ago so i am not sure if you will still be able to respond to this message/comment. If spot metering or center weighted metering uses the center of the camera frame, then my off center AF points on the mark 3 will be unusable? i find it hard/challenging to recompose shooting portraits using center AF points (especially shooting with 50mm f1.4-1.8, some shots are not as sharp compared to shots taken with AF points straight in the eye)). any comments or suggestions?
I´m a beginner on the photography and already took my first couple of courses. And for some reason some of my pics were fine but with an over exposure in some areas without any reason. I think that with this article I can fix that. Thank you.
Thanks for this, great tips. I shoot food and have always kept everything on evaluative mode. But I have a lot of contrast in my images (I like dark backgrounds) and have found some of my main subject over exposed.