I was hanging out in one of my blogging groups the other day, and people were discussing things they wanted to do to improve their photography. One thing that popped up a few times was switching to manual mode, and how daunting that seemed.
I am here to tell you that I thought the same thing until I actually went for it. Shooting in manual mode allows you access to a larger number of settings than automatic modes, so you can have fun adjusting all of them. But the thing is — you don’t have to, your first time shooting in manual, or ever if you don’t see the need for it! Shooting in manual mode can be as simple as 1-2-3.
Infographic design by Lix Hewett
Transcript:
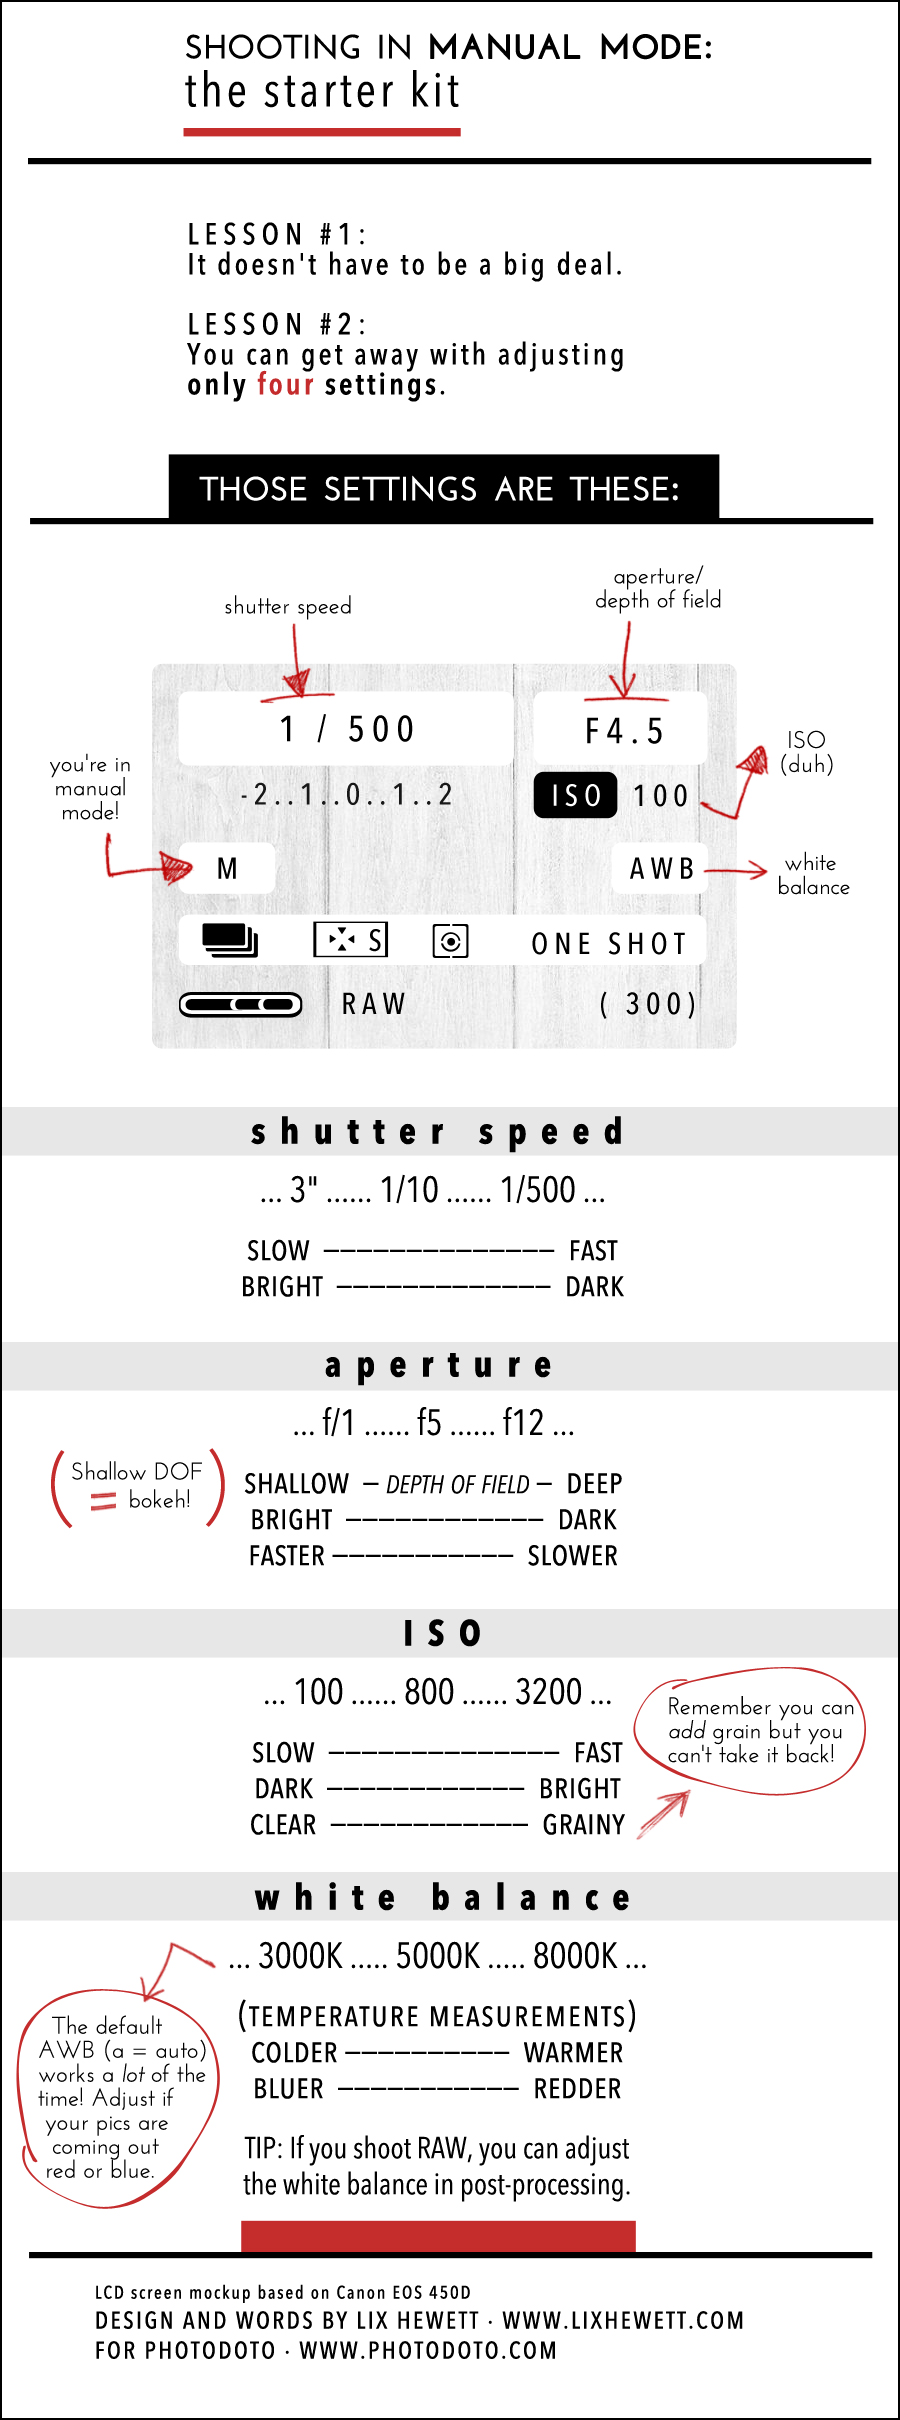
Shooting in Manual Mode: The Starter Kit
Lesson #1: It doesn’t have to be a big deal.
Lesson #2: You can get away with adjusting only four settings.
Those settings are these:
- Shutter Speed
… 3″ …… 1/10 …… 1/500 …
slow —————————————— fast
bright ————————————— dark - Aperture
… f/1 …… f5 …… f12 …
shallow — depth of field — deep
bright ———————————— dark
faster ——————————— slower
Note: Shallow depth of field = bokeh! - ISO
… 100 …… 800 …… 3200 …
slow —————————————— fast
dark ———————————— bright
clear ———————————— grainy
Note: Remember you can add grain but you can’t take it back! - White Balance
… 3000K ….. 5000K ….. 8000K …
(temperature measurements)
colder —————————— warmer
bluer ——————————— redder
Tip: If you shoot RAW, you can adjust the white balance in post-processing.
Note: The default AWB (a = auto) works a lot of the time! Adjust if your pics are coming out red or blue.
Click on the following link to find out 6 things to learn after manual mode.
Further Reading
Credits:
LCD screen mockup based on Canon EOS 450D
Design and words by Lix Hewett · www.lixhewett.com for Photodoto · www.photodoto.com


Not very useful advice, if you leave out the meter reading … if your going for the manual mode, your meter should be set to the spot meter, because the spot meter can be called the manual mode of the camera’s light meter. So now, use the above information (in the article), to set all the parameters and at the same time get a correct exposure, guided by your camera’s light meter reading. The pointer of your camera’s light meter, in the viewfinder, should be positioned in the middle. There’s a whole number of considerations to take into account when using a spot meter, to determine the correct exposure. Basically, your aim is to point the centre of the camera’s view finder (marked with a circle in the viewfinder) to an object that’s hue is as close as possible to a grey card, because the light meter is calibrated to the grey in a grey card. If your subject is of a different colour, you can either:
1) take your light reading from a different object in the scene (make sure that the same kind of light is falling on that object as the light on your subject). You can use a grey card for this, but as pointed out above don’t hold the grey card in the shadows, when your subject is in the sunlight.
2) compensate the exposure – basically: if your pointing your spot meter to snow, the meter’s pointer should be set from +1 to +2, and if your pointing your meter at a heap of coal, -1 to -2.
After using the above advice to set the exposure, you can shoot as long as you don’t change ISO, aperture, or shutter speed. If you change these parameters, or the light changes, you have to take another light reading.
The white balance setting can affect how your photo looks, but does not affect the exposure.
This is all really interesting and I will absolutely read up on it. This guide however is meant to help people dive into manual mode, and what you said would have made me run for the hills when I was still struggling to use it. There’s a time to learn about meter readings, and that time for me was not when I was just looking for a little more control on my photos.
Without checking the light meter reading, the exposure will be completely random, and in many cases you will get no photo due to underexposure or overexposure … I have attached an image of the light metering mode setting and the light meter value in the viewfinder … a pointer displays the exposure value and if the exposure is out of the camera’s sensitivity range the meter will blink. You should make sure the pointer is in the middle of the light meter scale. I have attached the image. The pointer is missing on the image, but you will see it in your camera’s viewfinder.