You’ve probably seen people using their DSLRs in place of webcams while streaming, and if you already have a DSLR, it could be an excellent option for you to do the same.
This article will tell you everything you need to know about how to stream with a DSLR. After reading this, you’ll be more than ready to start off your streaming career.
In general, streaming with a DSLR involves using the proper equipment such as a quality USB and HDMI cable, setting up your broadcasting software, customizing your stream, picking the right focus type for your environment, having a fully charged battery, and using a good quality microphone. Let’s get into the details.
There are numerous benefits to using a DSLR as your camera while streaming. The most obvious benefit would be the image quality, as a DSLR is made for capturing high-quality image content. This comes with another very useful option: the ability to control your image however you want. On DSLRs, you can change lenses depending on your filming environment, and customization is always a great option to have while streaming.
While streaming with a DSLR might require more space, it comes with various benefits, and once you learn how streaming with a DSLR is done, you will never go back.
Everything You Need To Know About How To Stream With A DSLR
Before delving down into what exactly you need to do when starting your stream, let’s see how you need to prepare in order to be able to stream with your DSLR as the camera of choice.
As you probably know, streaming requires special equipment, and sometimes a significant number of it. However, here we have the basics to make this setup work for you.
Use High-quality USB Cable
As using a DSLR for streaming purposes is nothing new, most of the leading manufacturers have modified their camera options to make it as smooth as possible. The main one is creating software of their own, so the transfer of the files could be made possible.
The main task on your side to make everything work is to find a good-quality USB cable that won’t break in crucial moments.
Each manufacturer has its software, and you will usually find the exact website you should go on in the instructions or the manufacturer’s official website.
But, when it comes to USB cables specifically, you should probably opt for either original ones from the manufacturers or those from well-known, high-quality brands. For casual, everyday use around the house, the cheap USB cables that cost only around a few dollars are an excellent choice; however, when it comes to your DSLR, it’s best not to mix things up too much and keep it more on the high-end.
It’s not only better for that probably expensive camera of yours, but it will also last longer, costing you less in the long run. And, the chances of it breaking in the worst moments, like during a significant stream, are minimal.
Get Good HDMI Connection
If this is not your first time connecting your DSLR to your computer, you may already have a capture card, and it would make sense if you wanted to use what you already have.
To transfer the video files from your camera to your computer while using a capture card, you must get yourself a suitable HDMI cable. Like with USB cables, going for more high-quality and even a tad more expensive options will be the better way to go with this one.
HDMI cables are usually very sturdy, so breaking or splitting isn’t something that you will need to worry about a lot, but still, it’s better to go for an option with guaranteed quality.
However, you still need a USB cable in the mix if this is how you choose to do things.
To connect your DSLR to your computer using a capture card, there are a few things that you’ll need to do. First, connect the DSLR to the capture card using the HDMI cable. Then, use a USB cable to connect the capture card to your computer. And that’s it!
You Need Trusty Software For Broadcasting
Streaming requires having a broadcasting software that will take the video and audio content you make and sends it out to your streaming platform of choice. One of the most popular and widely used ones is OBS which is free.
After connecting your camera using one of the two recommended methods, you will need to set up your broadcasting software of choice and set your DSLR as the source for the video content that’s going to be streamed.
Once you set everything up, it’s the broadcasting software that you will use to customize your video and the visuals of your stream. Through these programs, you can set up overlays and panels, your chat, and basically all the tiny details that make your stream special. This is also how you can edit and customize the video itself while you’re streaming, making your image and audio quality just right.
Setting your DSLR up for streaming is not a hard and complicated process, and after you’ve done it once, you will be able to repeat the process seamlessly. Besides the fact that the full process is very easy to go through, you won’t have to set everything from scratch all over again once you’ve set the basics up.
Just scroll down, and you will find out what are the exact steps you need to take to have a great streaming experience with your DSLR.
And just a little disclaimer before starting, this guide will be mainly focused on setting your DSLR up in OBS, as that is the most widely used software for broadcasting. It is also a favorite software for a reason, so it also comes as a recommendation to go for it if you still haven’t decided on which one you want to use. But, even if you choose a different software, the process is more or less the same.
Let’s set you up!
Connect The Hardware
The first thing you need to do is connect your DSLR to your computer. As I’ve already said, you can do this either by using a USB cable or a capture card and an HDMI cable. If you go for the first option, then all you need to do is plug the USB into the camera and into the computer, and you’ll be mostly set. If you decide to include the capture card into the mix, you will first need to connect the capture card to your computer using an HDMI cable and then connect the capture card to the computer using a USB cable.
Set Your Source In OBS
For OBS to be able to get your video content, you need to set your specific DSLR device as a source.
If you didn’t download the software yet, then this will be the first thing that you’ll need to do.
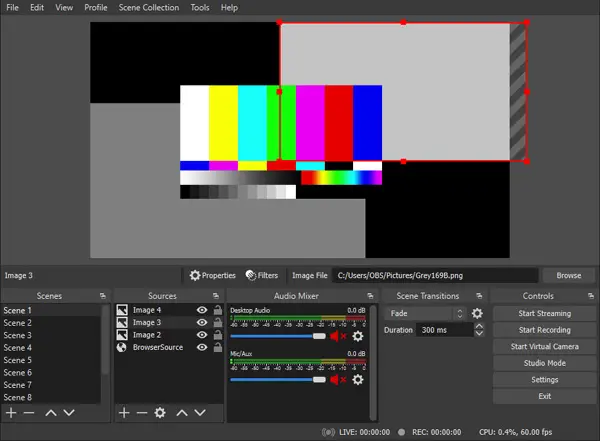
After that has been done, you will need to open the software. You will see a part of the window that’s named Sources, and there is going to be a plus “+” symbol. You should click on that and then click on Video Capture Device.
Another window will open, and you should see a section that says Device. Click on the dropping menu, and choose your DSLR model as your device source of choice.
After that, just click on the Ok button, and you will see the video content your camera is filming in your OBS.
If you don’t see it, check whether everything is connected appropriately. If it is, you might’ve forgotten to turn the DSLR on. Even though it sounds like a stupid mistake, you will be surprised how often it happens that people think that something huge is wrong with their devices while the solution was that simple. It happens, so make sure that that is all done before going into panic mode.
Customize Your Content
Now that everything is set up, you’ll be able to do the fun part of this and customize your stream and make it look the way you want it to.
To achieve the look you want, you should use stream visuals, like overlays and panels. There are various websites where you can find this, either free or paid content, depending on where you stand with your interests and budget.
Here is a hardware device you can use.
Besides that, you will be able to edit things like lighting, contrast, and shadows, which is great, especially if you work in conditions that don’t have the best lighting situation. Of course, having a DSLR in the first place will highly impact and improve the video quality.
If you want to look more in-depth into the ins and outs of streaming with a DSLR, and videos are your preferred type of content, then I recommend checking this one out:
Keeping Everything Running Properly
While the main issue you had to deal with is setting everything up the DSLR and connecting it to your computer, it’s equally as important to keep everything running while you’re streaming.
The main issue that you could run into while using a DSLR is the issues with your focus. Depending on what your content is like, you can choose whether you set your camera to autofocus or manual focus. If you don’t move a lot and tend to stay more or less physically passive during your streams, then the manual setting could be what you should stick to, as it will mostly stay perfect the way you set it up. But, if you do move a lot and change your positions frequently, and if you show different things during the streams, then it’s best to opt for autofocus, as it will adapt to whatever it’s happening on the stream.
Besides that, you will mostly just need to keep an eye on your OBS and make sure that the effects you put on are still working.
Obviously, you should make sure that your DSLR’s battery is full since an empty battery in the middle of the stream can cause a lot of issues for you. Disappearing in the middle of the stream and not being able to immediately come back could irritate your audience, especially if it happens more than once, so it really is important to be sure of this.
Don’t Forget The Audio
Most DSLR cameras have the ability to register sounds, as well as the visual part. For some beginners, it could be good enough to focus just on the audio you get from the camera, however, the moment you collect enough money to invest in a good separate microphone, you should absolutely go for it.
The microphones that are in the cameras are usually not that good at picking up your voice, or any other sounds, with a lot of detail. Also, the quality of the sound can usually be very questionable.
And if there’s one thing that you should know about streaming, it’s that for the majority of the audience, your audio is more important than your visual appearance. The reason behind this is that streams are a place where you interact with your audience and talk in real-time, therefore being able to hear you clearly is a crucial factor in how popular your streams will be.
Also, streams usually go on for multiple hours, and people often aren’t able to have their full attention to watch it, but having a stream play in the background as a podcast while they do something else is a common thing to do, so keep that in mind if you want to keep your audience entertained and active during the stream.
Let’s Start Streaming
Now that your DSLR is set, you have only a few little things to worry about. To get the best stream possible, and have a very satisfied audience, make sure that your audio is as good as your video, if not even better.
This article was written with the assumption that you already have your trusty DSLR, and want to start using it in a new way. However, if that’s not the case, or you are in need of an update to your equipment, then you should make sure that you choose something that works for you, and here’s where you can find the best DSLR for streaming currently available.
Thats it. I hope you enjoyed reading the article. Click the following link to learn about the best green screen for video conferencing.


