We found 739 results for your search.

Earn Money With Digital Photography—Promote Your Skills

This guest post was written by Laura Charon. Laura is an avid photographer who has been taking pictures for years–first with an old brownie camera and more recently with a Canon Digital Rebel XTi. You can read more of Laura’s posts at Beyond Megapixels. Contact me if you are interested in guest writing for Photodoto. -John

Congratulations! You’re ready to take the next step with your digital photography, and start earning some money with it! There are two avenues you can pursue — you can sell the photographs that you take, or you can provide your photography skills as a service to other people. Either way you go, earning money with your photography is challenging and rewarding in this highly competitive field.

lineup2 by Snerkology

In this article we’re going to talk about promoting your photography skills.

Create a portfolio — The first important step in selling your photographs is to establish a portfolio. Create a collection of the work that you are the most proud of, or that is the most applicable to the type of photography you will be performing (portraits,

Continue reading Earn Money With Digital Photography—Promote Your Skills

DSLR 101 – White Balance

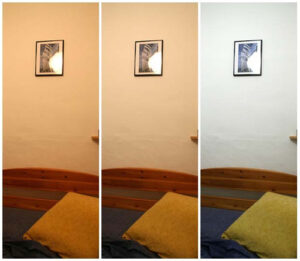
251693960_23f2711016We’re continuing with our DSLR 101 this week and today we’re explaining white balance.

What?
White balance is responsible for keeping your photos the correct temperature. A low colour temperature creates more red, a higher colour temperature more blue. Digital cameras create the correct colour temperature by picking the part of the photo that it thinks should be white and filtering the light to make that area white.

Why?
If you want natural looking photos you need the correct white balance. In other words having the correct white balance prevents your photos from looking too cold (blue) or too warm (red). Although your camera will have an Automatic White Balance (AWB) setting digital cameras are not as good at detecting which part of the photo should be white as you are.

You can get a more accurate white balance by choosing a manual setting for the white balance or creating a custom white balance of your own.

How?
Most DSLRs will let you choose a white balance from within the menu. The choices are likely to include daylight, shade, cloudy/twilight, tungsten, fluorescent light,

Continue reading DSLR 101 – White Balance

DSLR 101 – Auto Exposure Bracketing

Do you own a DSLR but use it mostly as a very expensive point-and-shoot? Time to take off the training wheels! Join us for DSLR 101! Don’t worry we’ll take it slow, and the little green rectangle of the auto setting will always be there for you to run back to if you find yourself in over your head!

Welcome to class, first up; auto exposure bracketing.

What?
Auto exposure bracketing allows you to automatically take a series (usually three but sometimes up to seven) of photos, each at different exposures. Basically the camera takes one image at what it perceives to be the correct exposure, one underexposed, and one overexposed.

Why?
What your camera views as the correct exposure may not necessarily be the exposure that suits a particular image best. You may find that you like your photos slightly overexposed, or that for a particular shot the underexposed version appeals to you more.

Auto bracketing allows you to take the different exposure shots in one quick succession, meaning it’s almost as fast as just taking the correct exposure shot. Especially for beginner photographers this is a great way to get shots in different exposures,

Continue reading DSLR 101 – Auto Exposure Bracketing

Photo organization: How Geoff does it

Photodoto reader Geoff Coupe sent in some very helpful and detailed responses to my plea for help regarding my Great Photo Organization Project (which is still proceeding although I haven’t updated the sidebar in a little while). Here are his excellent responses to my questions (and you can read more on his blog). Thanks, Geoff!

If you’ve got a great system for organizing and archiving your growing photo collection, share it in the comments or email me a guest post for publication here. Maybe we could make a regular series of it… Thanks!

Question: As soon as I tagged my second photo I realized that I need a common taxonomy for my tags. I can’t tag some photos “Bird” and others “Birds” and still others “Winged beasts.” I need to pick a definitive tag and use it for all of my photos. How do I decide? Should all tags be plural or singular? Does it matter? Also, while I’ll be the main user of the archive for now, one day my children or grandchildren will inherit my collection, so the tags will need to make sense to other people besides myself.

Continue reading Photo organization: How Geoff does it

Is film photography for you?

Back in the long ago time, there was film. Sheets of chemicals and magic that transformed when they were struck by rays of light. And it was good.

But it was also kind of a pain in the ass because you could only shoot 24 or 36 frames at a time before you had to change the film. And you had to carry around lots of film in bulky little cans. And you couldn’t preview or delete your shots. And sometimes you’d find that you shot an entire roll with the wrong exposure but you didn’t find out until you got the film back from the developer a week later. Good times.

But some say there is also a certain quality to film photography that hasn’t been replicated by digital. A special and ineffable charm, difficult to express but instantly recognizable. And, contrary to what you might expect, there are quite a few new-to-film photographers out there, drawn to film by the novelty or the look or the antiques or the desire to practice arcane arts on the verge of becoming extinct. Film is Not Dead,

Continue reading Is film photography for you?

Quick Tips for Photographing Autumn

Up here in the Northern hemisphere autumn is most definitely on its way. In my town we went from 90F+ last week to 60F this week and some rain came along too. It’s not bad news though because autumn can be the best time of year for photography. The light is great and there’s all those pretty colored leaves to document. Here are a few quick tips to help you make the most of the season:

1.Take advantage of the shorter days. You don’t need to get up at the crack of dawn to photograph a sunset and that pretty warm evening glow occurs early in the evening. So even if you’re too lazy to photograph in the beautiful first-light/last-light in summer now you can get out there and capture it.

2. Get the details. Leaves are, of course, a big part of autumn photography. Put your camera on a low f-stop and get in close, capture the color and the detail of the leaves. Don’t leave out the big picture but these closer shots can really capture the color of the season.

3.

Continue reading Quick Tips for Photographing Autumn

Review: The DAM Book: Digital Asset Management for Photographers

The DAM Book by Peter Krogh is my digital asset management bible. It is a definitive source of information about everything you need to know to get your photos organized, archived, and protected.

This book is a lot of things but let me start by telling you what it is not. It won’t teach you how to post-process your photos in Lightroom. It doesn’t include any Photoshop tutorials. It doesn’t include a camera buying guide or any gear reviews.

It will help anyone who is serious about organizing their photos get them organized.

Digital Asset Management (DAM) as Krogh defines it is: “a term that refers to your entire digital photography ecosystem and how you work with it. It comprises the choices you make about every component of your digital photography practice.” Your digital photography ecosystem is:

  • Images
  • Software
  • File formats
  • Organization
  • File storage architecture
  • Storage Media
  • Backups
  • Workflow
  • Migration

DAM has many goals including finding images when you need them, image processing, and forward compatibility.

Continue reading Review: The DAM Book: Digital Asset Management for Photographers

How to Remove Dust Spots in Camera or in Software

Are dust spots ruining your photos and you don’t know how to get rid of them? If so, you’re not alone! Dust is a common issue when taking pictures and can be a huge nuisance that affects all your photos. Fortunately, there are some easy steps you can take to remove them.

dust spots on a photo

In this article I will discuss methods to remove dust spots physically in camera and in software after the photos were already taken.

Continue reading How to Remove Dust Spots in Camera or in Software

Brush Up Your Skills!

For most of us up here in the Northern hemisphere the summer is over and we’re back to work, school, and the regular routine. Once the first day of school pics are taken it’s easy to put down the camera and forget about photography only to remember it’s existence when Halloween rolls around. But wait! Don’t do that! Practice makes perfect (or at least slightly improved) and that’s as true for photography as anything else. So keep the camera out and use these tips to keep your eyes in shape over the coming months. That way there’ll be no dust to shake off when the festive season rolls around.

1. Get down on your knees or up on a chair or really anywhere that gives you a different perspective of something you’ve seen a million times. I have a friend who gets up on the roof of her house once each season and photographs her family standing in the garden looking up at her. It gives a different perspective of the garden and makes a great portrait.

2. Get in close and practice getting some beautiful bokeh. Click here for our easy to follow guide to bokeh.

Continue reading Brush Up Your Skills!

Want to Look More Professional?

Have you outgrown Flickr? Feel you’re a bit too good for Photobucket? Recently I’ve been trying out a couple of alternatives for showing off your shots.

First up is SmugMug. They claim “Your photos look better here.” and actually there might be some truth to that statement. A SmugMug gallery looks very slick and professional. Here’s what one I made earlier looks like in editing mode (visitors to the site can’t see all the option bars at the top of the page):

RDavis_SmugMug

You can choose from a variety of themes depending on your asthetic preferences and make photos available to be viewed in sizes ranging from small to X3 large (plus the original size). One feature I really like, if you go for the slightly more expensive “power” account, is the option to disable visitors from right-clicking and saving your photos. A nice, simple deterrent to help keep your photos a bit safer online. You can also password protect galleries or hide urls so only people you sent the link to will be able to access them.

So far I’ve found the website easy to use and if you’re technically-challenged there’s a video to help you get started.

Continue reading Want to Look More Professional?