Let’s get one thing clear – you’re not going to learn how to shoot perfect portraits overnight. There are many things you need to learn first. When it comes to portrait-shooting, no factor is more important than lighting. Even if you’re planning a home portrait session, you can still make the most from various lighting setups to achieve great results.

Off-camera flash is one of things you’ll need here. Here are 7 actionable tips to creating studio light setups right at home and help you capture classic portrait lighting, creating some truly beautiful pictures.
1. Controlling the light sources
First, consider the problem of lighting inside your room. If you think that opening the windows and turning on all lights is a good idea, try again. The more the better rule doesn’t apply here. If you have both natural and artificial lights on, you’ll be mixing light sources – and that will only make it harder for you to white balance the image. If both these light sources happen to hit your subject, expect trouble. Make sure to control the light sources, and stick to just one of them.
2. 90-degree angle, high contrast light
All you need is minimal amount of equipment and you’ll be on your way to achieving fantastic results. But be careful – if you decide to use a single flash head, the angle might end up being really unflattering for your subject. To put it simply, the strong light will emphasize the uneven skin texture and create stark shadows paired up with bright highlights.
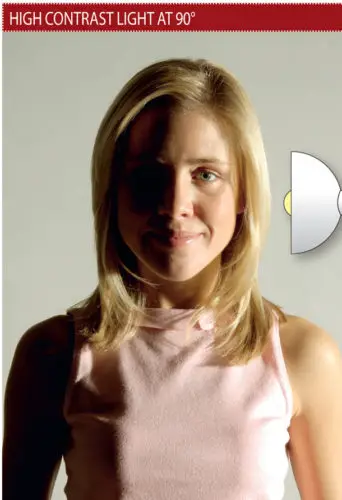
Photo by digitalcameraworld.com
What you need here is a diffuser. Without this smart piece of equipment, you can be sure that the light will result in high contrast and once you place it near the subject, create serious fall-off problems with light unevenly across the face.
3. 45 degrees, low contrast light with a reflector
Add a diffuser shaped like an opaque umbrella, and you’ll create a light source that will provide you with a significantly lower contrast. The soft flash will help you make your portrait more interesting to the eye.
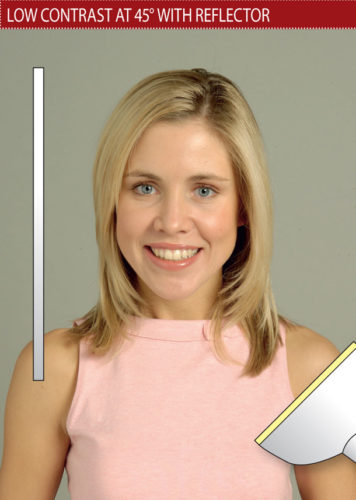
Photo by digitalcameraworld.com
If you’d like to reduce some of the visible shadows, just place a warm-colored reflector close to the face of your subject.
4. 45 degrees, high contrast light
This is an interesting combination, because it helps you emphasize the characteristics of your subject. But you’ll be dealing with areas of deep shadow as well. This is where light positioning is important – if you place it at a less acute angle, you can be sure that the light won’t bring out skin texture. At the same time, it might not be flattering to the subject. Without a reflector, only half of the face will be illuminated.

Photo by digitalcameraworld.com
5. 45 degrees, high contrast light with a reflector
This lighting setup will perfectly show the three-dimensional nature of your subject’s face without creating too high a contrast or deep shadows. You should use it together with a reflector. This is how you can create an insignificant difference between the sides of the face which are lit and reflected.
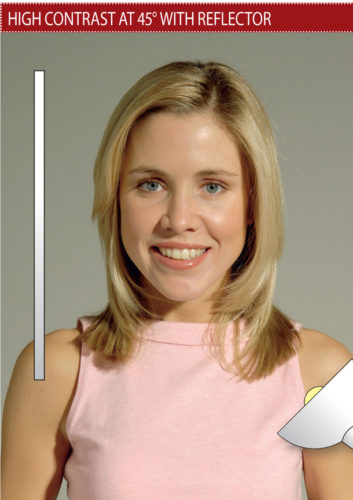
Photo by digitalcameraworld.com
But the contrast won’t be too high here, just a slight drop in brightness that will help you to mimic the soft natural lighting. Your photos will have depth and the lighting source will prove more than flattering for your subject. Try to position the reflector in different ways to achieve different lighting effects.
6. Diffused light with a reflector
This is again a lighting setup where the source of light is softened. A diffuser will give you an effect similar to daylight cloud cover. It will spread light from the small source into a larger area, reducing the intensity of your flash unit. Still, you can be sure that the final effect will be flattering to the subject. What about a reflector? It will bounce light back onto the unlit side of your subject’s face, helping you capture it better.
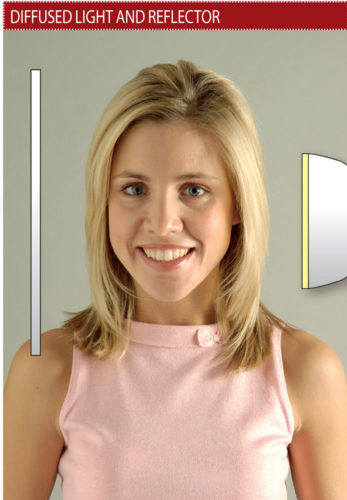
Photo by digitalcameraworld.com
7. Rim lighting placed behind the subject
If you’d like to place the focus on the shape of your subject’s head, this is the right technique to use. By putting the lighting set-up behind the subject, you can create a cool rim-light effect that will look just stunning and make your portrait really special. All you need is a small light source. The only thing you need to watch out for is rendering the face as a mere silhouette. To avoid this kind of effect, open the aperture wide and possibly use reflectors on either side of the subject to bounce the light back into the subject’s face.
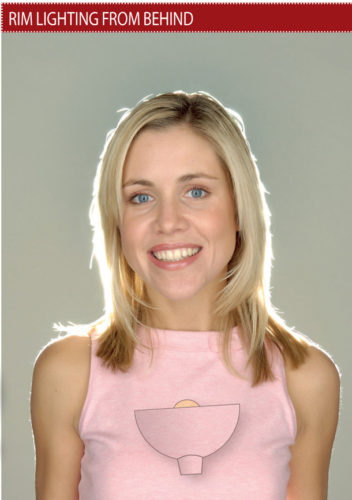
Photo by digitalcameraworld.com
These are some basic lighting techniques that will help you make beautiful portraits right at home. Most importantly, they provide you with a good foundation which you can easily use to begin your experimentation. This is the first step to finding your own style for portrait lighting set-ups.
For more on portrait photography click here.


1 comment