Whether you’re a novice or an expert photographer, enhancing your phone camera quality can drastically boost the visual appeal of your mobile photos. In this comprehensive guide on how to make phone camera quality better, we will explore various techniques and tools that can elevate your smartphone photography game.
By implementing these tips and tricks in this article on how to make phone camera quality better, you’ll be well-equipped to capture stunning images using just your smartphone’s camera.
Phone cameras do not provide the same quality images as mirrorless cameras or DSLRs for various reasons including sensor and lens type, but there are several ways you can improve the quality of your phone camera output. Let’s discuss.
Mastering Lighting Techniques
Proper lighting is crucial for capturing high-quality images with your phone’s camera. Utilize natural light whenever possible, and strategically position yourself or your subject to maximize available light. In low-light conditions, consider using additional light sources like lamps or external flashes. Low light causes noise in phone camera photos due to the size of the sensor and lack of a large lens with good optics which would permit a large amount of light to enter.
Using Natural Light Effectively in Outdoor Photography
Natural light can greatly enhance the overall appearance of your mobile photos. When shooting outdoors, try to schedule photo sessions during golden hours (early morning or late afternoon) when sunlight is softer and more diffused. This helps avoid harsh shadows and overexposed areas in your images. Also, be mindful of the sun’s direction; backlighting can create a beautiful halo effect around subjects while sidelighting emphasizes textures and depth.
Positioning Subjects for Optimal Indoor Lighting
In indoor settings, take advantage of windows as primary sources of natural light by positioning subjects close to them. Avoid direct overhead lights that may cause unflattering shadows on faces or objects; instead, use soft ambient lighting from multiple angles for balanced illumination. If necessary, you can also bounce artificial lights off walls or ceilings to soften their intensity.
Supplemental Lighting Options for Low-Light Situations
- Built-in flash: While most smartphone cameras come equipped with a built-in flash feature, it often results in washed-out colors and harsh shadows due to its limited range and power output. Use this option sparingly if no other alternatives are available.
- External LED panels: These portable devices emit continuous soft lighting ideal for both photography and videography purposes. Try out these portable, varied-sized LED panels that can be attached to your phone or tripod for easy use. Check out these options to find one that suits your needs.
- DIY solutions: In a pinch, you can create makeshift light diffusers using everyday household items like white bed sheets, tissue paper, or even aluminum foil to control the intensity and direction of artificial lighting sources.
Mastering lighting techniques is essential for improving your smartphone photography. By utilizing natural light effectively, positioning subjects optimally indoors, and exploring supplemental lighting options in low-light situations, you’ll be well on your way to capturing stunning images with enhanced camera quality.
Gaining expertise in lighting is a must for any shutterbug, and with practice you can upgrade your pics to the next level. With a good tripod or alternative stabilization method, you’ll be able to make sure that your smartphone camera captures sharp images in all kinds of situations.
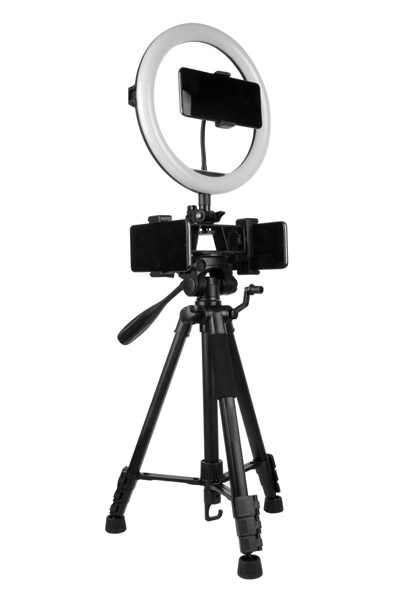
Stabilizing Your Smartphone Camera
Investing in a tripod designed specifically for smartphones can minimize camera shake while providing versatility during photo sessions. Mini tripods are portable, affordable options that offer increased steadiness without sacrificing mobility.
Benefits of Using a Smartphone Tripod
A smartphone tripod not only helps you achieve steady shots but also allows you to explore various angles and compositions that might be difficult to capture handheld. This is particularly useful when taking long exposure shots or shooting time-lapse videos, where even the slightest movement can ruin the final result. A tripod also allows you to free up your hands, letting you interact with your subject or easily make changes on the phone’s display.
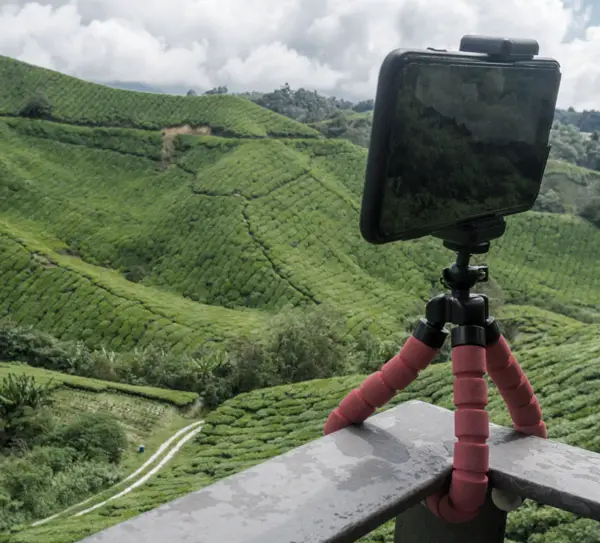
Types of Tripods Suitable for Mobile Photography
- Grip-style tripods: These compact devices have flexible legs that can be wrapped around objects like tree branches or railings for unique perspectives.
- Ball head tripods: With their adjustable ball heads, these models provide precise control over the angle and orientation of your smartphone camera.
- Suction cup mounts: Ideal for attaching your phone to smooth surfaces such as windows or car exteriors, suction cup mounts allow you to capture interesting viewpoints on-the-go.
- Gimbal stabilizers: Although pricier than other options, gimbals offer superior stabilization by counteracting hand movements when shooting video footage with your smartphone camera.
- Magnetic mounts: Equipped with strong magnets capable of holding most Android phones and iPhones securely; magnetic mounts enable quick setup on metallic surfaces.
Alternative Stabilization Methods
If investing in a dedicated tripod isn’t feasible at the moment, there are several alternative techniques you can use to stabilize your smartphone camera:
- Lean on a stable surface: Rest your phone against a wall, table edge, or other sturdy surfaces to minimize movement during shooting.
- Use two hands: Holding your phone with both hands can help reduce shake and improve overall stability when taking photos.
- Tuck in your elbows: Keep your arms close to your body while holding the phone for added support and steadiness.
- Breathing techniques: Exhale slowly as you press the shutter button on your phone’s screen. This helps prevent sudden movements that may cause blurriness in mobile photos.
Incorporating these stabilization methods into your photography routine will significantly enhance the sharpness of images captured by your camera phone. Remember that practice makes perfect – continue experimenting with different approaches until you find what works best for you and delivers good pictures consistently. As an amateur or professional photographer, mastering this skill is essential for producing high-quality shots using just a smartphone’s rear camera capabilities.
Lastly, some smartphone photography enthusiasts recommend using apps like Camera FV-5 (for Android) or Camera+ 2 (for iOS), which offer built-in stabilization features that help reduce blurriness caused by shaky hands.
Achieving the best quality images and videos necessitates stabilizing your phone camera. By optimizing zoom capabilities and attachable lenses, you can further enhance the photographic potential of your mobile device.
Optimizing Zoom Capabilities and Attachable Lenses
To maximize the image quality of your smartphone camera, you must familiarize yourself with its built-in zoom functions and look into using attachable lenses. In this section, we’ll discuss digital vs optical zoom, how to choose the right type of attachable lens for specific shooting scenarios, and tips on using these accessories effectively.
Understanding Digital vs Optical Zoom Limitations
Digital zoom is a common feature in Android phones and other smartphones but can result in pixelated images due to software-based magnification. On the other hand, optical zoom relies on physical movement within a camera lens or sensor system to maintain image clarity while enlarging subjects. Unfortunately, most smartphone cameras lack true optical zoom capabilities; hence attaching external lenses becomes an attractive option for enhancing your phone’s camera performance.
Choosing the Right Attachable Lens Type
- Wide-angle: These lenses are ideal for capturing expansive landscapes or fitting more elements into a single frame without distorting perspective too much.
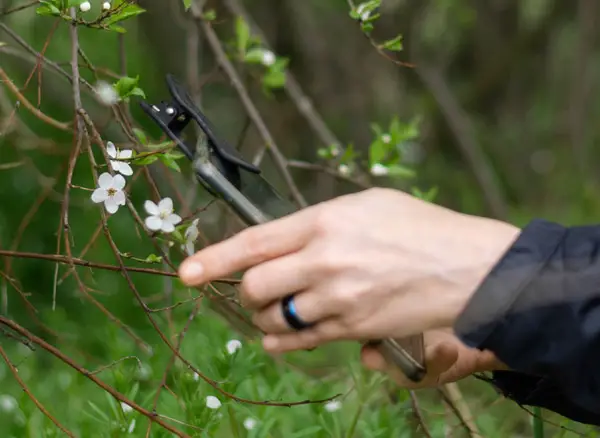
- Macro: These lenses are perfect for close-up photography of small objects like flowers or insects with incredible detail resolution.
- Telephoto: These lenses allow you to capture distant subjects without losing sharpness by providing additional reach beyond your phone’s native focal length range.
Selecting an appropriate lens depends on factors such as budget, compatibility with your device, and desired effect. Ultimately, experimenting with different types will help determine which ones work best to suit individual needs and preferences.
Tips on Using Attachable Lenses Effectively
- Proper attachment: Ensure that the lens is securely fastened to your phone’s camera, aligning it correctly with the built-in lens. This will prevent unwanted light leaks or image distortion.
- Maintain stability: As with any photography setup, keeping your device steady while using an attachable lens is crucial for capturing sharp images. Consider using a tripod or other stabilization methods to minimize camera shake.
- Cleanliness: Keep both your smartphone’s camera lens and the attachable lenses clean by regularly wiping them down with a soft cloth. Dirt or smudges can negatively impact image quality.
- Avoid overrelying on digital zoom: Even when using external lenses, avoid excessive use of digital zoom as it may still result in pixelation and loss of detail. Instead, try physically moving closer to your subject if possible.
- Compatibility: Ensure the lens you choose is compatible with your specific smartphone model. Some lenses are designed for particular brands or models, while others offer universal compatibility.
- Trial and Error: Practice makes perfect. Spend time experimenting with different shooting scenarios and settings to get comfortable using your new lens attachment effectively.
Incorporating these tips into your mobile photography routine will help you make the most out of attachable lenses and enhance overall photo quality taken with your smartphone’s camera system beyond its built-in limitations. Explore various options available, experiment with different shooting scenarios, and ultimately elevate the artistry of captured moments.
Harnessing advanced settings and features is another way to optimize image quality on a smartphone camera.
Harnessing Advanced Camera Settings and Features
Many smartphones offer a Pro mode, allowing users manual control over exposure, ISO, shutter speed, white balance, and other aspects typically managed automatically by the device itself. Experimenting with these various parameters will enable you to fine-tune your shots to match the specific requirements of each scene captured. Furthermore, if supported on your phone’s camera app, shoot in RAW or at the highest JPEG format possible to retain greater detail and flexibility for post-processing adjustments such as color correction, contrast sharpening, and more.
Exploring Pro mode settings on popular smartphone models
Different Android phones come equipped with varying levels of advanced camera settings within their native camera apps. For example:
- Samsung Galaxy: The Samsung Galaxy series features a comprehensive Pro mode that allows users full control over focus points, aperture size (on select models), shutter speed ranging from 1/24000s to 10 seconds or longer depending on model version.
- iPhones: While iPhones do not have a built-in “Pro” mode per se, they allow some degree of manual control through third-party applications like Halide or Moment which can provide similar functionality.
Adjustments to improve image quality settings
To achieve the highest image quality possible using your smartphone’s camera system, follow these tips:
- Select optimal resolution: Increase photo resolution within your phone’s camera app settings menu – this ensures images are saved at the maximum pixel count available for the given sensor configuration.
- Adjust exposure: Use the camera’s built-in Exposure Value (EV) slider to manually adjust brightness levels in your shot.
- Tweak white balance: To ensure accurate color representation, experiment with different white balance presets or use manual mode for precise control over temperature and tint adjustments.
The benefits of shooting in RAW format
Shooting photos in RAW format can greatly enhance your smartphone photography experience. Unlike JPEGs, which are compressed files that lose some detail during processing, RAW images retain all data captured by the camera sensor. This allows for greater flexibility when editing images using photo editing apps like Adobe Lightroom Mobile or Snapseed – enabling you to recover highlights, shadows, and make other adjustments without compromising image quality. However, it is essential to note that not all smartphones support capturing RAW images natively; hence check if your device offers this feature before proceeding.
To maximize your photographic potential, it is essential to familiarize yourself with the various camera settings and features available. Leveraging editing tools and apps is a great way to further enhance your photos after they have been taken.
Leveraging Editing Tools and Apps
Post-processing is an essential aspect of photography that can significantly enhance the quality of your images. With a wealth of editing tools and applications available for mobile phones, you have the capability to refine your pictures and make amazing visuals directly at your fingertips. This article looks at some of the most popular photo editing apps, strategies to help refine your photos, and advanced features such as Google’s Magic Eraser.
Popular Photo Editing Apps for Smartphones
- Snapseed: A powerful app developed by Google offering professional-grade editing tools in a user-friendly interface.
- Adobe Lightroom Mobile: This mobile version of Adobe’s renowned software provides advanced adjustments with cloud syncing capabilities.
- VSCO: Known for its beautiful filters and presets, VSCO also offers essential editing tools to elevate your smartphone photography game.
Basic Editing Techniques to Improve Image Quality
To make the most out of these photo-editing apps, consider implementing these fundamental techniques:
- Cropping: Reframe your shot by removing unwanted elements or adjusting composition according to the rule-of-thirds guideline.
- Brightness & Contrast: Adjust brightness levels to achieve optimal exposure while increasing contrast for more vivid colors and depth perception.
- Saturation: Boost color intensity without overdoing it, ensuring natural-looking hues.
- Sharpening: Enhance image clarity by applying subtle sharpening effects to reduce blurriness and improve overall sharpness.
Advanced Features such as Google Magic Eraser
Some photo editing apps offer unique features that can further elevate your mobile photos. One example is the Google Magic Eraser, available in Google Photos app on select Android phones. This tool allows you to remove unwanted objects or distractions from your images with just a few taps, resulting in cleaner compositions and more focused subjects.
By leveraging these powerful editing tools and techniques, you can significantly enhance the quality of your smartphone photography while expressing your creative vision. Remember, practice makes perfect – so don’t be afraid to experiment with different adjustments until you achieve the desired results.
Maintaining a Clean Camera Lens
Regularly wiping the lens with a soft cloth can significantly improve image clarity and reduce blurriness caused by smudges or dust particles on the surface. In this section, we will discuss the importance of cleaning smartphone lenses, proper methods for cleaning camera lenses, and how to prevent damage during lens maintenance.
The Importance of Cleaning Smartphone Lenses
A dirty camera lens can drastically affect your mobile photos’ quality by causing issues such as haze, glare, or distortion in captured images. As our smartphones are constantly exposed to various elements like dirt, fingerprints, and oils from our skin throughout daily use unlike a camera, it becomes even more crucial to maintain their cleanliness regularly. A well-maintained camera lens ensures that you get good pictures every time you take out your phone to capture memories.
Proper Methods for Cleaning Camera Lenses
- Use a microfiber cloth: The best way to clean your smartphone’s camera lens is using a lint-free microfiber cloth designed specifically for optics or eyeglasses. Gently wipe away any visible debris without applying too much pressure on the glass surface.
- Avoid harsh chemicals: Refrain from using alcohol-based cleaners or other abrasive substances that may cause damage to the delicate coatings on modern digital cameras’ lenses.
- Circular motion: When wiping down your phone’s screen and rear camera area (including its surrounding), always do so in gentle circular motions to avoid leaving streaks or scratches.
Preventing Damage During Lens Maintenance
It is critical to maintain your camera lens in pristine condition, but you must also take steps to ensure no harm comes during the cleaning procedure. Here are some tips:
- Avoid using compressed air: Although tempting, never use canned air or blow directly onto your smartphone’s camera lens as this can force dust particles into delicate components and cause more harm than good.
- No touching with fingers: Resist the urge to touch the glass surface of your phone’s camera with bare fingers, as natural oils from our skin can leave smudges that affect image quality.
- Keep away from moisture: Ensure that neither your cleaning cloth nor phone comes in contact with water or other liquids while performing maintenance on its lenses. If needed, slightly dampen a corner of the microfiber cloth for stubborn dirt but be cautious not to introduce excessive moisture into sensitive electronics within smartphones.
- Avoid Excessive Pressure: When wiping the lens surface, apply gentle pressure to prevent scratches or other damages. Pressing too hard can also cause internal components of the phone’s camera system to become misaligned.
- Keep Your Phone Case Clean: Dirt and debris trapped between your smartphone and its case can scratch the camera lens over time. Regularly remove and clean both your phone and its case to minimize this risk.
- Avoid Direct Sunlight: Exposure to direct sunlight for extended periods may lead to overheating, which could damage sensitive electronic components within your device. Always store your phone in a cool, shaded area when not in use.
Incorporating these simple yet effective practices will help maintain optimal performance and longevity for both amateur and professional photographers’ mobile devices alike. By regularly cleaning your smartphone cameras following proper techniques, you’ll ensure every shot is captured at its highest image quality possible – allowing you to focus on perfecting compositions rather than troubleshooting technical issues caused by dirty lenses.
In conclusion, maintaining a clean camera lens is crucial for achieving high-quality mobile photos. By following proper cleaning techniques and taking preventative measures against potential damage, you will ensure that your smartphone’s camera remains in optimal condition for capturing stunning images.
Utilizing Multiple Cameras on Your Smartphone
Modern smartphones often come equipped with multiple cameras, each designed to cater to specific shooting scenarios. By understanding the strengths and weaknesses of each camera sensor, you can make informed decisions about which one to use in different situations. This will help you maximize your smartphone’s camera capabilities and achieve the highest image quality possible.
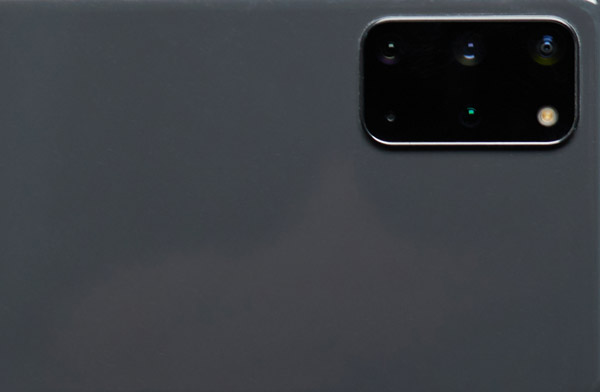
Understanding Each Camera Sensor’s Strengths and Weaknesses
The primary rear camera typically offers the best overall performance for most photography needs. However, additional lenses such as wide-angle, ultrawide, macro, or telephoto offer unique advantages depending on what you’re trying to capture:
- Wide-angle lens: Ideal for capturing landscapes or large group photos without distortion.
- Ultrawide lens: Allows for even more expansive shots than a standard wide-angle lens but may introduce some distortion at the edges of images.
- Macro lens: Designed for close-up photography of small subjects like insects or flowers.
- Telephoto lens: Provides optical zoom capabilities that maintain image quality when taking photos from a distance but may struggle in low-light conditions due to smaller apertures.
Tips on Selecting the Best Camera Mode Based on Shooting Scenarios
To make the most out of your phone’s multi-camera system during different shooting scenarios, follow these tips:
- In bright outdoor settings with plenty of natural light, feel free to experiment with any camera mode. The best camera phones can handle various lighting conditions.
- For indoor photography, use the main rear camera or ultrawide lens for group shots and avoid using telephoto lenses due to their reduced low-light performance.
- If you’re capturing close-up details like flowers or insects, switch to macro mode for sharper images.
- Avoid using digital zoom whenever possible as it degrades image quality. Instead, rely on optical zoom provided by a telephoto lens (if available) in well-lit situations.
Maximizing Image Quality Across Different Sensors
To achieve consistent image quality across all camera sensors on your smartphone, consider these tips:
- Avoid zooming: Digital zoom can degrade image quality. Instead, rely on optical zoom provided by telephoto lenses or physically move closer to your subject when possible.
- Maintain proper lighting conditions: Each sensor performs differently under various light levels. Ensure there’s adequate natural light available whenever possible and avoid using flash unless absolutely necessary.
- Edit images post-capture: Use photo editing apps like Adobe Lightroom Mobile, Snapseed, or VSCO to fine-tune exposure settings and correct any inconsistencies between different cameras’ outputs after capturing images.
Incorporating these techniques into your smartphone photography routine will help you make the most out of your device’s multiple camera sensors, ensuring that you capture stunning mobile photos in a variety of situations.
With practice and trial-and-error, you can refine which settings are most suitable for various shooting situations.
Experimentation and Practice
To continually improve your phone photography skills, take advantage of its portability by capturing shots in various situations and experimenting with settings and compositions. Assessing the photos taken will assist in developing proficiency with your particular gadget, while refining techniques over time.
Importance of Practice in Mobile Photography
Repetition of the same activity yields improved results; this is especially true for mobile photography. The more snaps you snap, the better informed you become about your phone’s photo-taking abilities and limits. People are not as aware of their phone camera features as they would be with a digital camera. Additionally, regular practice helps develop an eye for composition, lighting conditions, and other essential aspects that contribute to taking good pictures.
- Set goals: Identify areas where you want to improve or experiment with new techniques. For example, try mastering low-light photography or focus on capturing stunning landscapes.
- Create a routine: Dedicate a specific amount of time each week to practicing smartphone photography. Consistency is key.
- Analyze results: Regularly review your photos to identify strengths and weaknesses in both technical execution (e.g., exposure) as well as artistic elements (e.g., composition).
Learning from Mistakes through Experimentation
Mistakes are inevitable when learning any new skill – including mobile photography. Embrace them. Each mistake provides valuable insight into how certain camera settings affect image quality or how different shooting scenarios impact overall photo aesthetics.
- Avoid zooming too much: In most cases, avoid zooming with your smartphone camera. Instead, move closer to the subject or use an attachable lens for better results.
- Experiment with exposure: Adjust exposure settings in challenging lighting conditions to capture well-balanced images. Learn how different adjustments impact overall photo quality.
- Try various angles and perspectives: Different angles can dramatically change a photo’s composition and visual appeal. Experiment with high-angle shots, low-angle shots, and everything in between.
Incorporating these practices into your mobile photography routine will not only help you become more familiar with your phone’s camera app but also enhance your understanding of essential photographic principles like shutter speed, natural light utilization, and proper framing techniques. As you continue experimenting and learning from mistakes, you’ll find yourself capturing higher-quality photos that truly showcase the power of today’s smartphone cameras.
Conclusion
Improving the quality of your phone camera is easier than you think. By choosing the right file formats, mastering lighting conditions, utilizing stabilization techniques, understanding zoom functions and sensor types, exploring third-party camera apps and editing tools, and enhancing your smartphone photography with attachable lenses – you can take stunning photos that rival some of those taken on professional cameras. Click the following link to learn more about why phones have multiple cameras.


