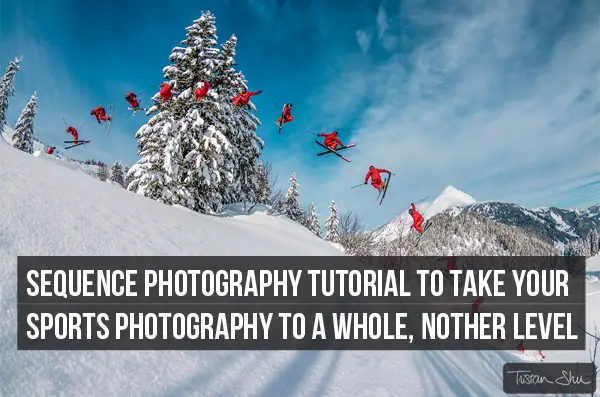
Sequence photography is a great tool to use when you need to have a more interesting shot to use, but it’s not always easy to do – to take a flawless sequence shot you’ll need to do as much work on the day as you will in Photoshop.
What you’ll need is:
- A tripod to steady the camera
- Photoshop (or equivalent) to edit the photo
- A steady hand
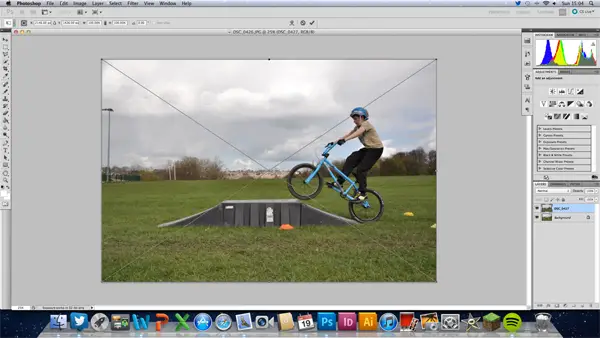
To start with, you’ll need to identify the shot you’ll be taking. Take a walk around where the action is, as you would if you were taking a normal photo, and find an angle you like – this should allow the subject to come in from a logical angle, with the “usual” photo being towards the middle and have room for the subject to leave the frame, so it will probably be a wider shot than you would usually take.
When you’ve got the angle sorted, put your camera onto the tripod and have a look at your camera’s settings. Dependent on how quickly your subject is moving, you’ll need quite a fast shutter speed – if it’s a cyclist for example, you’ll need to have it around the 1/200th area so it freezes the subjet in each frame as any blur will look messy and be hard to work with when editing. This means it’s usually better to have the camera in Manual, as you can control the shot completely and the camera won’t be changing anything mid-shot.
Don’t be tempted to use the flash for a sequence shot either, as most flasheswon’t be able to fire three or four times a second. Now all you have to do is get the focusing right (getting completely side-on is easier for both focusing and editing) and wait for the subject.
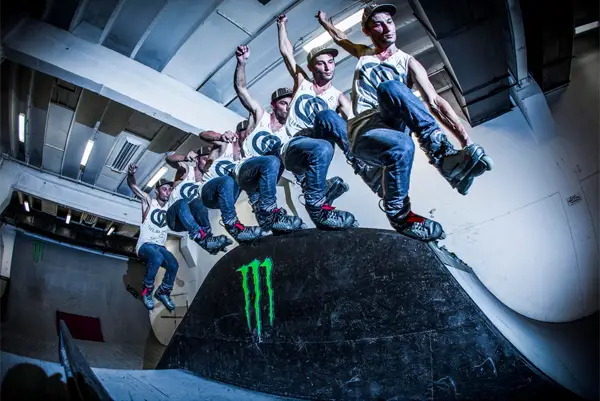
When you’re ready and the subject is about to pass through the frame, hold down the shutter release button so the camera takes a series of photos.Try and time it so you take the first photo just before the subject enters the frame. This will ensure you get as many photos as possible, and won’t have an uneven gap at either side. Do as much as you can to make sure the camera stays in the exact same spot as you take the photos (this is what the tripod’s for), as this will save you time in Photoshop later.
Release the button after the subject has left the frame. When looking at the pictures on the back of the camera, look for straight lines – like the ground or a tree – and try to judge whether they’re in the same place in every photo You can also zoom in on a specific area of the photo and scroll through each image to get a better idea. If there are any massive changes, do it again – it will save you time later. This can often take some practice and time, but once you’re happy, you can move on to editing the photos.
Editing
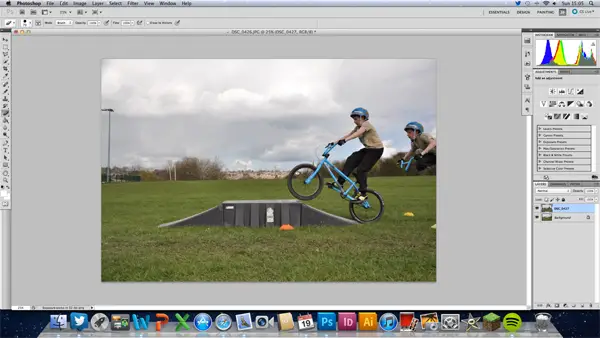
Open the first photo in Photoshop, then click “File – Place” and place the second photo directly on top.
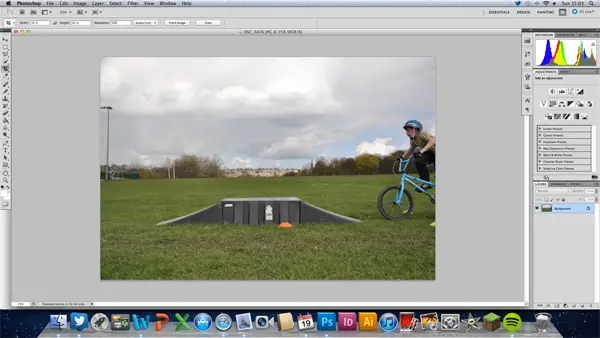
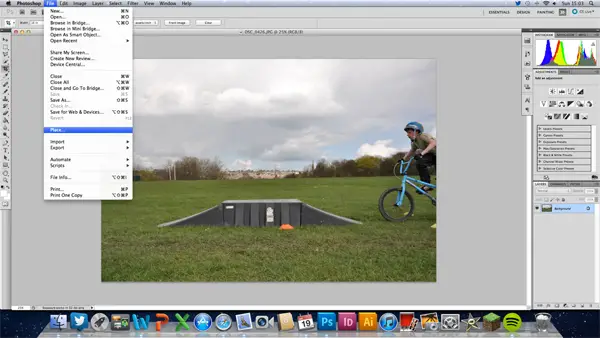
This will cover the first photo and create a new layer.
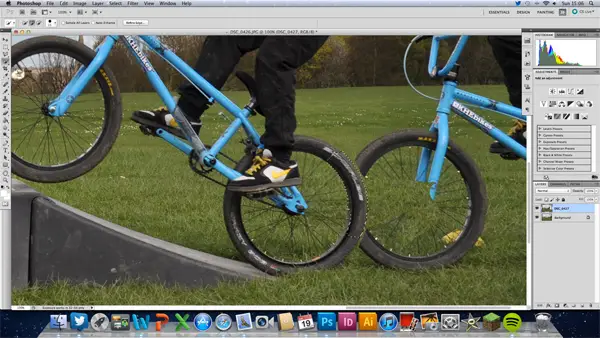
Use the eraser tool and start erasing the portion of the second photo that covers the first, revealing the subject underneath. This is where the importance of having the camera in the same place whilst shooting comes in, as any small movement will be shown in the straight lines in the image; however these can be hidden behind the subject if erased with care.
It’s relatively easy to erase when the images don’t overlap, however it can be difficult when the subject overlaps itself across the image. To minimise the chances of accidentally erasing any parts of a layer, select the area of the layer you want to protect and use that to protect the area. This will act as a buffer between the part of the image you want to protect and the part you want to erase, and this will make the process quicker and easier.
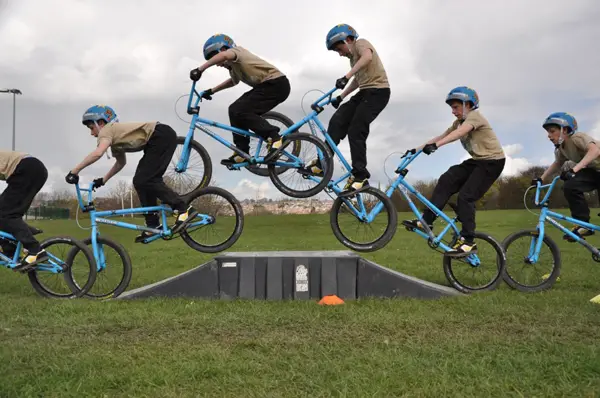
Once you’ve done it for the first image, repeat the process across all the remaining image using the same process of placing and erasing. When the final image has been placed and you’re happy with the final product, flatten the image. Flattening will save on file size, and mean editing is far easier. As there will only be one layer to edit, any changes you make will be applied to the whole image, rather than one area, saving you time and effort.
Top tips
- Look out for shadows – a shadow on the ground around the subject will make editing far more complicated, as you’ll have to edit both the subject and their shadow, giving you twice as much work (and a massive headache!)
- Be conscious of how far away you are – getting close can be a good way of capturing the action, but can present problems when shooting. The closer you are, the further apart the subject will be in each of the photos. It’s like when you look out the window of a moving car – the closer you look, the faster things seem to be moving. If you look at an object in the distance, it seems to be moving much slower. If you want to have lots of photos in your sequence, get further away and zoom in.
- This technique takes plenty of trial and error, and sometimes you won’t realise something hasn’t worked until you get home and start editing. Try practising at home if you’re unsure, and remember to do as many as you can “on the day” to maximise the chances of getting a great sequence
Author’s Bio: Tom Jeffries is an ambitious content writer and photographer. He used the techniques outlined above to shoot some of the photos used in his book, BMX Racing. For more information on photography, see Plusnet’s blog post about it here.


