Ever see those photos that look impossibly sharp? How about ones that have zero blur and are sharp throughout, even when its a macro closeup of an object that would be impossible to capture without a huge amount of light?

In this article I will tell you the secrets behind a technique called focus stacking, which is not difficult to do, and how you can perform it manually without fancy expensive gadgets. We will also look at automatic and semi-automatic methods.
Manual focus stacking has been a technique in the world of photography for many years. As new camera hardware and software became available over time, however, it has become much easier and quicker to accomplish.
For fully manual focusing stacking, you take several photos of a scene varying the focus and then lay them on top of one another using a free or paid photo editing program. Alternative methods include automating the image acquisition process or the stack editing process. Read on.
Are You Ready To Manual Focus Stack?
Although it may sound like a complicated and unnecessary process, don’t be fooled. Manual focus stacking is an important and useful photography technique that any serious and dedicated photographer should know how to do successfully. It can be useful in macro photography, landscape photography, architectural photography and even portrait photography.
Manual focus stacking involves talking several photos of a frame with a slight variation in focus between them based on objects in the view such as foreground, midground and background and then using post processing to create en enhanced, sharp depth of field not present in the original photos.
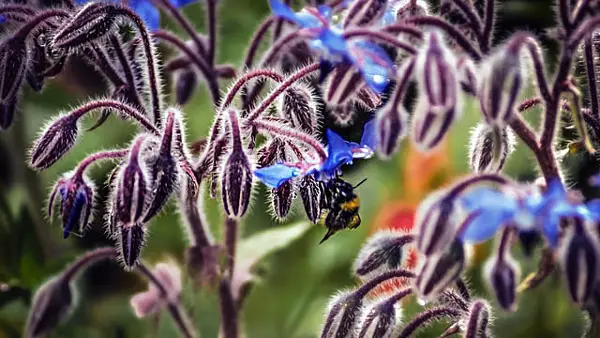
The result of manual focus stacking is a detailed, sharp and crystal clear photograph of a selected object or location. As well, another result that is gained from manual focus stacking is the final photograph presenting that selected object or location in a greater depth of field view.
Another cool thing about manual focus stacking is that you can choose which item in the photograph you want to make center stage. In manual focus stacking you can highlight one object to show its importance or beauty by blurring out the other details in different areas of the photograph.
Manual Focus Stacking- Pros?
Manual focus stacking is an important photography skill that every serious and dedicated photographer should know how to do. Here are the pros of manual focus stacking;
-
- Manually focus stacked photographs have more detail
-
- Manually focus stacked photographs have a greater depth of field
-
- Manually focus stacked photographs are crystal clear
-
- Manually focus stacked photographs have fine lines
-
- Manually focus stacking photos allows you to control how your photograph will turn out more than with automatic focus stacking
-
- Manually focus stacking photographs will let you practice you photography skills
-
- Manually focus stacking photographs can help you develop and learn your editing skills.
-
- Manually focus stacking photographs will help you learn how to use your specific camera model.
-
- Manually focus stacking photographs will help you get familiar with your digital editing software.
Manual Focus Stacking
So how do you do manual focus stacking? The process of manual focus stacking may seem complicated and long at first. However, this isn’t the case at all. Manual focus stacking is an easy and quick photographic process that anyone can learn, regardless of their photographing ability and knowledge.
The process of manual focus stacking requires two separate steps. The first step in the process of manual focus stacking is to take pictures of the selected object or location. The second step in the process of manual focus stacking is to combine the previously taken photographs into one final image in a photograph editing software program. Here, in more detail, is a step-by-step guide on how to do manual focus stacking.
Manual Focus Stacking Image Acquisition
The first step in the process of manual focus stacking is to take pictures of the selected object or location.
1. Select the chosen object or place that you will use for your photograph
2. Make sure you have all the necessary camera gear and equipment that you need to take your photograph.
3. Place your camera on a sturdy platform. This platform shouldn’t wiggle or shift. This platform could be a tripod, which is the best option, or any stable base that can securely hold your camera. You should be able to position your camera in any way that you like on this platform.
4. Select a constant exposure level for your chosen object or place that you will use for your photograph. Set your aperture to a value of f8 for example. All images need to be taken at same aperture, shutter, iso, zoom setting.
5. Set your camera to the ‘manual mode’ setting. If you are unsure about how to set your camera to the ‘manual mode’ setting, read your camera’s unique manual as every camera is different.
6. Set your camera to the ‘Live View’ setting. If you are unsure about how to set your camera to the ‘Live View’ setting, read your camera’s unique manual as every camera is different.
7. Adjust your camera’s view accordingly
8. Adjust the focus point on your camera to focus on an object in the frame close to the camera. Please note that you will have to do this by using your camera’s ‘manual focus’ setting in conjunction with your focus ring
9. Take a photograph of your selected object or location
10. Don’t move your camera. Instead, using your camera’s ‘manual focus’ setting in conjunction with your focus ring, shift your camera’s focus point to the next farther object. This different location should be slightly farther away from your first focus point
11. Take a photograph of your selected object or location
12. Repeat steps 8, 9, 10, and 11 as many times as you need to or as you want to
Thats it for the photo stack acquisition process! If you want to automate it, read the sections farther down for methods.
Now on to processing your photo stack…
Manual Focus Stacking Image Stack Processing
Processing can be done by various methods. Lets start with the steps for manually processing in some common photo editing programs.
Manual Focus Stacking In Lightroom
1. Open lightroom
2. Adjust exposure etc if something looks off (use same settings on each image)
3. Sharpen photos if needed using a filter
4. Open all your photos as new layers in the same image
5. Name each layer based on location of image in your stack, ex. foreground, midground, background or number them
6. Move layer order so background layer is on top in list of layers
7. Select all the layers
8. Select edit/auto align, choose auto for projection type (layers may get a little shifted during the process)
9. Crop them so one image doesn’t stick out past others on edges
10. Go to background layer and click add layer mask
11. With mask selected, use black color brush (make hardness 50%) to paint over areas of that layer you dont want to keep (since its called background paint over foreground areas using black on mask layer)
12. Next go to midground layer and paint over areas that should not be in midground
13. Next go to foreground layer and paint over areas not in foreground
14. When you finish with all your layers, you will see in your image everything is nice and sharp
15. If an area is still out of focus, go to corresponding layer and use white color brush to paint over black color in that layers mask (as you do this, those areas should become sharp)
16. When done, select all layers when done, RMB and choose flatten image
Manual Focus Stacking In Photoshop Using Masks
1. Get your photos off your camera
2. Upload your photographs to your computer. Open Photoshop.
3. Do File/Scripts/Load files into Stack or load all photos by hand into separate layers in one file.
4. Select all layers and go to Edit/Auto Align Layers and leave defaults
5. If layers move, you can select area without images sticking outside and trim the image
6. Name each layer based on location of image in your stack, ex. foreground, midground, background or number them
7. Move layer order so background layer is on top in list of layers
8. Go to background layer (farthest away from camera) and click add layer mask
9. With mask selected, use black color brush (make hardness 50%) to paint over areas of that layer you dont want to keep (since its called background paint over foreground areas using black on mask layer)
10. Next go to midground layer and paint over areas that should not be in midground
11. Next go to foreground layer and paint over areas not in foreground
12. If an area is still out of focus, go to corresponding layer and use white color brush to paint over black color in that layers mask (as you do this, those areas should become sharp)
13. Select all layers when done and flatten image

Costs of Manual Focus Stacking
I will next describe automated focus stacking for comparison but lets look at the costs of manual focus stacking. For either method you need to own a camera with auto or manual focus, thats a given.
For the manual focus stacking methods described above you need an image editing program. I talked about using Photoshop or Lightroom. These are not the cheapest programs although you can find both softwares in less expensive subscription versions (click here for Photoshop and here for Lightroom).
You also have the option of using a completely free image editing program like GIMP. You just need to figure out how to perform the same operations mentioned in the steps above.
Automatic Focus Stacking (in Photoshop)
Below is a method for a more automated focus stacking. Keep in mind that the program will not always get things perfect this way and you may need to use the more manual method described earlier.
1. Using a manual focus lens, focus on object closest to camera
2. Take a picture
3. Keep adjusting the manual focus ring slightly as you move focus farther back from camera
4. Take photo at every change
5. Open Photoshop
6. Do File/Scripts/Load files into Stack
7. Select all your layers/photos
8. Do Edit/Auto Blend Layers with Stack Images option turned on. This automates the masking process.
9. Flatten your image or export
Fully Automatic Focus Stacking?
If the described process for manually focus stacking is too long for you and you don’t mind spending some extra money, you have other options. These options have to do with the first part of the focus stacking process- the focus selection and image acquisition.
The Camranger for example is a hardware device and software app you connect to your camera which does the work of taking focus stack photos for you and figuring out the number of photos needed. It does not do everything for you but it saves you some time.
Below is a video of what you would have to do following capture of your photos with the device:
Other more automated focus stack acquisition methods include automated focusing rails such as the one by StackShot.
Heliconsoft sells several products to automate focus stacking, such as Helicon focus program, Helicon remote control, and Helicon extension tube.
Other Focus Stacking Methods
Other ways of focus stacking exist depending on your field. You can research these if you are looking for another method or just want to learn about the process at the links below:
-
- Using Slabberjockey
To Zoom Out…
There you go. This has been an article on everything you need to know about manual focus stacking as compared to semi automatic and automatic focus stacking.
Taking crystal clear, in-depth, detailed photos people will enjoy is the basic goal of every serious and dedicated photographer. This can be accomplished by learning how to do manual focus stacking.
Click the following link to learn the importance of focus.


1 comment