Have you ever gazed up at the night sky, mesmerized by its glittering expanse, and wished to capture that magical sight with your phone? The ethereal beauty of starry skies can seem elusive when it comes to photography. Your mobile device is more able than you think it to be.
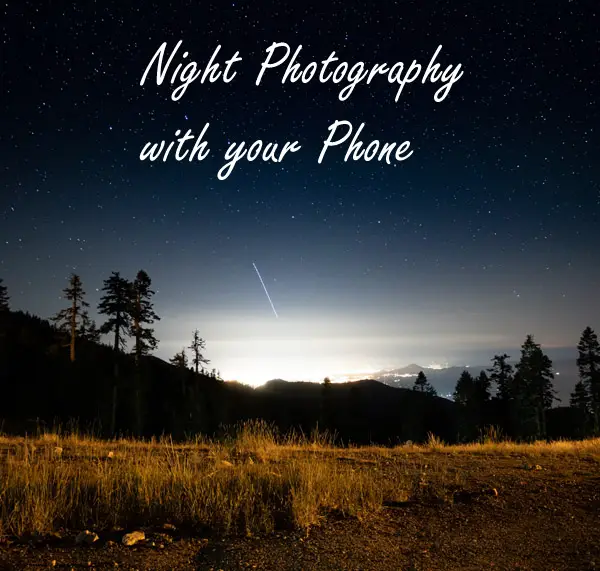
In fact, armed with some simple tips and tools, you could be capturing incredible images of the cosmos right from your backyard. Imagine having stellar snapshots as memories of night-time adventures or quiet moments under twinkling stars!
This journey into night sky photography with a phone will let us peek into shutter speed mysteries, learn about exposure settings in low-light conditions and even dive deep into capturing celestial events like meteor showers! So grab your phones because we’re about to turn them into powerful astrophotography devices. Are you ready?
Understanding Night Sky Photography with Phones
Capturing the beauty of the night sky on a smartphone might seem challenging, but it’s possible. Armed with some knowledge about light conditions, shutter speed, and long exposure settings, you can transform your night sky photography.
The Science Behind Star Trails
Ever wondered why stars appear to streak across your photos when shooting at night? That’s due to Earth’s rotation. As our planet spins on its axis, stars move across the sky creating what we call star trails in long-exposure photographs.
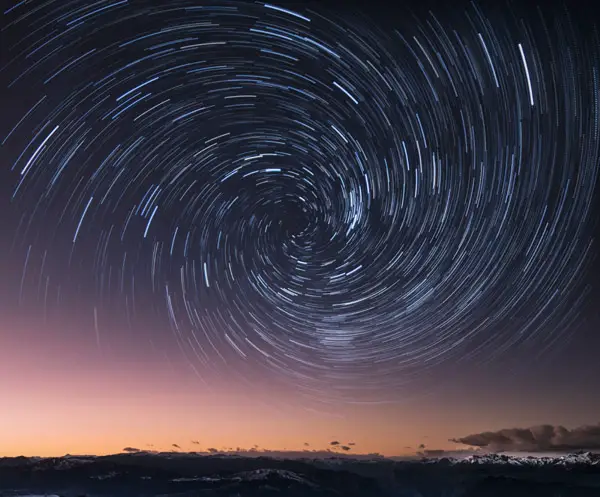
A fascinating fact is that if you aim your camera towards Polaris or North Star, you’ll get concentric circles instead of straight lines as this star remains almost stationary.
Understanding Light Conditions for Night Sky Photography
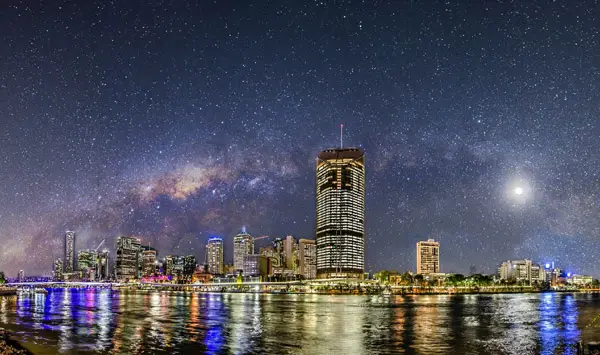
Nighttime isn’t just about darkness; different light conditions significantly impact how well we capture celestial wonders. A clear moonless night offers ideal lighting for observing fainter objects like galaxies and nebulae because there’s less light pollution.
- To photograph brighter planets or the Moon itself without them appearing overexposed against a dark background – twilight hours (just after sunset or before sunrise) work best.
If city lights are causing issues by washing out dimmer stars in your frame – try heading out into rural areas where skies are darker. Note: Regardless of location always make sure there aren’t any artificial sources of light nearby as they can lead to unwanted glare in pictures.
It may surprise many budding photographers that their everyday smartphone has enough potential under its hood to take mesmerizing shots of cosmic phenomena. But keep expectations realistic – while a smartphone camera can yield decent night sky photos, it might not match the quality of those taken with high-end DSLRs. A long exposure shot on a phone would need a tripod or stable surface to avoid distortion.
Choosing Your Equipment for Night Sky Photography
To capture the night sky’s beauty with your phone, you’ll need more than just a clear night and enthusiasm. The right equipment can make all the difference in your astrophotography journey.
Selecting Your Smartphone for Astrophotography
The first piece of gear to consider is, naturally, your smartphone. Flagship smartphones are typically equipped with advanced camera features suitable for astrophotography.
If you’re an Android user seeking out stars trailing across the dark canvas above, options like Google Pixel stand out due to their superior low-light capabilities. However, iPhones have also made significant strides in this area recently thanks to artificial intelligence enhancements.
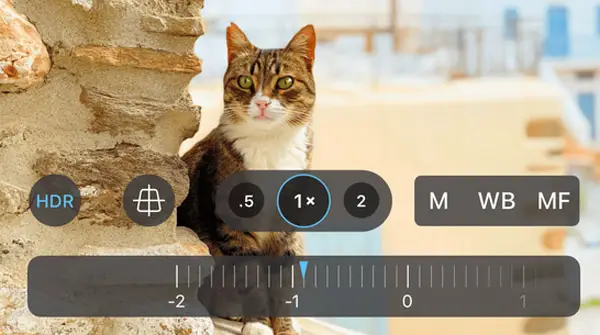
When selecting a smartphone specifically for astrophotography purposes though, there are two key features to look out for: manual controls and ‘night mode’ capabilities.
The Importance of Stability
No matter how steady you think your hands might be under starry skies or city lights alike—believe me when I say—a tripod is essential. This tool helps eliminate camera shake which often leads to blurry images during long exposure shots (which we love using). Using a tripod makes sure that those beautiful stars aren’t blurred into indistinct streaks across your photos.
Here are some compact yet sturdy smartphone tripods.
Smartphone Holders and Adapters
Afocal photography, a method where your smartphone’s camera is aligned with the eyepiece of a spotting scope or telescope to capture incredible images, can be an exciting venture for night sky enthusiasts. For this technique though, you’ll need an afocal adapter that allows your phone to sit securely over the eyepiece.
Exploring Additional Tools
While these basics are essential for any aspiring astrophotographer, there are additional tools that might make capturing star-studded skies even more enjoyable. For instance, a remote shutter for a smartphone can help minimize physical contact with your device during long exposure photographs—a game-changer in preventing unwanted movement.
Leveraging Camera Apps for Better Results
Unlocking the full potential of your smartphone camera for night sky photography is easier than you think. It’s all about understanding which apps to employ and how they can boost your outcomes.
Professional camera apps like Camera FV-5 and ProCamera give manual controls, taking you beyond the standard ‘auto’ mode that most phones offer.
You see, auto settings may work well during daylight hours, but at night? They tend to struggle with exposure times and ISO settings – key components when shooting stars or celestial bodies. That’s where these pro-level applications come into play.
In essence, these camera apps act as a bridge between limited phone functionality and DSLR-like control over photographic elements. Let me tell you more about this…
A Deeper Dive into Professional Camera Apps
Manual Mode: This feature lets photographers adjust shutter speed (exposure time) according to their needs – something extremely beneficial when capturing moving objects like stars across the night sky.
‘Night Mode’: This specialized setting adjusts the color balance in low-light conditions resulting in clearer images with less noise. You’d be surprised by what difference it makes.
Capturing The Stars With Pro-Level Precision
An app I’ve found particularly useful is Camera FV-5. It offers extensive manual controls and a unique ‘Long Exposure’ mode perfect for capturing star trails.
Mastering Manual Mode for Night Sky Photography
The night sky, with its twinkling stars and sweeping galaxies, offers a vast canvas to photographers. Yet capturing these celestial wonders on your smartphone can be tricky. One key is understanding how to use manual mode effectively.
Unlock the Power of Your Smartphone Camera
Your smartphone’s camera may not seem like an obvious choice for astrophotography but don’t underestimate it. The built-in cameras in phones today have advanced significantly, allowing you to capture stunning night sky photos.
To get started with manual mode, first find this setting on your phone’s camera app. This will give you control over exposure settings including shutter speed and ISO levels – crucial components when shooting under low-light conditions.
Fine-Tuning Exposure Settings
In photography terminology, ‘exposure’ means the sum of light that strikes your camera’s sensor. Too much light results in washed-out images; too little leaves them dark and grainy.
In night sky photography where lighting is minimal, adjusting exposure settings becomes paramount. A higher ISO value increases sensitivity to light while longer exposures allow more time for faint starlight to reach the sensor. Note: Long exposure photographs can result in beautifully captured star trails.
Tackling Shutter Speed and ISO Levels
Achieving the right balance between shutter speed and ISO level takes some practice as both are interdependent: a faster shutter speed requires a higher ISO level or else images turn out too dark; likewise lower shutters speeds mean less need for high sensitivities.
- Briefly speaking, ‘Shutter Speed’ determines how long the camera sensor is exposed to light. A slow shutter speed allows more time for capturing light, ideal for night sky photography.
- The ‘ISO Level’ affects the sensitivity of your smartphone’s camera sensor to incoming light. Higher ISO levels can help you capture images in darker conditions but may introduce ‘noise’ or graininess into your photos.
Trial and Error – Your Best Friend
Astrophotography is no simple feat, requiring skill, dedication and a passion for the stars. It’s a skill that demands patience, precision, and passion for celestial bodies.
Avoiding Common Pitfalls in Night Sky Photography
Shooting the night sky can be exciting, yet it is simple to slip into some common mistakes. But don’t worry; with a bit of guidance, you’ll steer clear of these pitfalls and capture stellar images.
Avoid Flash and HDR for Better Night Sky Photos
When we’re shooting under low-light conditions like those found during nighttime photography sessions, our instinct might tell us to use flash or High Dynamic Range (HDR) settings. Despite the temptation, it’s not recommended to use flash or HDR when taking photos of the night sky with your phone.
The flash feature on your phone isn’t designed for long-distance illumination – it won’t reach stars millions of miles away. Instead of illuminating distant celestial bodies as one might hope, using flash often results in overexposed foregrounds while leaving the stars darkened. Therefore, avoid using flash when photographing the night sky.
The same rule applies to HDR mode too – remember that HDR works by combining multiple exposures, which could blur moving objects like stars due to earth’s rotation between shots.
Say No To Digital Zoom For Quality Images
Digital zoom seems tempting since getting closer to those glittery dots seems desirable. ‘The more magnified they are,’, you may think, ‘the better.’. This is another pitfall many new photographers tumble into without realizing its impact on their starry skies captures.
In reality though, digital zoom should also be avoided. It simply enlarges pixels rather than providing true optical magnification, resulting in grainy or pixelated images. So for clearer night sky photos, resist the temptation to zoom in digitally and instead try moving your phone closer if possible.
Manual Mode is Your Best Friend
While auto mode might seem like an easy route when you’re starting out with night sky photography, it often doesn’t yield the best results. That’s because automatic settings may not adequately adjust for dark skies filled with twinkling stars.
When you switch to manual mode, it gives you the power to adjust important elements. These include exposure time and ISO levels, letting you truly customize your shot.
Advanced Techniques for Night Sky Photography
The allure of the night sky is irresistible, but capturing its beauty on your phone can be tricky. Let’s elevate your smartphone astrophotography game by jumping into advanced techniques like photographing noctilucent clouds and northern lights.
Capturing Noctilucent Clouds
Noctilucent clouds are rare atmospheric phenomena that occur at high altitudes during twilight hours. They’re elusive subjects to capture due to their fleeting nature, so patience is key here. Start by finding a location with minimal light pollution and set up your tripod – it’s crucial for eliminating camera shake.
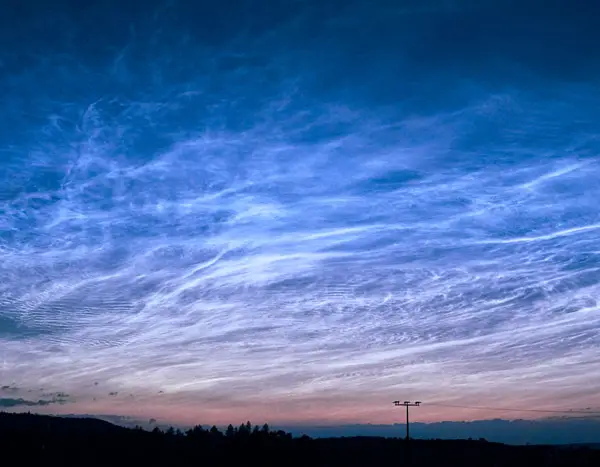
Your smartphone camera settings need adjustments too. Use manual mode if possible and tweak ISO levels to minimize noise reduction without sacrificing brightness. NightCap Pro, an app designed specifically for low-light conditions, could be helpful in this scenario.
Photographing Northern Lights With Your Phone
The spectacle of aurora borealis or ‘northern lights’ might seem out-of-reach for phone photographers, but don’t let that deter you. It’s all about being prepared and knowing how best to use what you’ve got: namely a decent Android smartphone or Google Pixel (known particularly well-suited due its AI-assisted photography).
A third-party app such as Camera FV-5 Lite lets you control exposure time—crucial when dealing with unpredictable lighting situations like these.
To avoid star trails caused by Earth’s rotation during long exposures while shooting northern lights, remember this simple tip: keep the shutter speed under 20 seconds.
Using the Right Equipment
Beyond your phone, additional gear can make a significant difference. A small tripod or an afocal adapter to connect your phone to a spotting scope are great additions. For remote shutter control and thus avoiding unwanted shake during shooting, consider using Bluetooth headphones with volume buttons.
Capturing Meteor Showers and Other Celestial Events
When it comes to night sky photography with a phone, meteor showers present an exciting challenge. Waiting can be a key factor in taking amazing pics of the night sky, since meteor showers don’t always take the same route through it.

To get started, one crucial thing you’ll need is patience. Meteor showers are not like star trails; they don’t follow a predictable path across the night sky. So be prepared to spend a good amount of time gazing upwards.
Finding the Perfect Spot
Your location plays a key role in your ability to photograph meteor showers effectively. Aim for places with minimal light pollution – away from city lights or populated areas – as this will allow the stars and meteors to shine brighter against the darkened backdrop of space. This guide provides great tips on where best to view events such as the Lyrid meteor shower.
You also want an open area that offers wide views of the night sky without obstructions like tall buildings or trees blocking your view.
The Right Tools Make All The Difference
A sturdy tripod is essential when shooting long exposure shots needed for capturing meteor streaks across the sky, while reducing camera shake which could result in blurry images.
In addition, using smartphone astrophotography apps can greatly improve results by giving more control over camera settings such as shutter speed and ISO levels than typical smartphone cameras offer natively. Camera FV-5, for example, is an excellent choice for Android phones.
Mastering Your Technique
Capturing meteors with a smartphone camera requires long exposure times to allow as much light in as possible. This means setting your shutter speed anywhere from 10 to 30 seconds and adjusting the ISO levels accordingly to avoid noise reduction issues that can degrade image quality.
One important tip: try not to use flash or digital zoom while capturing meteor showers.
Post-Processing Your Night Sky Photos
You’ve spent a night under the stars, snapping away with your smartphone. Now you’re left with a gallery full of potential masterpieces that just need some refining.
The Magic of Editing Apps
A good photo editing app can help you take your night sky photos from ordinary to extraordinary. Adobe Lightroom is renowned for its noise-diminishing capability, which makes it a must-have when attempting to reduce graininess in low illumination settings. On the other hand, apps like Photo Lab Pro let you play around with ‘light painting’ effects and create stunning edits.
Capturing RAW Images: A Little More Work but Worth It.
If your phone supports it (many android phones do), try shooting in RAW format rather than JPEG. This might require using third-party camera apps such as Camera FV-5 or Manual Camera, which offer this functionality along with advanced controls over exposure settings and shutter delay – critical elements while photographing starry skies.
This gives more flexibility during post-processing because RAW files retain much more detail compared to compressed formats like JPEGs – particularly useful when trying to capture raw beauty of celestial bodies above us.
Nailing Noise Reduction without Losing Detail
Noise can be one of the biggest hurdles in night sky photography phone images due to high ISO levels often required by dark environments. Effective noise reduction is all about balance. Go too far with noise reduction and the details in your starry skies could be lost, but not going far enough can result in distracting noise. Most editing apps offer a slider for noise reduction – start low and slowly increase until you find that sweet spot.
Boosting Brightness with Curves
Ever notice how your night sky photos sometimes look brighter on your phone screen than they do once you’ve downloaded them? That’s where curves come into play. This powerful tool allows for precise control over the brightness levels of different areas of an image without affecting others. In simple terms: it lets parts of your picture stand out more while keeping other parts dark – helping stars to pop against the darkness.
FAQs
Can I do astrophotography with a phone?
Absolutely, your smartphone is capable of capturing the night sky. Just make sure you’re using manual settings and long exposure times.
How do I take pictures at night with my phone?
To shoot nighttime photos, switch to ‘night mode’ if available, stabilize your device on a tripod or surface, and use long exposures.
What is the best phone for taking pictures of the night sky?
The best phones are those that have advanced camera features like manual controls and high-quality sensors such as flagship iPhones or Pixels.
How to take pictures of the night sky with an iPhone?
You can capture stellar shots by using ‘Night Mode’, stabilizing your iPhone on a solid base, turning off flash and adjusting focus manually.
Conclusion
You’ve journeyed through a universe filled with practical tips and insights. The mysteries of shutter speed, light conditions, and long exposure settings? Unraveled.
You discovered how your smartphone camera can capture celestial wonders like star trails or meteor showers. Tools such as tripods became essential allies in this cosmic adventure. You found out that professional camera apps offer manual controls for better results.
The pitfalls to avoid were identified – remember no flash or digital zoom! You delved into advanced techniques for capturing phenomena like noctilucent clouds or northern lights.
So now it’s time to apply what you learned: step outside under the starry skies, whip out your phone, and create stunning night sky photos! Click the following link for the ultimate guide to low light photography.


