Imagine standing before a canvas of sky, your camera in hand as the sun dips below the horizon. That’s where my journey with silhouette photography began.
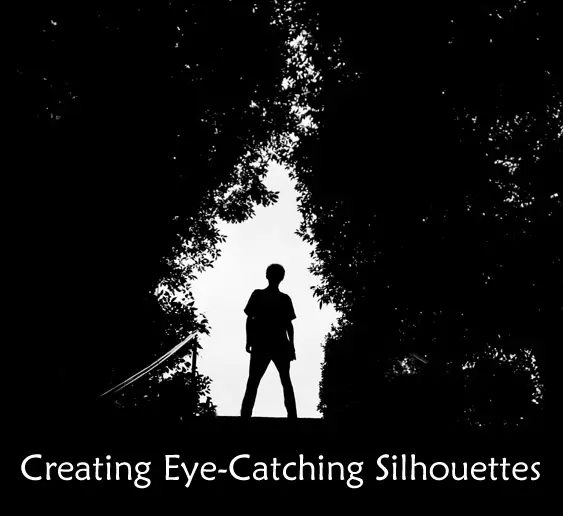
I learned early on that these shots are more than just pictures; they’re stories waiting to be told. They convey drama and emotion through stark contrast and simplicity.
In this piece, you’ll learn how to harness light sources like that dipping sun, tweak your camera settings for those crisp silhouetted subjects against bright backgrounds, and tap into post-processing tricks to polish off each shot. By the end, capturing gorgeous silhouette portraits or creative landscape outlines will seem less like luck—and more like second nature.
The Essence of Silhouette Photography
Silhouette photography, a dance between light and shadow, turns the ordinary into the extraordinary. It’s where photographers play with exposure to cast their subjects in mystery, reducing them to nothing but intriguing outlines against a bright background. What is silhouette photography if not the art of transforming the mundane into silhouetted poetry? This genre captivates because it strips down its subjects to their most basic form—a dark shape—allowing viewers’ imaginations to soar.
The silhouette is an old art form, said to have been named after Etienne de Silhouette, Louis XV’s finance minister. Apparently, he was so stingy that anything cheap, including portraits, were labeled “a la Silhouette.” Silhouettes became very popular in the 18th century but went out of fashion after the invention of the daguerreotype, an early form of photography. And now here we are, creating silhouettes with our digital cameras. Ain’t life grand?
Defining Silhouette Photography
A silhouette is simply a dark outline filled with a solid color, usually against a light background. You might think that creating these types of images with your camera is a difficult or highly technical task. Well, you’d be wrong.
A stunning silhouette captures more than just an outline; it seizes emotion and narrative without revealing all. Why is silhouette photography popular? Perhaps because every blackened figure or object can tell a thousand stories, each unique to whoever gazes upon them. The creative potential of silhouette photography lies in this very enigma—it doesn’t show us life as it is but rather as we feel it could be.
To master such powerful imagery requires understanding why our eyes are drawn toward these stark contrasts—the human mind loves puzzles and filling in blanks which silhouettes offer.
Essential Gear for Crafting Silhouettes
Imagine stepping into the world of silhouette photography, where your gear is like a key unlocking doors to realms filled with stark contrasts and dramatic outlines. To get you there, let’s talk about the essential equipment that will elevate your game in crafting those stunning silhouettes.
Selecting Your Camera and Lens
The heart of silhouette photography lies in choosing the right camera for silhouette photography. A perfect camera serves as a faithful companion on this creative journey. Whether it’s capturing an intimate portrait silhouette or freezing motion in street photography, having recommended lenses for capturing silhouettes can make all the difference between good and great silhouette photos.
For starters, a camera with manual mode is crucial when automatic exposure won’t cut it. Manual mode gives you full control over shutter speed, aperture priority settings – both play a pivotal role when shaping light around your subject sharp against brighter backgrounds.
Lenses are just as vital; they shape how we see our subjects within their environments—choosing one with versatility ensures that whether photographing silhouetted figures holding hands against an early morning sky or creating interesting silhouette shapes at dusk, every shot comes out perfectly exposed.
Digital Cameras: The Foundation of Your Toolkit
A digital camera capable of shooting in RAW format lets you capture more details—an advantage when editing program time rolls around later. It also helps ensure that lighting conditions don’t leave your images too dark or washed out by providing flexibility during post-processing to adjust exposure levels until they’re just right.
Lenses: Capturing Contrast & Clarity
Your lens choice should be guided by personal preference but here’s something worth noting: larger apertures (smaller f-stop numbers) create shallow depth fields which help keep focus subject sharp while blurring everything else away into obscurity—a useful trick if you want only the recognizable shape standing out from its bright background.
Tips on Picking Lenses:
- A wide-angle lens captures expansive landscapes offering plenty room for creativity with compositions;
- a telephoto zoom allows isolation particular features scenes making them pop even further contrasted backdrops;
- a fast prime lends itself well low-light situations keeping noise minimum preserving detail shadows highlights alike without need excessive photo editing afterwards.”
So there you have it—the basic building blocks required before venturing forth onto new visual quests armed nothing but shadow light. Remember though always test different combinations find what works best because end day most powerful tool disposal isn’t gadget bag—it’s own unique vision artistry manifest through photographs taken along way.
Mastering Camera Settings for Silhouette Shots
If you’re looking to add some drama and intrigue to your photos, silhouette photography is the way to go. But it’s not just about finding a bright background and hoping for the best—your camera settings play a crucial role in nailing those striking silhouettes.
Manual Mode vs. Auto Mode
In auto mode, digital cameras make all the decisions for you, which can be great when time is tight or conditions change quickly. But let’s face it: automatic exposure often gets flustered by high contrast scenes like silhouettes. To capture gorgeous silhouettes consistently, switch over to manual mode where you call the shots on shutter speed, aperture, and ISO.
Taking control means you decide how much light hits your sensor—a must when creating that perfect dark silhouette against a brighter background. With manual mode engaged, get ready to become an exposure compensation ninja as well.
Understanding Exposure Levels for Silhouette Photography
To convey drama with every silhouette shot requires understanding of exposure levels more than anything else. Here’s where things get spicy—you want your subject underexposed while keeping that bright backdrop properly exposed without blowing out details.
This balancing act begins with setting your metering around the sky or another light source instead of the subject itself—this lets them fall into shadow while preserving detail elsewhere. If we’re talking early morning or late afternoon sunlight (hello golden hour.), try using exposure bracketing if precision matters most; this captures multiple shots at different exposures so one will surely hit sweet spot.
Aperture Priority Mode for Controlling Depth of Field in Silhouettes
Sometimes playing it safe pays off too though—if fiddling with full manual intimidates you initially then aperture priority might be your new BFF here because controlling depth of field helps keep subjects sharp even when they are just outlines. This handy semi-automatic option lets photographers choose their desired f-stop (aperture) while leaving other variables up to our smart little friend—the camera body—to sort out based on current lighting conditions.. So yes – small apertures yield sharp backgrounds but remember wider ones create bokeh magic if blurring isn’t what scares away viewers…
Remember friends: practice makes perfect. Whether opting for fully manual controls versus semi-auto modes such as aperture priority comes down to personal preference—and maybe a bit of trial and error—but once you’ve dialed in these techniques, shooting silhouettes will become second nature quicker than you can say ‘cheese’…or should we say ‘silhouette’? Keep experimenting until each photo editing session ends with fist pumps in the air because that’s when you know you’ve nailed it.
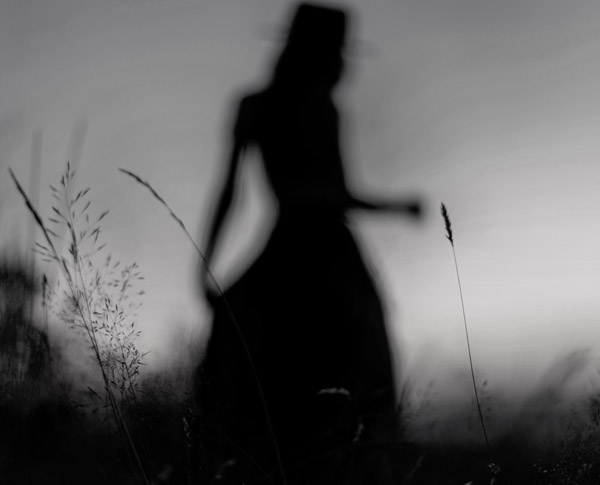
Techniques to Capture Stunning Silhouette Images
The trick to creating silhouettes comes from an understanding of how your camera calculates exposure. The light meter in your camera doesn’t know anything about the scene in front of it except how much light is shining through the lens. That light is analyzed and measured and shutter/aperture settings are calculated. This works best if the lighting in your scene is even. But if the scene has very bright areas and very dark areas then it doesn’t do so well and will often underexpose your subject (making it too dark). This is one of the reasons for the advice to keep the sun at your back when shooting photos.

is all it takes to make a great silhouette.
1/640s @ f/13
How can you take advantage of this to make a silhouette? The simplest way to make one is to place your subject in front of a very bright background. This could be anything from a bright, cloud-filled sky to the sunset to a window with sunlight streaming in. The brighter the background the better. This mixture of bright background and darker subject will confuse the camera’s light meter — exactly what we want. Make sure your camera is not in portrait mode, zoom out or take a few steps back to make sure the bright background is included in the scene along with your subject, and then shoot. It’s as simple as that. The reason for not wanting portrait mode for this type of shot is that sometimes portrait mode will activate a different kind of light reading that disregards light from the edges of the frame (called “center-weighted” exposure).
To really boost the effect, you can use your camera’s “exposure lock” feature. Many cameras allow you to “lock” the exposure from one subject, recompose on a different subject, and then shoot the photo. Cameras that have this feature usually allow you to do this by simply holding the shutter half-way down. Other cameras might have a separate button to temporarily lock the exposure. Here’s how you use it: point the camera at the bright background so that it fills the frame. Now lock the exposure. Then, recompose to include your subject and the background together and take the photo. Since the exposure was locked on the bright background, the camera will expose the background correctly and underexpose the subject, often making a perfect silhouette.
1/800s @ f/5.6
Full-body portraits and faces in profile make good subjects and shooting them in this way can be a lot of fun. One final tip: when your family and friends are “oohing and ahhing” over your artistic silhouettes, don’t forget to let them believe that they were very difficult to make.
Utilizing Natural Light
Silhouette photography turns the ordinary into the extraordinary, and natural light is your best ally in this transformative process. Think of it as nature’s studio lighting—it’s not just free; it’s also versatile. To capture gorgeous silhouettes, position your subject between you and a bright background, such as during early morning or late afternoon when the sun paints the sky with golden hues.
The trick lies in finding that sweet spot where sunlight backlights your subject without overwhelming your camera sensor. When done right, you can create silhouette photos where figures are reduced to their most basic form—a dark shape against a brighter background—tapping into our innate love for mystery and drama.
To really make those silhouetted subjects pop, use exposure compensation if shooting in priority mode or adjust exposure manually for more control over how much detail is retained within those intriguing outlines. A correctly exposed backdrop coupled with an underexposed foreground will let you shoot stunningly sharp backgrounds while keeping your main interest cloaked in shadowy intrigue.
Composition Strategies
Framing is crucial—you want viewers to say “Wow.” not “What am I looking at?” Whether photographing silhouettes of people holding hands against a sunset or capturing wildlife shapes set against undulating hillsides, composition plays a crucial role in conveying emotion and story through these visual contrasts.
A good silhouette photo invites us into its world by using recognizable shapes which immediately convey meaning—an arching tree branch or two lovers embracing tell stories without words—and creating striking compositions requires keen attention to both space around subjects (negative space) and interesting patterns they may create together (positive space).
For instance, try placing solitary figures off-center for added impact using rules of thirds; juxtapose static objects like buildings with dynamic elements like flying birds; experiment by breaking conventions because sometimes asymmetry makes an even stronger statement than balance ever could. Always ensure that there’s clear separation among multiple elements so each retains its distinct identity instead of merging into one blobby mass on screen—after all, we’re aiming for impactful clarity here.
Remember: mastering creative silhouette photography isn’t about owning perfect camera gear but understanding how different settings affect what gets captured inside that frame.
With practice comes proficiency; before long, manual mode will become second nature allowing full artistic freedom whether crafting minimalist portrait silhouettes filled only by soft contours defining human expression from afar—or intricate landscapes featuring layers upon layers contrasted details telling tales as old time itself… Let imagination lead the way towards crafting something truly unforgettable.
It’s all about playing with shadows cast across the canvas. We explore how light and dark create depth, bringing life to images.
Post-Processing Silhouette Imagery
You’ve framed the perfect silhouette against a fiery sunset or a cityscape bathed in twilight. But before you share that stunner with the world, let’s give it some post-processing love to really make it pop. Trust me, this is where good becomes great.
Choosing the Right Editing Program for Silhouette Photography
Picking an editing program can feel like ordering at a gourmet burger joint—overwhelming but oh-so-satisfying once you get it right. For silhouettes, Adobe Photoshop and Lightroom are your best bets; they’re versatile enough to handle anything from subtle tweaks to major overhauls on your shots.
If you want more of a one-click wonder solution though, apps like Snapseed or VSCO come packed with filters and basic tools that can quickly up your silhouette game without too much fuss.
Enhancing Contrast and Exposure in Silhouette Images
A dark subject against a bright background—that’s what we’re after here. To achieve this striking look, play around with contrast sliders until your subject is as dark as midnight coffee while still keeping those background details crisp enough to tell their own story.
Sometimes all you need is a nudge on the exposure compensation dial; other times, exposure bracketing might be necessary when lighting conditions were less than cooperative during shooting time.
Cropping and Straightening for A Polished Silhouette Picture
No one wants their horizon line crooked unless they’re trying to convey drama—or had one too many coffees. Use gridlines for guidance because even if everything else in photography bends rules sometimes—a straight horizon isn’t negotiable (unless artistically intentional).
Cropping isn’t just about cutting out photo bombers either—it’s about composition too. If there was ever any doubt whether that random tree branch added or detracted from your shot—now’s the time to decide.
Creative Exploration with Silhouette Photography Subjects
Embarking on a journey through different subjects in silhouette photography is like opening a door to a realm where light and shadow play the lead roles. It’s not just about what you shoot, but how the subject interacts with the backdrop of light that defines its essence.
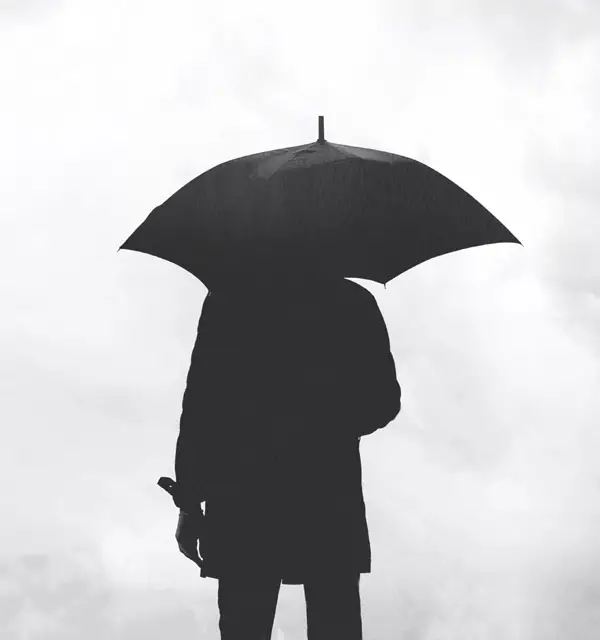
Silhouette Portraits: Capturing the Essence of a Person
The human form makes for one of the most engaging subjects when it comes to silhouettes. Portrait silhouette photography strips down distraction, leaving pure emotion and body language to tell an individual’s story. When shooting silhouette portraits, think less about facial expressions and more about posture and pose; these will convey your subject’s narrative against that brighter background.
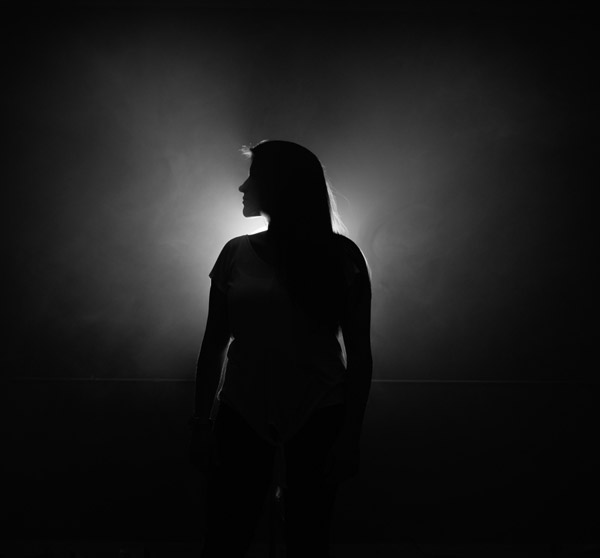
To get those striking portrait silhouettes, set up your camera on manual mode—this lets you control shutter speed, aperture, and ISO settings yourself rather than relying on auto mode which could misinterpret exposure levels due to bright backgrounds. Also consider using exposure compensation or bracketing if you’re battling tricky lighting conditions.
Exploring Different Photography Subjects
Diversity in subjects brings new dimensions into silhouette imagery. From street photography showcasing urban outlines against early morning skies to capturing sharp background details around soft-focused figures—there’s no limit when exploring different photography subjects. Whether it’s people holding hands along a white wall or architectural structures cutting across sunsets; each provides unique opportunities for creativity.
A great tip? Use aperture priority mode when balancing focus between your sharply outlined subject and interesting backgrounds—it gives enough depth without making everything else too blurry or too sharp based on personal preference.
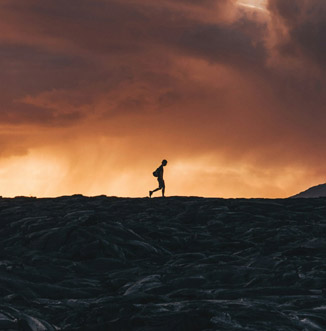
Silhouettes in Nature: Capturing Wildlife & Landscapes
Nature presents endless inspiration for creative silhouette photography—from trees etched against twilight hues to wildlife scenes dramatized by dawn light sources. While photographing silhouettes within nature requires patience (especially if waiting for that perfect animal shot), it pays off by conveying drama inherent in natural environments—a lone eagle soaring before sunrise can embody freedom itself as much as any detailed close-up might attempt.
- Maintaining a good distance between your camera lens and the subject, whether it’s nature or wildlife, is key. This approach keeps the foreground details sharp and allows far-off scenes to stay clear and impactful.
FAQ
What is a silhouette in photography?
A silhouette captures your subject as a dark shape against a lighter background, ditching detail for drama.
How do you take a silhouette picture?
To snap that perfect silhouette shot, aim your camera at the light source behind your subject and adjust exposure.
How do I turn a photo into a silhouette?
Dial down brightness and pump up contrast to morph any regular photo into an intriguing shadowy figure.
What settings should I use for silhouette photography?
Crank up the shutter speed, drop aperture low. Remember: underexpose the main event to get those silhouettes sharp.
Conclusion
Capture the essence, capture the drama. Silhouette photography transforms simple scenes into striking statements of contrast and shape.
Master your tools; master your craft. From selecting the right camera to tweaking settings in manual mode, every choice sharpens your image’s impact.
Compose with intent; compose with creativity. Whether it’s a silhouette portrait or a landscape, how you frame that shot can convey volumes without a word spoken.
Edit with precision; edit for perfection. Use editing programs to fine-tune exposure levels and enhance contrasts, making each silhouette pop against its bright background.
Create with passion; create lasting impressions. With these skills at hand, every photograph you take has the potential to be an iconic work of art—a snapshot that defines both subject and photographer alike. Click the following link to learn how silhouettes have transformed over the years.


0 comments