Photography is one of the most powerful arts of all time. It gives time a meaningful value, some might say even more valuable than memories. Photos can express deep emotional features of places, things, people, and objects. They are part of our legacy to the future generation.
But it’s not all about the future, or the past. It’s about capturing the moment not only with our eyes, but with our hands. Making that awesome day stay alive forever, and being able to review the same moment over and over again. This is what gives beauty to this art. Today, when we are all so caught up in technology and innovative machinery, we forget to take a break, look up, and see the trees, the sunshine, or the people around us. Photography gives us the chance to do it! It takes us out of our shelves and puts us straight into the centre of action.
Although it all sounds like sunshine and rainbows, being a good photographer is a challenging skill to learn and develop. It takes time and a lot of practice, and being “present” all of the time – otherwise, how could you capture all the small details that makes your photos so stunning to view?
Fortunately, this is not a skill you can learn in school. And this is the good part. All you need is a camera, determination, and commitment toward your work. The rest will come naturally.
I know you are here because you want to improve your skills – you are in the right place! Today we are going to talk about photographing moving objects.
Step 1. Exposure Triangle Tips
When we capture moving objects, we have to know how to blur and freeze our subjects. The Exposure Triangle is crucial in the process. Take a look at the following tips on using the exposure triangle to capture movement.
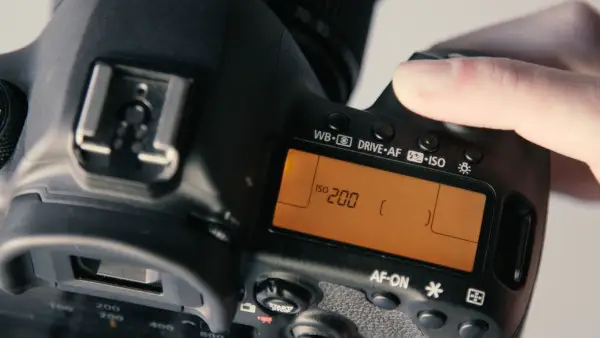
ISO
ISO is the sensibility of your apparatus to light. The lower the ISO number, the less sensitive your camera is to the light. Thus, if you encounter problems when it comes to light sensitivity, reduce the shutter speed or the ISO. ISO is strongly dependent on the other 2 components of the exposure triangle – if you increase ISO, the aperture and shutter speed go down to keep balance.
Aperture
Camera has to be set on TV (lets you specify a shutter speed and leaves the camera to figure out everything else) mode in order for you to be able to use the shutter speed setting by itself. If there is too much light coming in, switch to manual mode and set the aperture value higher. To keep the correct exposure, use a larger aperture when you capture movement.
Shutter speed
Shutter speed is the length of time the shutter stays open. It determines if you can freeze a moving object or not. Remember – 1/1000 is much faster than 1/60. Therefore, setting the speed to 1/2000 for example will help you freeze any moving object!
Step 2. The Camera Modes
It’s important to know when to use camera modes. This way, capturing moving objects in different times of the day is so much easier. Take a look at this short guide on camera modes:
Automatic Mode
Automatic mode is an easy peasy way to take photos. You do not have to talk to your camera and make it understand what it has to do. By setting the mode to ‘automatic,’ the exposure triangle is going to work on its own. The light balance, ISO, shutter speed, and aperture will adapt to any conditions. Remember that if you really want to learn how to use a camera professionally, you need to start practicing the other modes too. Otherwise, what’s the point of having a fancy camera if you don’t even use all of its features?
Macro Mode
Despite its name, macro mode actually allows you to capture micro subjects. If you want to shoot nature very closely, or even small snakes or ladybugs, you should use this mode. It allows you to move into the space of the subject, so you get a more realistic view of it. Focusing is more difficult in this mode, since the short distance makes the depth of field narrower. Tip: a tripod is not necessary when shooting in this mode, since the depth of field is so reduced.
Portrait Mode
When shooting in portrait mode, the subject of your picture is the only focus point that matters. The background will be out of focus, while your subject’s face and shoulders will be in the foreground. If you choose a big aperture, it will help you set the foreground ever more accurately.
Movie Mode
Moving subjects are so much harder to capture than still subjects. Thus, turn the movie mode on whenever you need to shoot movements. Be aware that your moving pictures will take up much more available space than the still ones.
Night Mode
No light makes it challenging for us photographers to define our picture’s features sharply. That is why we have the night mode. This extraordinarily fun mode will set your apparatus to a longer shutter speed to maintain the small particularities of your subject, and will also shoot off flash to enlighten the setting and the subject. It is best used at parties and night clubs! Now go have a blast and take some photos downtown! Practice makes perfect.
Action mode
Sometimes referred to as sports mode, this one can also be used for shooting moving things (from people to buses or athletes running). Tip: focus your camera before on the place the subject will be by the time you want to capture it.
Landscape mode
Sets the focus on the background of the picture, gives a large depth of field to the image. The focal points are usually far away from the camera.
Step 3. Moving Objects
Now that we recapped the basic concepts of photography, we can move on to the most interesting part: moving objects.
Choosing your story
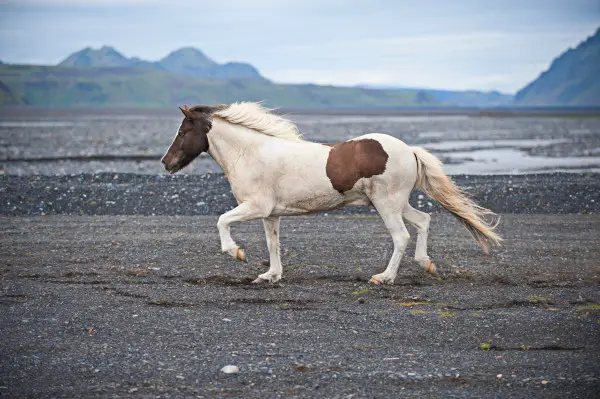
Taking photos of different scenes is very similar to telling a story. You have to pick your plot, characters, and setting. Making the observer dive into your story is what makes good photographers good. It could be a car speeding on the road, as well as a woman rushing through the rain to catch a cab. A horse running in an open field, a bird flying graciously, a cat trying to catch a mouse… anything!
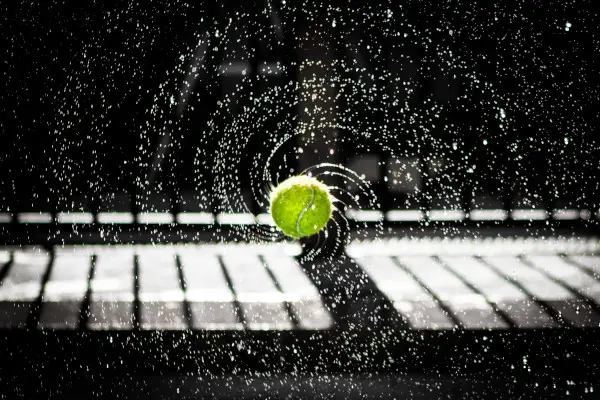
Choosing your effects
Before taking the photo, make sure you know what type of effect you want to use. There are so many ways in which you can take a picture. If you make up your mind on that first, you will have no difficulty understanding the technique that follows your choice. Take a look at the photo below.
Modifying the shutter speed
As you have read previously, the shutter speed is a crucial factor in photography. You already know that the shutter speed tells you how much time the shutter will stay open. Thus, choosing the speedier option freezes the subject in its current moment sharply, while choosing the slower one results in your camera sensor gathering a lot of light, and the resulting photo being quite bright, blurring your subject.

Exploring aperture mode: on
Experimenting with the aperture is always an interesting way of getting to know your camera. Start by setting your aperture to a wider opening (smaller number), and take a photo – can you see the extra light bursting in your foreground? Now set the aperture to a narrower opening (larger number). Suddenly, less light, and a more prominent subject.
Play with your camera as much as you like. This is the only way to become better.
Understanding the importance of your tripod
Our hands and bodies often move without us even noticing. And that is normal, we are human. But a tripod’s design is to do exactly what we cannot do: stay still. This helps a lot when we’re taking moving photos. Setting your shutter speed to slow and using a tripod helps the unmoving background stay still and focused, while making your subject undergo the unfocused effect. You have to try it!
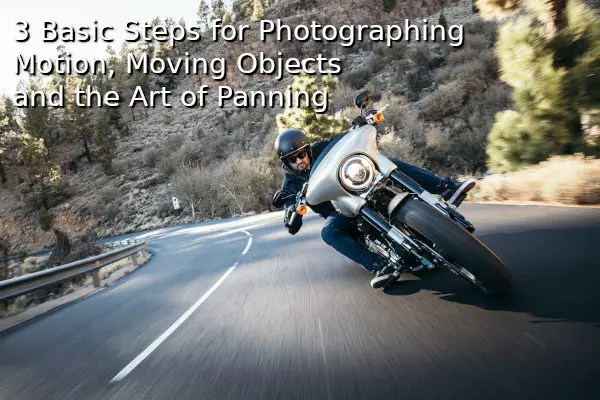
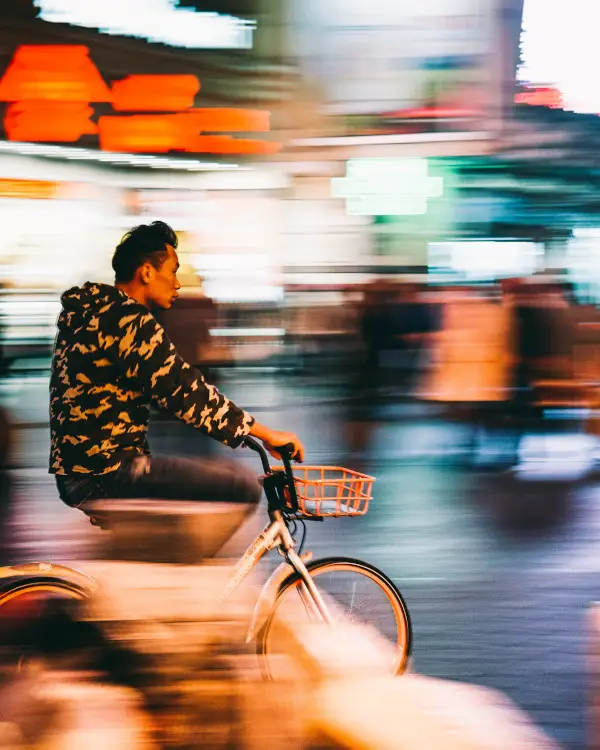
Panning
While seemingly complicated at first, panning is actually one of the best ways to take amazing moving photos. By definition, to pan is to move your camera horizontally or vertically as it scans your focused subject. I would like to expand more on this technique, since it is such a commonly used method to get high quality moving pictures wherever you might be.
The Art of Panning:
-
Choose a slow shutter speed – this will help you either brighten up your photos, or introduce blur into the photo. Introducing blur into your photos when panning is an interesting way to create original settings. Make sure your position is not affected by anybody or anything in your field of vision. Don’t let yourself get distracted by different shapes or colours. Stay focused on your object.
-
You will see your object moving towards you, or past you in a horizontal direction. Track it with you camera, and make sure you hold it still. A tripod might help a lot here.
-
A very important thing to keep in mind is to stay as parallel as you can with your object. I know I’ve said it before, but I really want to emphasize this, because it helps a lot!
-
Until you get the hang of it, you can always use the automatic focus mode. If you do not have that, do not forget to pre-focus before you capture your subject. After that, just let go of the shutter.
-
After releasing the shutter, pan as long as you can, following your object on its way moving. Keep going for a while even if you hear the shot is complete. And that’s it! You just practiced panning for the first time.
Important Tips:
-
Patience, practice, breathe. Panning is a lot! Photographing in general is a lot! You might find yourself struggling so much that you want to quit. Don’t! I’ve mentioned it before and I will mention it again: practice makes perfect.
-
Make it a daily routine. Practicing once per day and then not practicing for the next two days won’t get you anywhere.
-
Sharing is caring, so share your work to the community. Writing about your experiences is a great way to help your peer group. If you ever need help with writing, don’t hesitate to use websites which are providing lots of assistance for beginners, and helps you share your information with confidence.
-
Contact photographers! See how they got so good at their jobs. Write to them, and tell them about your experiences and struggles – I am sure they would be more than happy to help anytime (I know I would!).
-
Post your works on different forums and websites. Be open to criticism and different perspectives. Feedback is one of your most useful tools when starting. Take everything objectively, and improve daily.
Photography plays a big role in art nowadays. Paintings are great, but photography catches up with it. Capturing different objects, understanding the concepts behind the art, and regularly practicing will take you very far. Photography is an investment in the future, and it is an investment in you.
I hope this guide helped you understand the basic concepts of this fine art. We know you just began, and that is fine. You might not be the best in the beginning, but through hard work, you can get anywhere. Stay focused on your learning, and keep your camera focused on your subjects! Good luck!
Click here for panning photography ideas.


1 comment