There seems to be a lot of confusion among beginners and experienced photographers alike about what “depth of field” really is. Most people seem to know it has something to do with focus. But beyond that, it seems like a bit of a magical beast. Like most photography concepts, this one is pretty simple to understand. Read on and we’ll demystify this important subject.
I’ve seen many comments on photos praising the depth of field (DOF). Here’s something that may come as a surprise to you: every photo has “depth of field.” When a camera—or an eyeball for that matter—focuses on a point, part of the scene in front of that point and part of the scene behind that point will also be in focus. The depth of that area measured from the point closest to the camera to the point farthest from the camera is called the depth of field.
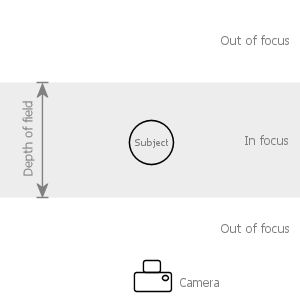
Depth of field diagram, top view. Everything in the gray area is in focus.
Everything within the depth of field is in sharp focus. Everything outside of the depth of field is blurry. The actual depth of this area varies depending on several factors: focal length of the lens, aperture, and focusing distance (it also depends on sensor size/format but lets assume that’s something you can’t control). All other things being equal, the depth of field shrinks as:
- The length of the lens increases.
- The aperture opening gets bigger.
- The focusing distance gets closer.
Changing those factors in reverse increases the depth of field. This is one of the reasons why wide-angle lenses are used for landscapes (to increase the depth of field) and why portrait photographers prefer short telephoto lenses with wide apertures (to decrease the depth of field).

Idea of a Chair. Only a sliver of this image is in focus.
1/800s @ f/1.8, 50mm. Click to enlarge.
When someone says that a photo has a “beautiful depth of field” they are usually talking about a photo with a very narrow depth of field and are admiring how only a tiny portion of the photo is in focus while the rest of the photo is a gorgeous blur. It’s also not unheard of for someone to praise the depth of field of a landscape photograph (but not as common). In this case, the praise is going to the photographer’s skill in ensuring that everything in the frame from the closest flower to the furthest mountain top is in sharp focus.
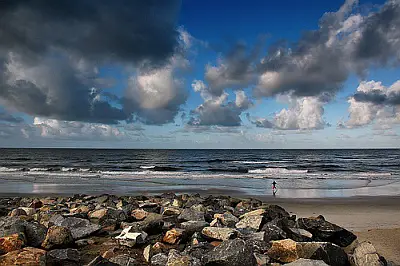
Between Heaven and Earth. Everything in this image is in focus.
1/320s @ f/9, 18mm. Click to enlarge.
Controlling the depth of field is an important skill because it literally allows you to control what elements in the frame are in focus. In a photograph, elements within the depth of field command attention and blurry elements outside of it do not. You can make a subject appear to leap off the page (or screen) by throwing the background out of focus. And you can mesmerize the viewer with a feast of never-ending detail by keeping everything in focus.
To create a depth of field that only contains your subject and blurs the background (portraits):
- Use a telephoto lens or zoom in on your subject.
- Move as close to your subject as possible.
- Move the subject away from (closer to the camera) background elements that you want to blur.
- Use a wide aperture setting (f/2.8, f/1.8, etc.)
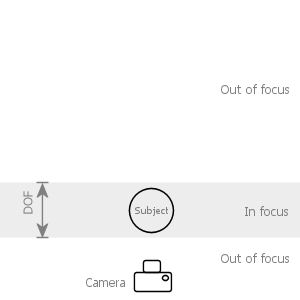
Portrait DOF diagram, top view. Notice the very narrow DOF field achieved by
placing the subject close to the camera, away from the background, and
using a wide aperture and/or telephoto lens.
Doing this can yield an incredibly narrow DOF. With the right setup, you can get a DOF that is literally millimeters thin! As you can imagine, that can make it difficult to get the focus on exactly the point you want. For portraits, you generally want the subject’s entire face in focus from the tip of the nose to the ear.
To create a depth of field that includes everything in the scene (for landscapes):
- Use a wide angle lens or zoom out to the widest setting.
- Move back and focus on a point about about 1/3 of the way into the scene.
- Use a small aperture setting (f/11, f/16, etc.).
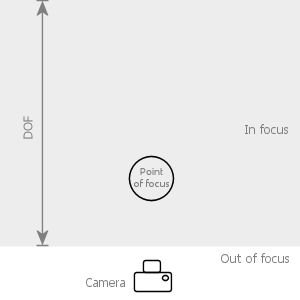
Landscape DOF diagram, top view. Notice the depth of field extends from
close to the camera to infinity and that the camera is focused at
a point about 1/3 of the way into the scene.
Focusing 1/3 of the way into the scene is a trick that approximates calculating what is called the “hyperfocal distance.” In a nutshell, the hyperfocal distance is the distance you focus at so that everything in the scene is within the depth of field. This distance changes depending on the focal length and the aperture setting but the rule of thumb is to just focus about 1/3 of the way into the scene and that’s usually close enough. If you really want to get technical though, there are hyperfocal distance calculators and charts out there that you can use.
This is also a neat trick you can use for things like taking quick candid grabs or street photography where you don’t want to worry about focusing. Just set your camera at about f/8 and manually focus about 15 feet away. Now your camera is ready at a moments notice to take a picture of anything from about 8 feet away to infinity without having to do any focusing.
Incidentally, bokeh is related to depth of field but they’re not the same thing. Where depth of field describes how much of the photo is in focus and how much is blurry, bokeh is a purely aesthetic judgement of the out of focus area.
I hope that clears up this often misunderstood subject. It’s a simple concept with important implications that gets easier to understand with practice. Being able to control the depth of field is an important tool that should be in every photographer’s bag of tricks.
Here is the video:


thanks so much, I really appreciate all the information you post here
I think it’s important to point out that depth of field is relative to magnification at the output (print or screen). You end up with greater depth of field just by leaning back away from your monitor. The as details appear smaller to your eye, you can’t tell if they are in focus or not. Thus, the only reason using a longer focal length appears to shrink the depth of field is because the magnification will be greater at the output. If your camera and subject stay in the same place, and you shoot at two different focal lengths, but crop and zoom so that the printed subject is the same size in both prints, the depth of field will also be the same in both prints.
I’ve been narrowing my depth of field for video interviews (Panasonic DVC PRO 50 Camera) by opening the aperature all the way (on bright days that would normally require a smaller aperature)then increasing shutter speed, so the shutter is opened the least amount of time, ergo lowering the amount of light entering my camera to an acceptable level. Combine this technique with a little increase of distance between me and the subject, zoom in a touch, and the background is nicely softened. The lack of detail behind my subject gives the audience an idea of what’s going on behind my subject but causes their otherwise wandering eyes to go back to the subject.
I was explaining ‘autofocus’ and ‘composing’ a shot with a point and shoot group and after they understood the concept of depth of field (one participant called it ‘focus field depth’) they understood why you could recompose after holding down the shutter button halfway.
I was surprised to discover how many people can’t grasp the simple concept of a half button press…
I guess I always thought people read at least SOME of their user’s manuals.